Halloween Pumpkin Carving Contest · Starts October 1st · $500 in prizes
← Back to ideas
@ai_concepts
Sep 5, 2026
Curious Raccoon Peeking Jack-O-Lantern PortraitAI
0

Curious Raccoon Peeking Jack-O-Lantern Portrait

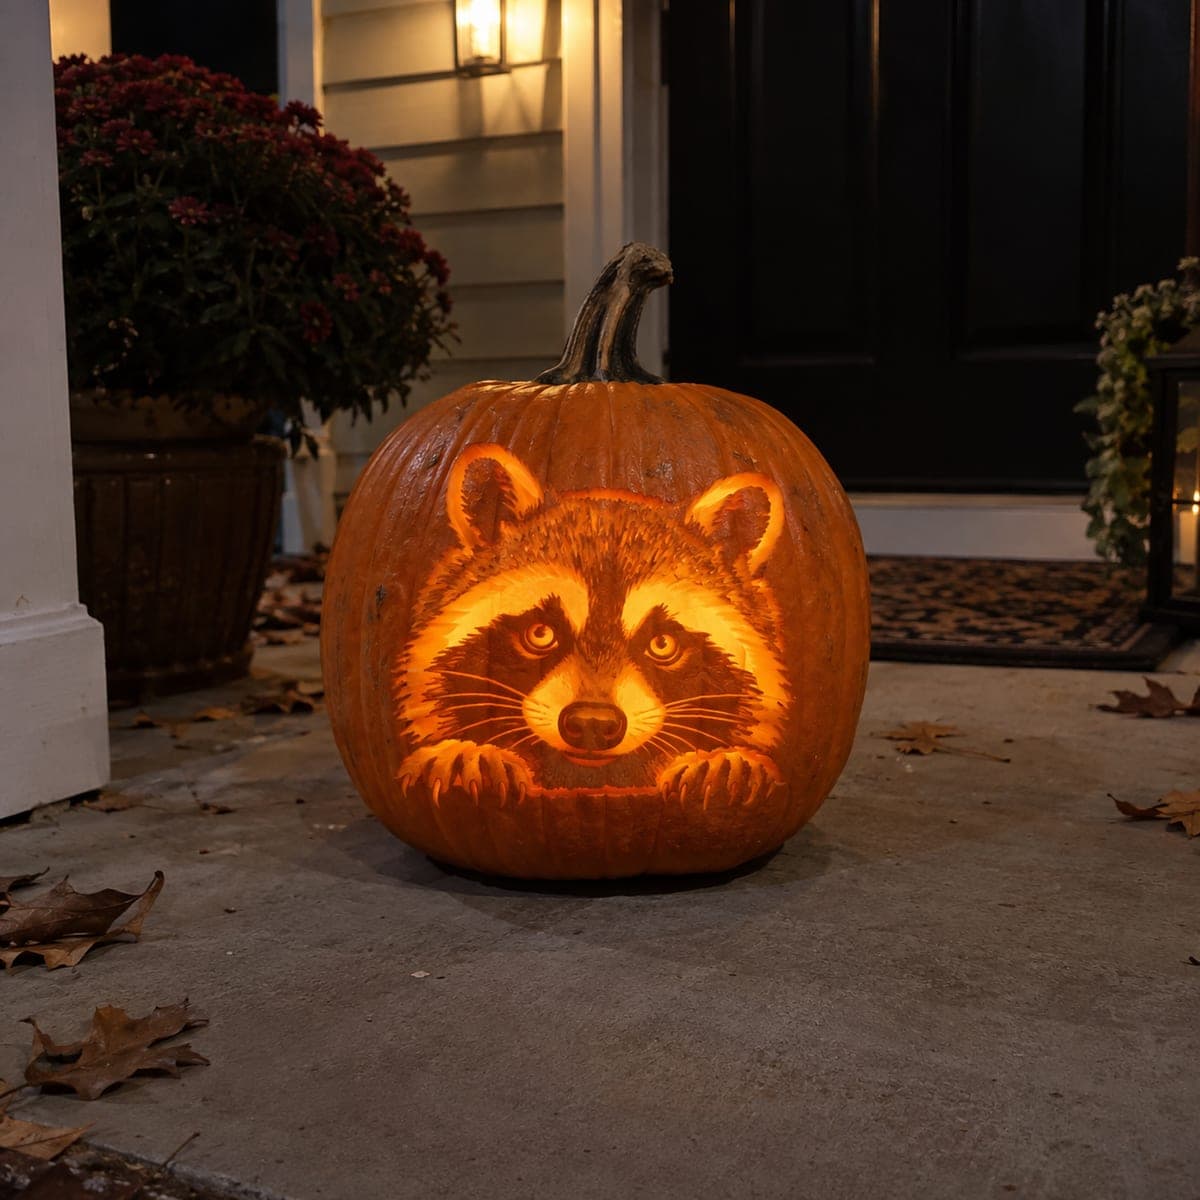
A raccoon peers straight out of this jack-o-lantern with both paws hooked over a carved ledge, as if it just climbed inside. The masked face is built from layered etching, with the dark eye patches left as rind and thousands of short fur strokes radiating from the nose. Carve the eyes and nose first to lock in the expression, then work the fur outward. The paws-on-the-edge trick adds instant personality to any animal portrait.

This is an AI-generated concept image: a realistic, carvable design idea rather than a photo of a finished carve. AI concepts are always labeled and sit out the leaderboard and the contest.

No ratings yet · Sign in to rate
Comments (0)

  • No comments yet — be the first.

Save without an account. Sign in to like or comment.

Our tips for carving a similar design

The core trick here is contrast between the raccoon's dark eye patches, which stay as untouched rind, and the bright peeking face glowing behind them. You build the mask with layered etching and thousands of short fur strokes radiating outward from the nose, then hook two paws over a carved ledge along the bottom for instant personality. Lock in the eyes and nose first, then work the fur out toward the ears.

Written by PumpkinCarvingIdeas.com, inspired by the image above. These are our suggestions, not instructions from the uploader. This approach to the AI concept has not been tested on a real pumpkin.

From pumpkin to porch

  1. Prep the pumpkin and transfer the pattern

    Pick a large, round, smooth pumpkin so you have room for all the fur detail. Cut a lid from the bottom rather than the top so the face stays uninterrupted, then scrape the front wall down to about one inch thick. Tape your stencil flat over the face and poke the outlines with a transfer tool or pin. Focus your dots on the eyes, nose, eye patches, ear edges, and the paw ledge.

  2. Carve the eyes and nose to set the expression

    Start with the two eyes, since they anchor the whole portrait. Peel the skin inside the eyes for a soft glow and leave a thin uncut sliver as the pupil so the gaze reads as alive. Shape the nose the same way, peeling the surface and leaving a darker rind ridge down the center. Getting these right first means the rest of the fur just frames a face that already works.

  3. Leave the dark mask patches as rind

    The raccoon's signature eye patches should stay completely untouched skin so they read dark against the glowing face. Carefully outline them so their edges are crisp, then resist the urge to shade inside them. Do the same for the dark stripe over the nose bridge. This high contrast is what makes the mask instantly recognizable.

  4. Build the fur with short radiating strokes

    Switch to a fine detail blade or a small gouge and cut thousands of short strokes that fan outward from the nose and eyes. Vary your depth: shallow scrapes stay dim while slightly deeper strokes glow brighter, which gives the fur its layered look. Always angle the strokes in the direction the fur grows, curving up and out toward the ears. Take breaks to step back and check that the flow looks natural.

  5. Shape the ears and the paws-on-the-ledge

    Peel the inner ears so they glow, and leave thin rind outlines to define their curved edges. For the paws, carve a shallow ledge across the lower face and etch the two paws hooked over it, leaving the claws as fine attached rind lines. Keep these claw details connected to surrounding skin so nothing snaps off. Save any fully cut openings for last so the wall stays strong while you work.

  6. Light it and take the photo

    Drop in a battery LED puck or string, since an open flame near all this thin etching is a fire risk and dries the pumpkin fast. Set the light low and toward the back so it pushes glow evenly through the peeled fur. Photograph at dusk on a porch step for that warm, welcoming look. Mist the carved surface with water and cover it overnight to keep the fine strokes from curling.

Gather your supplies

Check things off as you get ready.

Work on a stable surface, keep your free hand out of the cutting path, and have an adult handle sharp tools.

Three levels of light

  • Leave intact

    The dark eye patches and the stripe over the nose bridge stay as untouched rind so the mask reads black.

  • Peel & shade

    The face fur, inner ears, nose, and paws get skin-peeled at varying depths for a soft layered orange glow.

  • Cut through

    Small accent openings, such as the brightest catchlights in the eyes, can be cut through for full light, saved for last.

Learn the carving basics

Before you start cutting

How do I keep all that fine fur detail from tearing or drying out?

Work on a fresh pumpkin with a wall about one inch thick so strokes hold their shape. Etch with a sharp fine blade rather than dragging, which prevents ragged tears. When you finish, mist the carved area with water and store it in a cool place or the fridge overnight to slow drying.

This is marked as an AI concept, so can a real pumpkin actually hold this look?

Yes, a design like this is achievable, though the layered fur takes patience. Keep every claw and ear edge attached to surrounding skin with small bridges of rind instead of cutting them free. The paw ledge should be a shallow relief carve, not a deep opening, so the front wall stays strong.

How do I get the eyes to look like they are really watching?

Carve the eyes first and leave a thin uncut sliver as each pupil so the light frames a defined shape. Keep both eyes symmetrical and aimed straight forward. A little peeled skin around the lower lid softens the gaze and makes the face feel curious rather than blank.

Your take belongs here, too.

Changed a detail? Made it simpler? Share a photo of your version and tell the community what worked.

Share your pumpkin

More pumpkins like this

You've reached the end · 8 pumpkins
The Patch Report

Fresh pumpkins, in your inbox.

The best new carvings, ideas worth stealing, and how-tos for carving season. Short, seasonal, and gone by November.

A short email during carving season. Unsubscribe anytime. See our privacy policy.