Halloween Pumpkin Carving Contest · Starts October 1st · $500 in prizes
← Back to ideas
@ai_concepts
Sep 14, 2026
Shaggy Lion Portrait PumpkinAI
0

Shaggy Lion Portrait Pumpkin

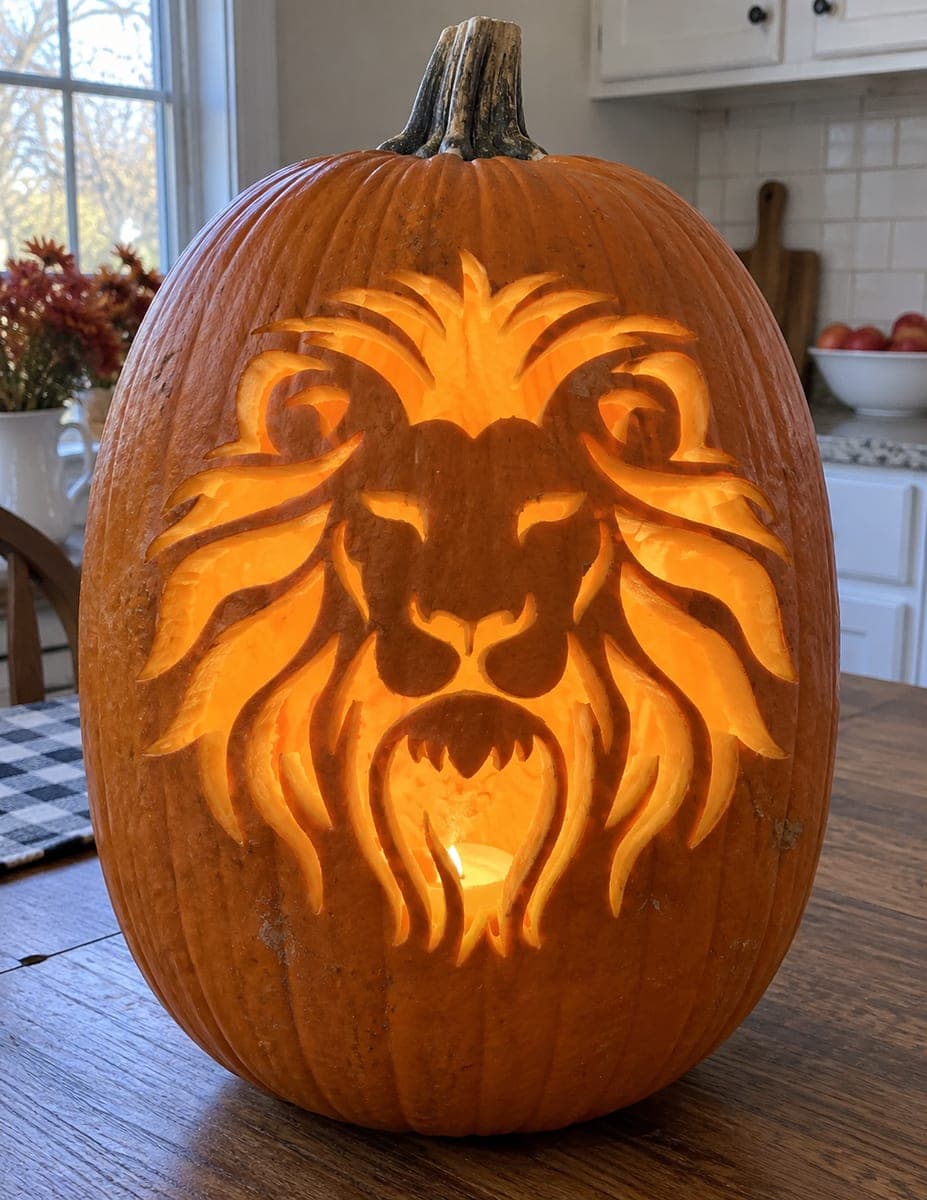
A fluffy long-haired dog or lion-like animal face is cut through the rind with two almond-shaped eyes, a rounded muzzle, and dozens of jagged fur points radiating outward from the face all the way to the edge of the carved area. The outer fur points are very thin and can snap if cut too quickly; work the perimeter fur in short passes with a fine pumpkin saw, and cut from the tip of each point down toward the face rather than across. Backlighting with a warm LED inside emphasizes the layered fur texture created by the many narrow rind bridges left between the openings.

This is an AI-generated concept image: a realistic, carvable design idea rather than a photo of a finished carve. AI concepts are always labeled and sit out the leaderboard and the contest.

No ratings yet · Sign in to rate

Comments (0)

  • No comments yet — be the first.

Save without an account. Sign in to like or comment.

Our tips for carving a similar design

The core trick here is a face made almost entirely of thin fur points, held together by dozens of narrow rind bridges that read as layered fur when backlit. You cut the eyes and muzzle first for structure, then build the mane outward in short controlled passes. Save the longest, thinnest tips for last so the pumpkin stays sturdy while you work.

Written by PumpkinCarvingIdeas.com, inspired by the image above. These are our suggestions, not instructions from the uploader. This approach to the AI concept has not been tested on a real pumpkin.

From pumpkin to porch

  1. Prep and transfer the pattern

    Pick a tall, smooth pumpkin with a broad flat face so the fur points have room to spread. Cut a wide access hole in the back rather than the top so the front stays intact and lit evenly. Scrape the inside wall behind the face down to about one inch thick so your saw glides through cleanly. Tape the stencil on and poke the outlines with a transfer tool or pushpin so you have a dotted map to follow.

  2. Establish the eyes and muzzle first

    Start with the two almond eyes and the rounded muzzle, since these anchor the whole face. Cut these openings fully through so they become the brightest features. Work slowly with a fine saw and keep the blade vertical to avoid widening the shapes. Getting these placed correctly early makes the surrounding fur read as a real animal face.

  3. Cut the inner fur zone

    Move outward from the muzzle and cut the shorter fur strokes framing the cheeks and brow. Leave a narrow strip of rind between each opening; these bridges are what create the layered texture. Cut each stroke from its inner end toward the face so any slip runs into open air, not into a bridge. Keep the openings clean and resist the urge to connect them.

  4. Work the perimeter fur points in short passes

    The outer fur points are the thinnest and most fragile part of this design. Cut from the tip of each point down toward the face in short strokes rather than dragging across the width. Take frequent breaks and let each bridge set before starting the next. If a point feels wobbly, leave slightly more rind at its base for support.

  5. Peel for soft mid-tone shading

    For the fur nearest the face, use a lino or ribbon tool to peel away just the skin without cutting through. These shallow areas will glow a dim orange and add depth between the bright cutouts and the dark untouched rind. Keep peels shallow and even so the light stays warm and diffuse.

  6. Light it and photograph

    Set a warm white LED puck or string inside, never a candle, since the thin bridges can dry and scorch. Turn it on in a dark room to check that every fur point reads and no bridge blocks a key opening. Trim or clean any spots that look muddy. Shoot at dusk on a porch step with the interior glow doing the work.

Gather your supplies

Check things off as you get ready.

Work on a stable surface, keep your free hand out of the cutting path, and have an adult handle sharp tools.

Three levels of light

  • Leave intact

    The background rind around the mane and the dark spaces between fur points stay untouched.

  • Peel & shade

    The fur closest to the muzzle and cheeks gets skin-peeled for a soft dim glow.

  • Cut through

    The two almond eyes, the muzzle, and the gaps between fur strokes are cut through for the brightest light.

Learn the carving basics

Before you start cutting

How do I keep the thin outer fur points from snapping?

Cut each point from its tip down toward the face in short passes rather than slicing across its width. Leave a little extra rind at the base of any point that feels loose. Work slowly and give the pumpkin rest between cuts so the bridges hold.

This is an AI concept image, so can a real pumpkin actually hold this many bridges?

Yes, if you keep the wall about one inch thick and leave a genuine strip of rind between each opening. The trick is not overcutting; every bridge you keep adds strength and texture. Simplify the very finest tips if your pumpkin feels fragile.

Why cut a back hole instead of the top?

A back access hole keeps the entire front face solid so the delicate fur has full support. It also lets you position the LED to wash light evenly across the muzzle and eyes. A top hole would weaken the mane area and cast uneven shadows.

Your take belongs here, too.

Changed a detail? Made it simpler? Share a photo of your version and tell the community what worked.

Share your pumpkin

More pumpkins like this

You've reached the end · 8 pumpkins
The Patch Report

Fresh pumpkins, in your inbox.

The best new carvings, ideas worth stealing, and how-tos for carving season. Short, seasonal, and gone by November.

A short email during carving season. Unsubscribe anytime. See our privacy policy.