Halloween Pumpkin Carving Contest · Starts October 1st · $500 in prizes
← Back to ideas
@ai_concepts
Aug 5, 2026
Majestic Lion Face Etched Jack-O-LanternAI
0

Majestic Lion Face Etched Jack-O-Lantern

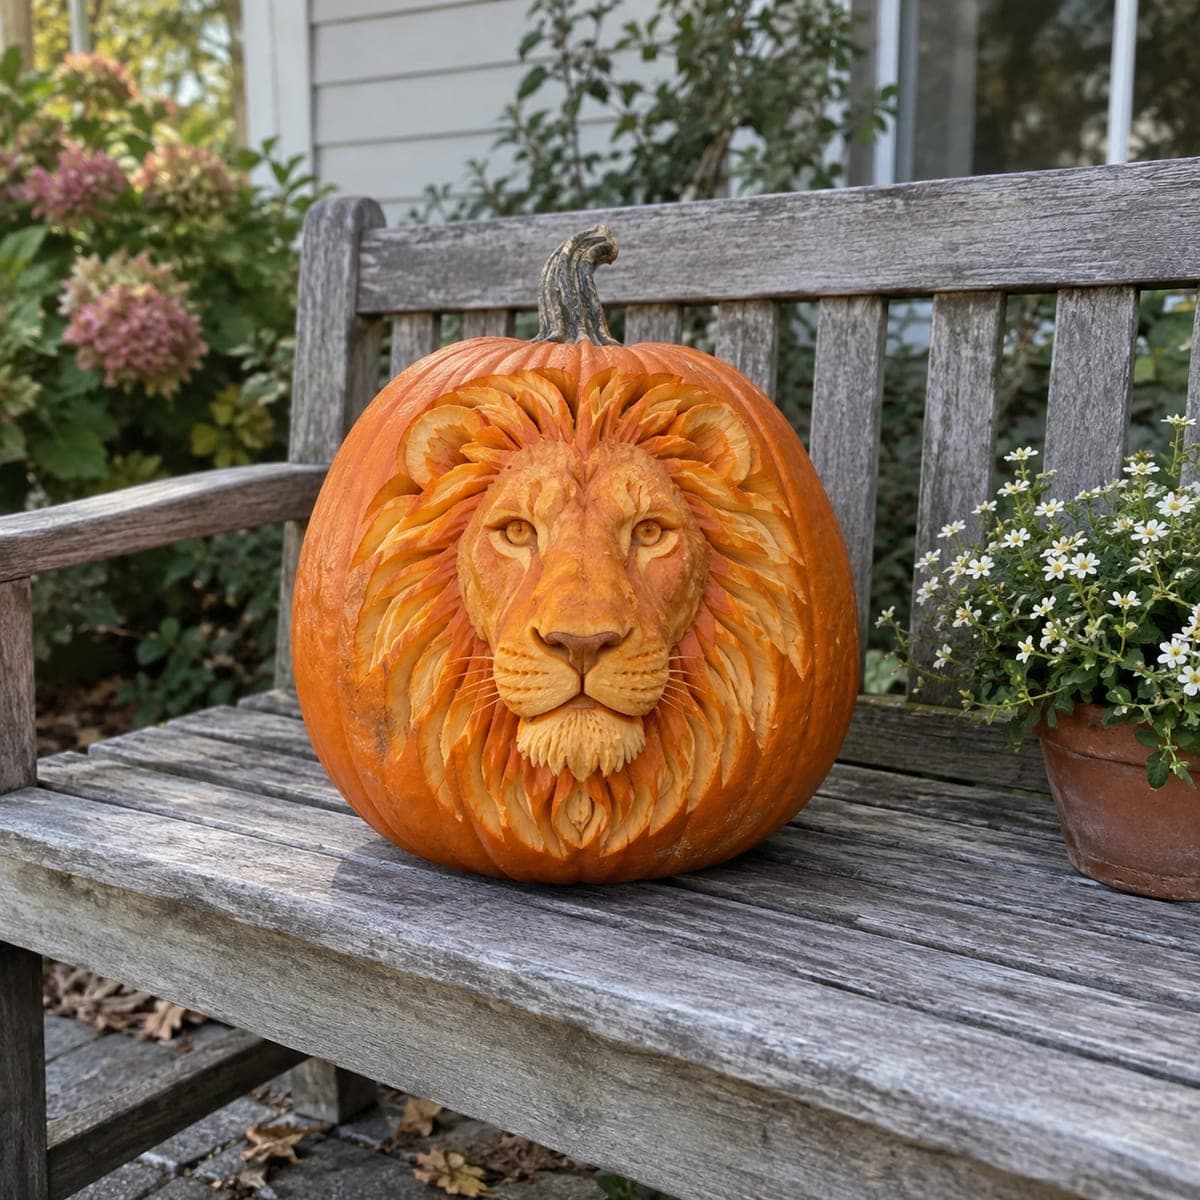
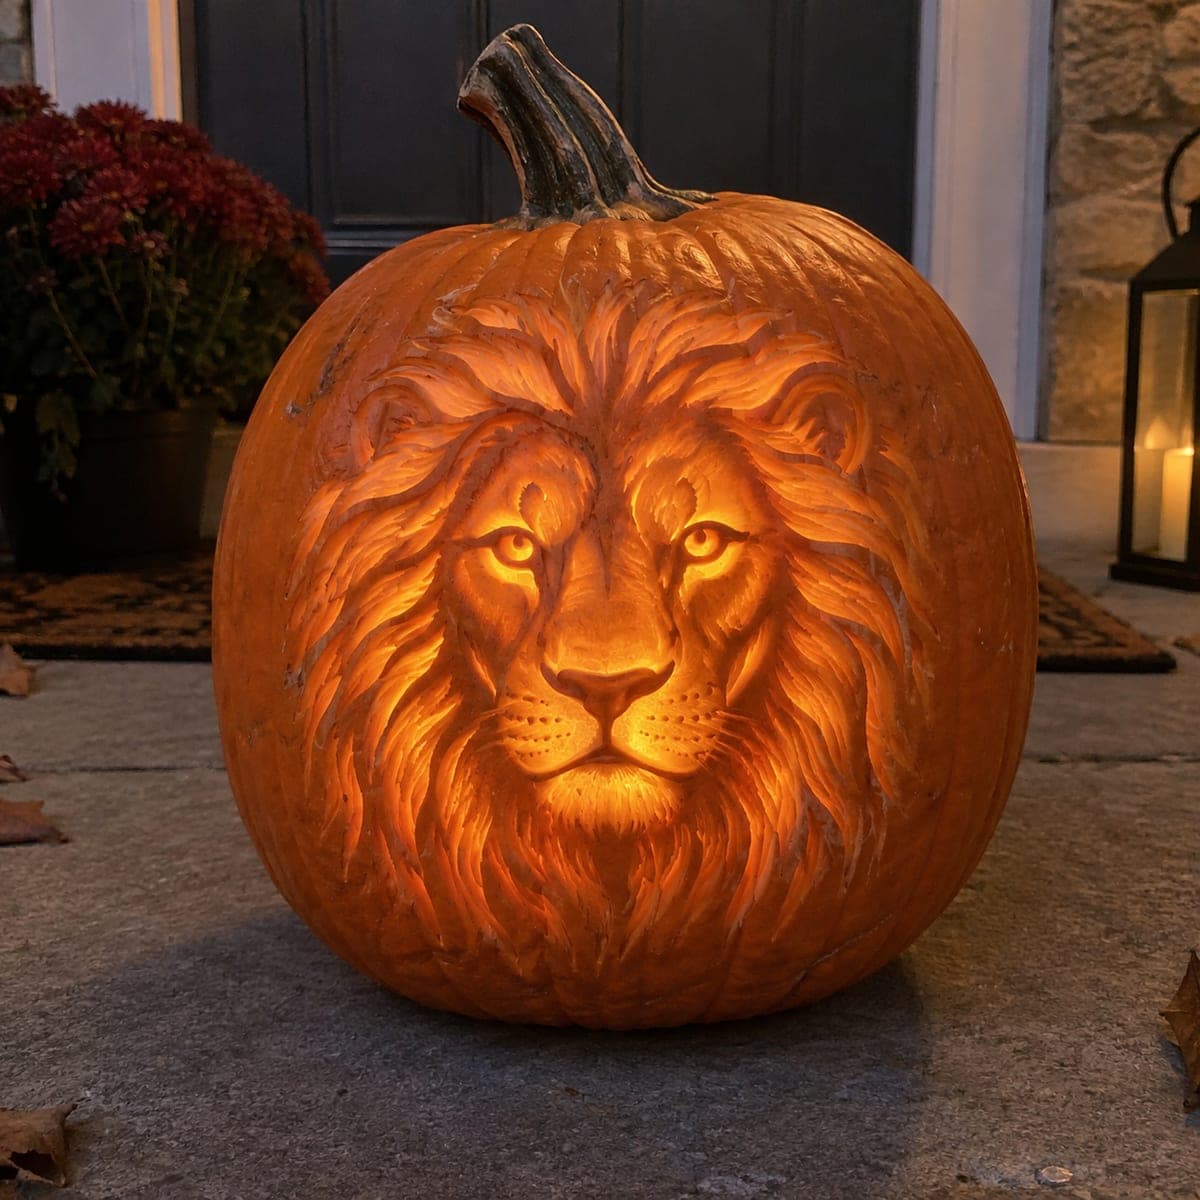
A lion's face fills this entire pumpkin, its mane flowing outward in long etched waves while the eyes and muzzle glow from thin-shaved flesh. Depth control does all the work here: the brightest highlights on the nose bridge and inner mane are carved nearly through, while the outer mane keeps more thickness for shadow. Use a steady LED inside, since a flickering flame can wash out the fine fur lines.

This is an AI-generated concept image: a realistic, carvable design idea rather than a photo of a finished carve. AI concepts are always labeled and sit out the leaderboard and the contest.

No ratings yet · Sign in to rate

Comments (0)

  • No comments yet — be the first.

Save without an account. Sign in to like or comment.

Our tips for carving a similar design

The whole trick here is depth control rather than open holes. You shave the pumpkin skin to different thicknesses so the mane, eyes, and muzzle glow at different brightnesses, and you almost never cut all the way through. Plan the face in the flattest, widest part of the pumpkin so the fur lines have room to flow outward.

Written by PumpkinCarvingIdeas.com, inspired by the image above. These are our suggestions, not instructions from the uploader. This approach to the AI concept has not been tested on a real pumpkin.

From pumpkin to porch

  1. Pick the pumpkin and transfer the design

    Choose a large pumpkin with a broad, smooth front face and few ribs so the mane reads cleanly. Tape your lion stencil over the flattest area and poke the main outlines with a pin or transfer tool: the face shape, eye placement, nose, and the big mane sections. Keep the stencil low and centered so the mane can fan out to the sides. Step back and check that the face is level before you commit.

  2. Open a back door and hollow out

    Cut a lid or an access hole in the back, not the top, so the front stays a clean canvas. Scrape the inside wall behind the face down to about one inch thick with a loop tool. A thinner wall lets your shaved areas glow evenly and makes the fine etching easier. Take your time and keep the wall even, since thin spots will glow much brighter later.

  3. Etch the mane and fur lines

    With a small loop or ribbon tool, carve the long flowing mane strands as shallow grooves that follow the curve of the face. Vary the depth so inner strands near the face are shaved thinner and brighter, while the outer mane stays thicker for shadow. Keep every stroke moving in the same direction the fur would grow. This shading stage is slow, so work in good light and rest your hand often.

  4. Shave the highlights on eyes and muzzle

    Peel the skin off the nose bridge, brow, inner eyes, and cheeks so those areas glow softly. For the very brightest spots on the nose and inner mane, carve nearly through the wall but leave a thin translucent layer instead of a full hole. Test with a light behind the pumpkin as you go. Leave narrow bridges of skin between fur strands so nothing collapses.

  5. Refine contrast and clean edges

    Compare bright and dark areas and deepen your shaved zones where the face needs more punch. Sharpen the eye outlines and the edge of the nose so the features hold their shape at a distance. Brush out all the pulp dust with a dry paintbrush so grooves stay crisp. Avoid cutting any large openings, since the glow here comes from thickness, not holes.

  6. Light it and photograph

    Set a steady, bright LED puck or a string of warm LEDs inside, pushed toward the back wall so light spreads across the whole face. Skip real flames, since a flicker washes out the fine fur lines you worked so hard on. Photograph at dusk on a porch step for the best glow. If the center looks dim, add a second LED.

Gather your supplies

Check things off as you get ready.

Work on a stable surface, keep your free hand out of the cutting path, and have an adult handle sharp tools.

Three levels of light

  • Leave intact

    The outer mane strands and background keep full skin thickness for the darkest shadow.

  • Peel & shade

    The brow, cheeks, inner mane, and muzzle are skin-peeled for a soft mid-orange glow.

  • Cut through

    The nose bridge and brightest inner highlights are carved nearly through for the strongest light, with no full openings.

Learn the carving basics

Before you start cutting

How do I keep the mane from looking flat?

Vary your carving depth strand by strand instead of shaving everything to one level. Thin the strands closest to the face so they glow, and leave the outer strands thicker so they fall into shadow. That difference in brightness is what gives the mane its layered, flowing look.

Should I cut through anywhere for the eyes?

No full cutouts are needed on this design. Shave the eyes very thin so they glow, but leave a translucent layer of flesh so they keep the soft, living look rather than reading as harsh holes. If you want a brighter stare, thin those spots a little more and test against the light.

How long will an etched pumpkin like this last?

Shaved surfaces dry out faster than the skin, so expect two to four days of good detail. Wrap it in plastic and refrigerate overnight, and wipe on a thin coat of petroleum jelly to slow drying. Carve it close to the day you want to show it off.

Your take belongs here, too.

Changed a detail? Made it simpler? Share a photo of your version and tell the community what worked.

Share your pumpkin

More pumpkins like this

You've reached the end · 8 pumpkins
The Patch Report

Fresh pumpkins, in your inbox.

The best new carvings, ideas worth stealing, and how-tos for carving season. Short, seasonal, and gone by November.

A short email during carving season. Unsubscribe anytime. See our privacy policy.