Halloween Pumpkin Carving Contest · Starts October 1st · $500 in prizes
← Back to ideas
@ai_concepts
Sep 14, 2026

Forward-Facing Tiger Portrait PumpkinAI
0

Forward-Facing Tiger Portrait Pumpkin

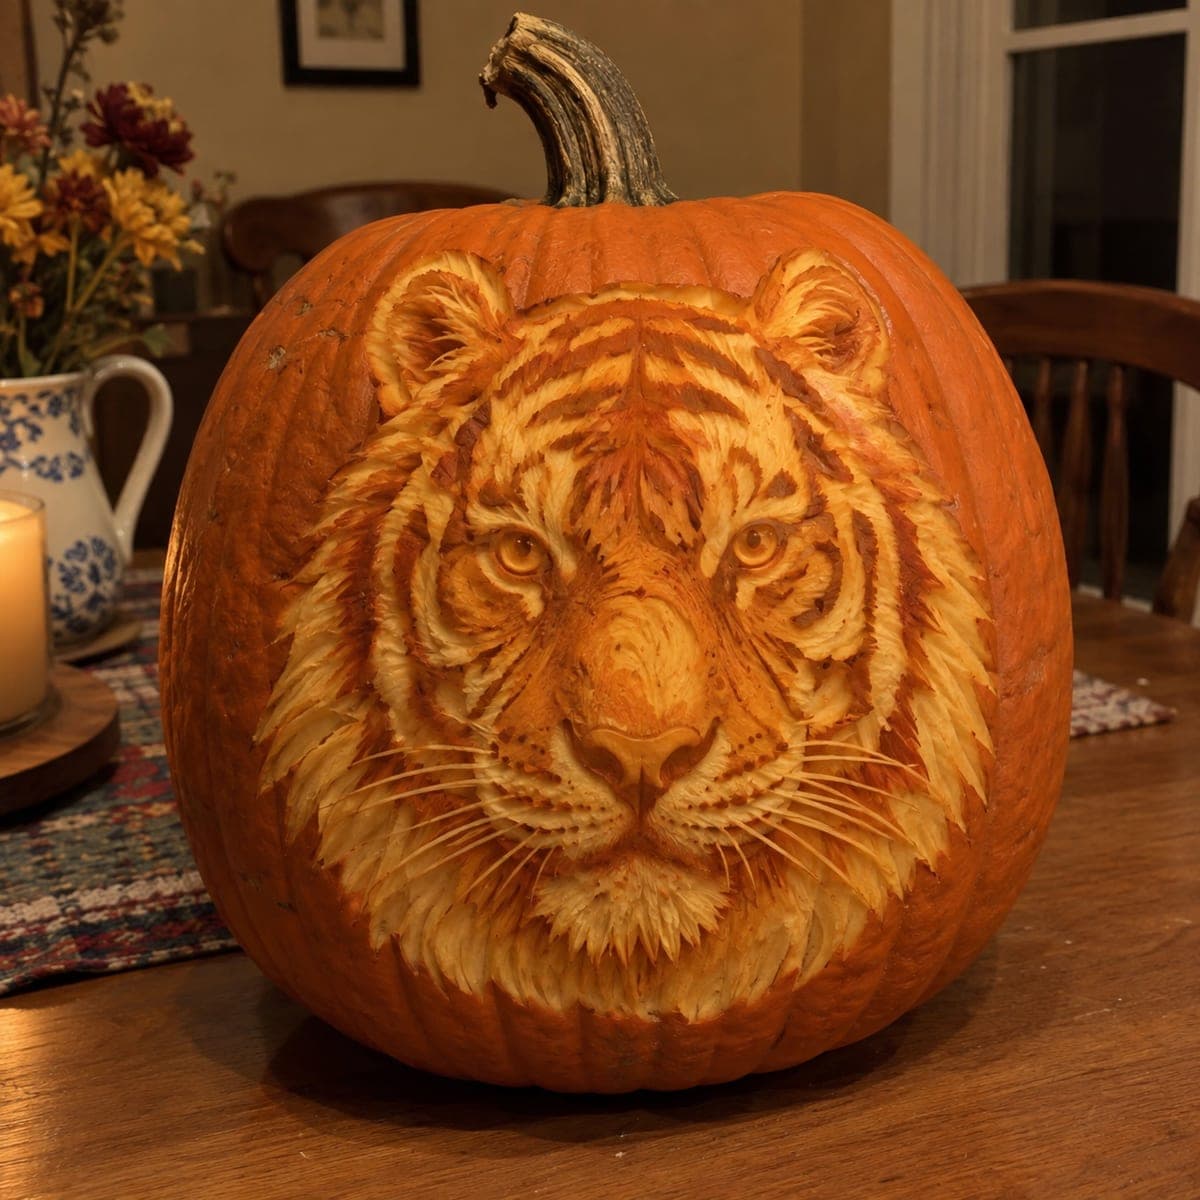
A forward-facing tiger portrait with intense eyes, a broad striped forehead, whisker-dot cheeks, and a nose bridge defined by vertical stripe cuts spans nearly the full face of this large pumpkin in a striking jack-o-lantern design. Horizontal and diagonal stripe channels are pierced all the way through, creating a glowing grid of light across the tiger's face. Because so many stripe cuts run close together, work from the center nose stripe outward toward each ear to keep the face symmetrical and avoid accidentally widening any single channel.

This is an AI-generated concept image: a realistic, carvable design idea rather than a photo of a finished carve. AI concepts are always labeled and sit out the leaderboard and the contest.

No ratings yet · Sign in to rate

Comments (0)

  • No comments yet — be the first.

Save without an account. Sign in to like or comment.

Our tips for carving a similar design

The core trick here is the grid of stripe channels cut fully through the shell, which turns the tiger's whole face into a pattern of glowing lines. The plan is to map the symmetry off the central nose stripe, peel the broad muzzle and forehead planes for a soft glow, and save the through-cut stripes and eyes for last. Working center outward toward each ear keeps both halves matched and stops any single channel from creeping wider.

Written by PumpkinCarvingIdeas.com, inspired by the image above. These are our suggestions, not instructions from the uploader. This approach to the AI concept has not been tested on a real pumpkin.

From pumpkin to porch

  1. Pick a tall pumpkin and open the back

    Choose a large, round pumpkin with a smooth front and few ribs so the striped face reads clearly. Cut an access hole in the back rather than the top so the stem stays intact for that natural look. Scrape the inside wall behind the face down to about one inch thick with a loop tool. A thinner, even wall makes the many stripe cuts easier and lets more light through.

  2. Transfer the tiger and mark your center line

    Tape the stencil flat and poke the pattern onto the skin with a transfer tool or push pin, dotting every stripe end and the eye outlines. Before you cut anything, mark the central nose stripe clearly, since it is your reference for symmetry. Confirm both ears, both eyes, and the cheek dot clusters line up left to right. A quick check now saves a lopsided face later.

  3. Peel the muzzle, forehead, and cheek planes

    Use a shading or ribbon tool to skin off the outer orange layer on the broad muzzle, the forehead between the stripes, and the flat cheek areas. Leave this layer thin so it glows dim orange rather than punching through. Keep the peeled zones smooth and follow the contours of the face so the light gradients look like fur planes. Do not rush into the stripes yet.

  4. Cut the stripes from the center outward

    Starting at the nose stripe, cut each thin channel all the way through with a fine detail saw, then move outward one stripe at a time toward the ears. Match each cut on the opposite side before advancing so the two halves stay even. Keep steady pressure and let the blade do the work so you do not accidentally widen a channel. Leave small skin bridges where two stripes nearly meet to keep the shell from cracking.

  5. Open the eyes and whisker dots last

    Cut the two eyes through fully so they read as the brightest, most intense points, saving them for near the end when the shell is still strong. Drill or poke the whisker dots on each cheek in matched clusters for the tiny pinpoint glow. Do the largest openings, like the outer face outline, only after the fine work is done. Cutting big holes last protects the delicate stripes while you handle the pumpkin.

  6. Light it and take your photo

    Set a battery LED puck or a string of LEDs inside, never a candle, since the many cuts and thin wall dry out fast. Aim for a warm bulb so the stripes glow amber like the reference. Shoot in a dark hallway or porch with the room lights off to let the grid of light pop. Mist the cut edges with water and store cool between showings to keep the face crisp.

Gather your supplies

Check things off as you get ready.

Work on a stable surface, keep your free hand out of the cutting path, and have an adult handle sharp tools.

Three levels of light

  • Leave intact

    The outer face outline and surrounding pumpkin skin stay untouched and dark, framing the tiger.

  • Peel & shade

    The broad muzzle, forehead planes, and cheek areas are skin-peeled for a soft mid glow.

  • Cut through

    The stripe channels, eyes, and whisker dots are cut fully through for the brightest light.

Learn the carving basics

Before you start cutting

How do I keep both sides of the face symmetrical with so many stripes?

Mark the central nose stripe first and treat it as your mirror line. Cut one stripe, then cut its matching partner on the other side before moving on. Working in matched pairs outward toward the ears keeps the face balanced and stops one side from drifting.

Won't all those close stripe cuts make the pumpkin fall apart?

They can if you cut them too wide or skip the bridges. Leave small uncut skin bridges where two stripes nearly touch, and keep your wall around one inch thick so it stays rigid. Save the biggest openings for last so the shell stays strong while you do the fine work.

This is a concept image, so is a real tiger like this actually carvable?

Yes, a design like this can be carved on a real pumpkin if you keep the stripes as thin channels and leave bridges between them. Do not try to cut every stripe edge to edge in one giant opening, or the face will sag. Peeling the muzzle and forehead instead of cutting them also keeps the structure sound.

Your take belongs here, too.

Changed a detail? Made it simpler? Share a photo of your version and tell the community what worked.

Share your pumpkin

More pumpkins like this

You've reached the end · 8 pumpkins
The Patch Report

Fresh pumpkins, in your inbox.

The best new carvings, ideas worth stealing, and how-tos for carving season. Short, seasonal, and gone by November.

A short email during carving season. Unsubscribe anytime. See our privacy policy.