Halloween Pumpkin Carving Contest · Starts October 1st · $500 in prizes
← Back to ideas
@ai_concepts
Aug 13, 2026
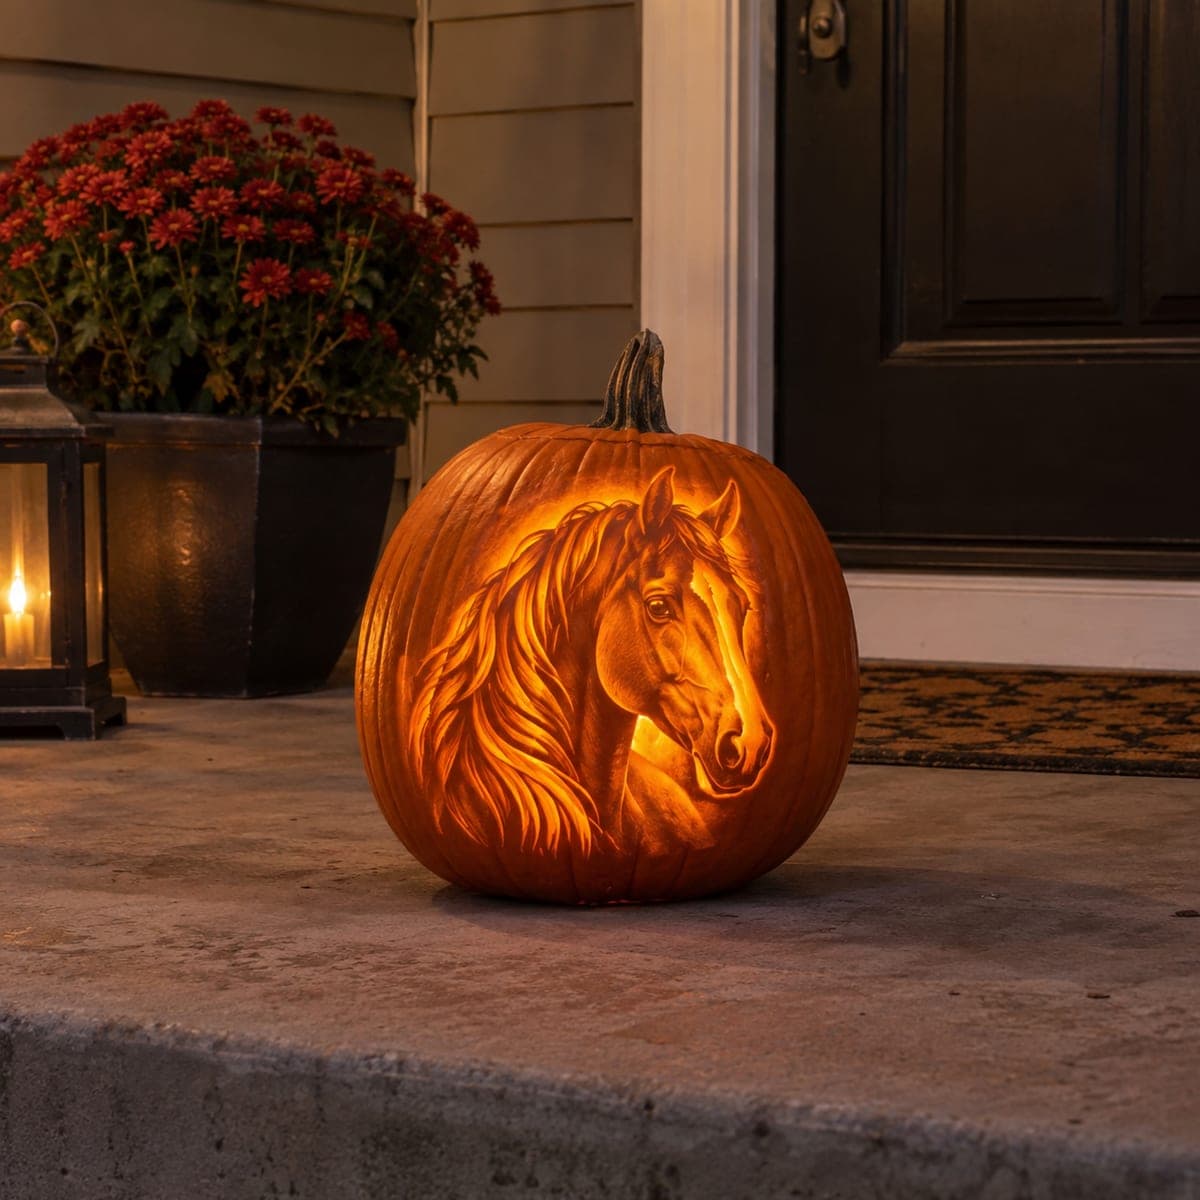
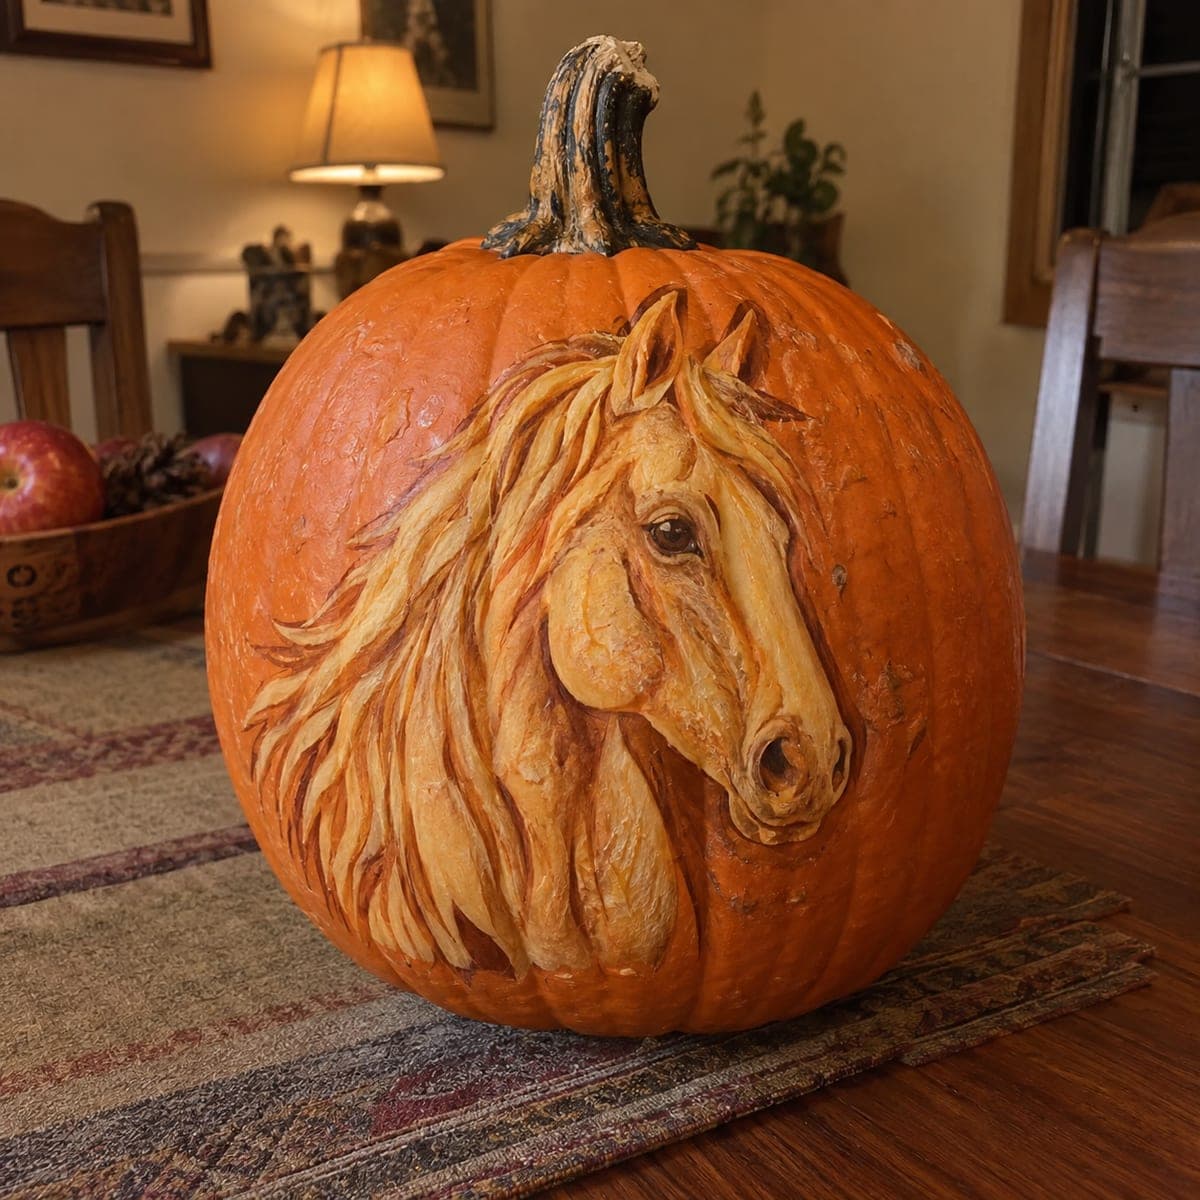
Flowing Mane Horse Portrait Pumpkin CarvingAI
0

Flowing Mane Horse Portrait Pumpkin Carving

A glowing horse portrait with a long flowing mane, etched into the pumpkin so the cheek and neck shine in layered golden tones. The effect comes from shading, peeling the skin away at different depths with a loop tool so thin spots glow brightest. Start with the lightest areas like the blaze and mane highlights, then deepen gradually, checking your progress with a light inside. An LED puck keeps the surface from cooking on warm nights.

This is an AI-generated concept image: a realistic, carvable design idea rather than a photo of a finished carve. AI concepts are always labeled and sit out the leaderboard and the contest.

No ratings yet · Sign in to rate
Comments (0)

  • No comments yet — be the first.

Save without an account. Sign in to like or comment.

Our tips for carving a similar design

The core trick here is relief shading, where you peel the skin away at different depths so thin spots glow bright and thick spots stay dark. Nothing is cut all the way through except a few deep shadow accents, so the whole horse reads as one softly lit form. Plan your value map first, working from the brightest areas like the blaze and lit cheek down to the darkest mane shadows.

Written by PumpkinCarvingIdeas.com, inspired by the image above. These are our suggestions, not instructions from the uploader. This approach to the AI concept has not been tested on a real pumpkin.

From pumpkin to porch

  1. Prep the pumpkin and transfer the design

    Pick a tall pumpkin with a smooth, pale front panel and no deep ribs across the face. Cut a lid or a bottom access hole so you can reach inside, then scoop the front wall down to about an inch thick for even glow. Tape your horse stencil to the smoothest area and poke the main outlines with a pin or transfer tool. Step back and confirm the mane flows off toward one side with room to spare.

  2. Score the outlines and map your values

    With a fine detail knife, lightly score the major boundaries: the muzzle, cheek, eye, ears, and the front edge of the mane. Do not cut through, just break the skin so you have guide lines. Mentally mark your brightest zones, the blaze down the nose and the top of the cheek, versus your darkest zones, the deep mane and the shadowed jaw. Having this map keeps you from over-peeling early.

  3. Peel the brightest highlights first

    Switch to a loop or ribbon tool and start on the lightest areas, the blaze and the lit edge of the cheek and neck. Shave the skin thin and even, taking off just the orange rind so the flesh underneath glows warm. Go slow and test often with an LED inside, since thin flesh brightens fast and you cannot add material back. Keep these passes shallow and smooth for that soft golden sheen.

  4. Build the mid tones and mane texture

    Move to the flowing mane and the mid-lit parts of the neck, peeling less deeply so they read as medium tones. Follow the direction of the hair with long curved strokes to suggest strands, leaving narrow ridges between grooves. Vary your pressure so some locks catch more light than others. Leave bridges of thicker flesh where strands cross so nothing weakens or collapses.

  5. Deepen the shadows and darkest accents

    Leave the untouched skin in the deepest mane recesses and the far side of the jaw so they stay dark and give the portrait depth. Only cut fully through for a couple of the very darkest slivers, the eye pupil or a deep gap in the mane, and save those true cutouts for last. Keep any through-cuts small so the front wall stays sturdy. Round the edges of the eye slightly so it reads soft rather than hard.

  6. Light it and photograph

    Set an LED puck light or a battery string inside and view the horse in a dark room. Look for flat spots that need a touch more peeling and any hot spots that got too thin. Wipe the cut surfaces and rub a little petroleum jelly on exposed flesh to slow drying. Shoot your photo at dusk on a porch step for that warm, glowing finish.

Gather your supplies

Check things off as you get ready.

Work on a stable surface, keep your free hand out of the cutting path, and have an adult handle sharp tools.

Three levels of light

  • Leave intact

    The deep mane recesses and the shadowed far jaw stay as untouched skin for dark contrast.

  • Peel & shade

    The flowing mane strands and mid neck get shallow peeling for warm medium tones.

  • Cut through

    Only a few tiny darkest accents like the eye detail are cut fully through, kept small for strength.

Learn the carving basics

Before you start cutting

How thin should I peel the brightest spots?

Peel just the orange rind off, leaving a thin veil of flesh that lets light glow through warmly. Test with your LED inside often, since flesh brightens quickly and you cannot rebuild it. Aim for a smooth, even surface rather than digging pits.

This is an AI concept image, so can a real pumpkin look like this?

Yes, this style is achievable with patient relief shading on a real pumpkin. The key is keeping the front wall about an inch thick and peeling to different depths rather than cutting through. Just work slowly and check the glow as you go.

How do I keep the mane strands from looking mushy?

Follow the hair direction with long, confident curved strokes and leave narrow ridges of skin between the grooves. Those raised ridges catch light and read as individual strands. Vary the depth so some locks glow brighter than others for a layered look.

Your take belongs here, too.

Changed a detail? Made it simpler? Share a photo of your version and tell the community what worked.

Share your pumpkin

More pumpkins like this

You've reached the end · 8 pumpkins
The Patch Report

Fresh pumpkins, in your inbox.

The best new carvings, ideas worth stealing, and how-tos for carving season. Short, seasonal, and gone by November.

A short email during carving season. Unsubscribe anytime. See our privacy policy.