Halloween Pumpkin Carving Contest · Starts October 1st · $500 in prizes
← Back to ideas
@ai_concepts
Jul 20, 2026
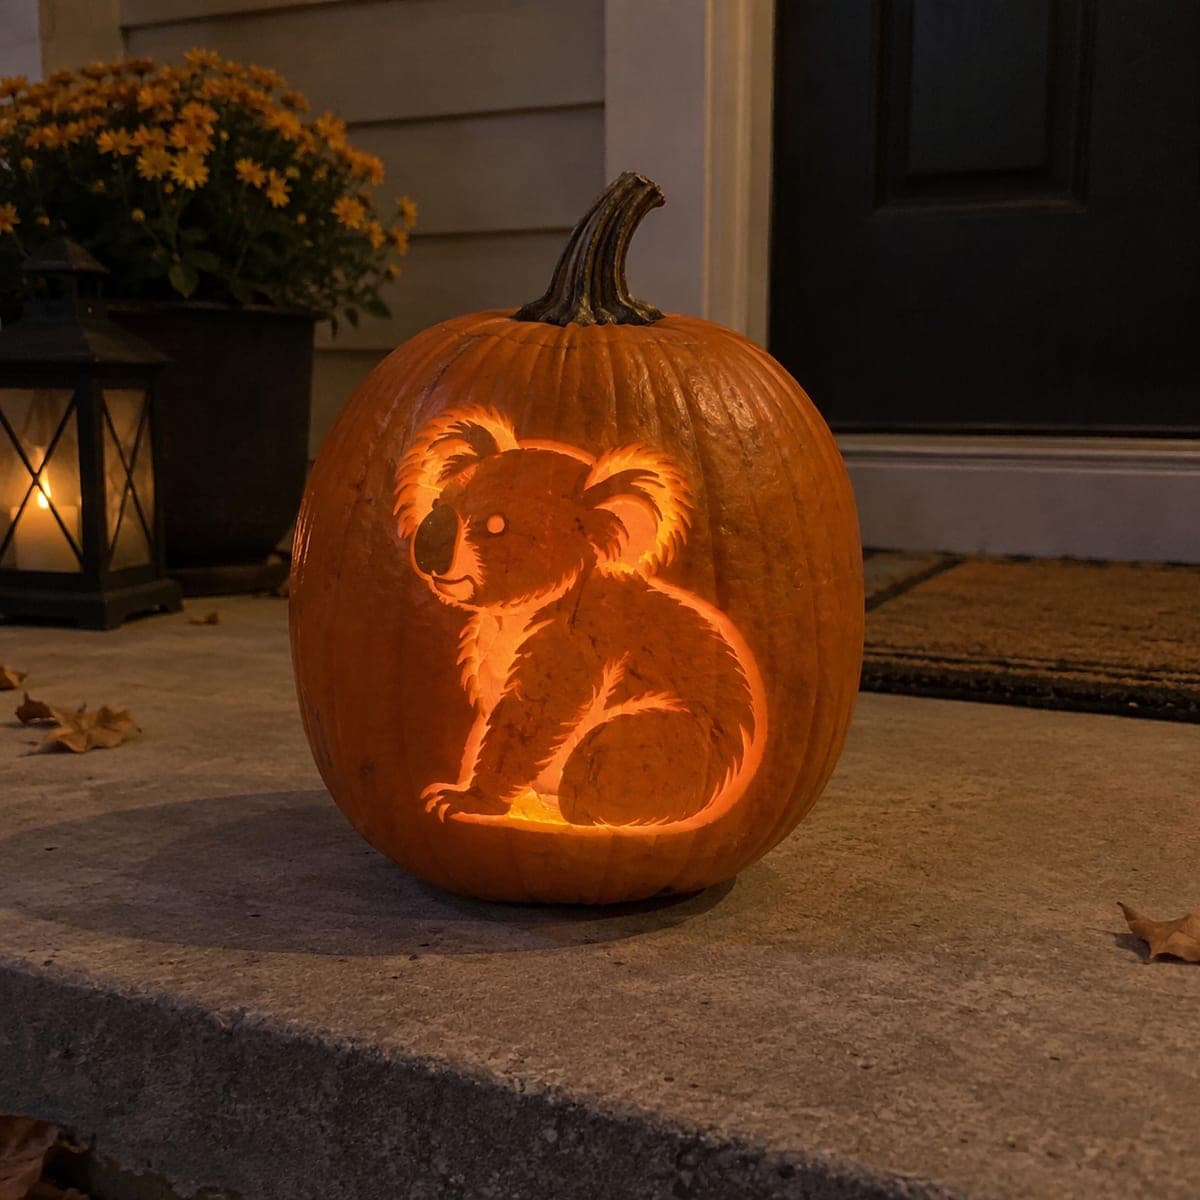
Koala Shading Pumpkin Carving on a PorchAI
0

Koala Shading Pumpkin Carving on a Porch

A fluffy koala sits in profile on this glowing pumpkin, its round ears and stubby nose etched with fine strokes that glow amber from the candle inside. The shading technique captures the koala's thick, textured fur by using a mix of shallow surface peels for the lighter belly and deeper channel cuts for the darker dorsal fur and eye markings. Use a ribbon tool for the large fur areas and a V-gouge for the fine wisps around the ears. This pumpkin carving idea offers a charming, non-scary alternative for families who want a cozy fall display.

This is an AI-generated concept image: a realistic, carvable design idea rather than a photo of a finished carve. AI concepts are always labeled and sit out the leaderboard and the contest.

No ratings yet · Sign in to rate
Comments (0)

  • No comments yet — be the first.

Save without an account. Sign in to like or comment.

Our tips for carving a similar design

The core trick here is layered shading, where you vary how deeply you carve to control how much light passes through. A koala reads as fluffy because the outline and fur wisps are cut through for bright light, while the body stays as peeled skin that glows dim orange. Plan your light zones before you touch a tool so the round ears, stubby nose, and soft belly all keep their contrast.

Written by PumpkinCarvingIdeas.com, inspired by the image above. These are our suggestions, not instructions from the uploader. This approach to the AI concept has not been tested on a real pumpkin.

From pumpkin to porch

  1. Pick a tall pumpkin and clean the cavity

    Choose a rounded, front-facing pumpkin with a smooth, blemish-free area for the koala. Cut a lid from the bottom or back rather than the top so the stem stays intact and the pumpkin sits flat. Scoop the inside and thin the carving wall to about one inch so peeled areas will glow. A thinner wall makes surface shading much easier to judge.

  2. Transfer the koala outline

    Tape your stencil flat against the pumpkin and poke the main outlines with a pin or transfer tool. Focus on the body silhouette, the two round ears, the nose, and the eye. Keep the dotted lines light so you can still tell the fur zones apart. Peel the paper and connect any faint sections with a washable marker.

  3. Peel the body for a dim glow

    Use a ribbon tool or a loop gouge to shave the skin off the koala's body, belly, and limbs. Remove only the orange skin and leave the flesh beneath, which will glow soft amber when lit. Vary your depth slightly so the belly stays lighter than the darker back. Work slowly and keep the peeled surface even to avoid blotchy light.

  4. Add fur texture with a V-gouge

    Switch to a small V-gouge for the fine wisps around the ears, cheeks, and back. Make short, curved strokes that follow the direction the fur grows, cutting a little deeper where you want brighter accents. These channels catch more light and read as fluffy edges. Keep strokes attached to the body rather than cutting all the way through.

  5. Cut the outline and details last

    Once the shading is done, cut fully through along the koala's outer edge and the bright fur tips for the strongest light. Cut the eye and the small nose highlight last so the surrounding skin stays supported. Leave thin bridges of skin between close cuts so the ears and limbs do not weaken. Save the biggest openings for the very end.

  6. Light it and photograph

    Drop in a battery LED, warm white or amber, for a safe steady glow. Set the pumpkin at eye level on a porch step and dim the surrounding lights to see the shading pop. Rotate it until the belly reads soft and the fur edges look bright. Snap your photo after dark for the best contrast.

Gather your supplies

Check things off as you get ready.

Work on a stable surface, keep your free hand out of the cutting path, and have an adult handle sharp tools.

Three levels of light

  • Leave intact

    The background pumpkin skin around the koala stays untouched and dark.

  • Peel & shade

    The koala's body, belly, and limbs are skin-peeled for a soft amber glow.

  • Cut through

    The outer silhouette, fur tips, eye, and nose highlight are cut through for the brightest light.

Learn the carving basics

Before you start cutting

How do I keep the belly lighter than the back?

Control light by varying peel depth. Shave the belly skin a little thinner so more light comes through, and leave the back fur zones slightly thicker for a darker tone. Test with your LED partway through so you can adjust before you finish.

Can I carve this without a full stencil?

Yes, but a stencil helps keep the round ears and body proportions right. If you go freehand, sketch the profile silhouette first, then add the ear circles and nose, and finally the fur strokes. Draw everything in washable marker so you can wipe and retry.

Since this is a concept image, will the thin fur wisps hold up on a real pumpkin?

They can if you keep most fur strokes as shallow V-gouge channels rather than full cuts. Only cut all the way through at the outer edge and a few tips, and leave small skin bridges between close cuts. This keeps the ears and limbs strong for several days.

Your take belongs here, too.

Changed a detail? Made it simpler? Share a photo of your version and tell the community what worked.

Share your pumpkin

More pumpkins like this

You've reached the end · 8 pumpkins
The Patch Report

Fresh pumpkins, in your inbox.

The best new carvings, ideas worth stealing, and how-tos for carving season. Short, seasonal, and gone by November.

A short email during carving season. Unsubscribe anytime. See our privacy policy.