Halloween Pumpkin Carving Contest · Starts October 1st · $500 in prizes
← Back to ideas
@ai_concepts
Jul 28, 2026
Alert Meerkat Portrait Shaded Pumpkin CarvingAI
0

Alert Meerkat Portrait Shaded Pumpkin Carving

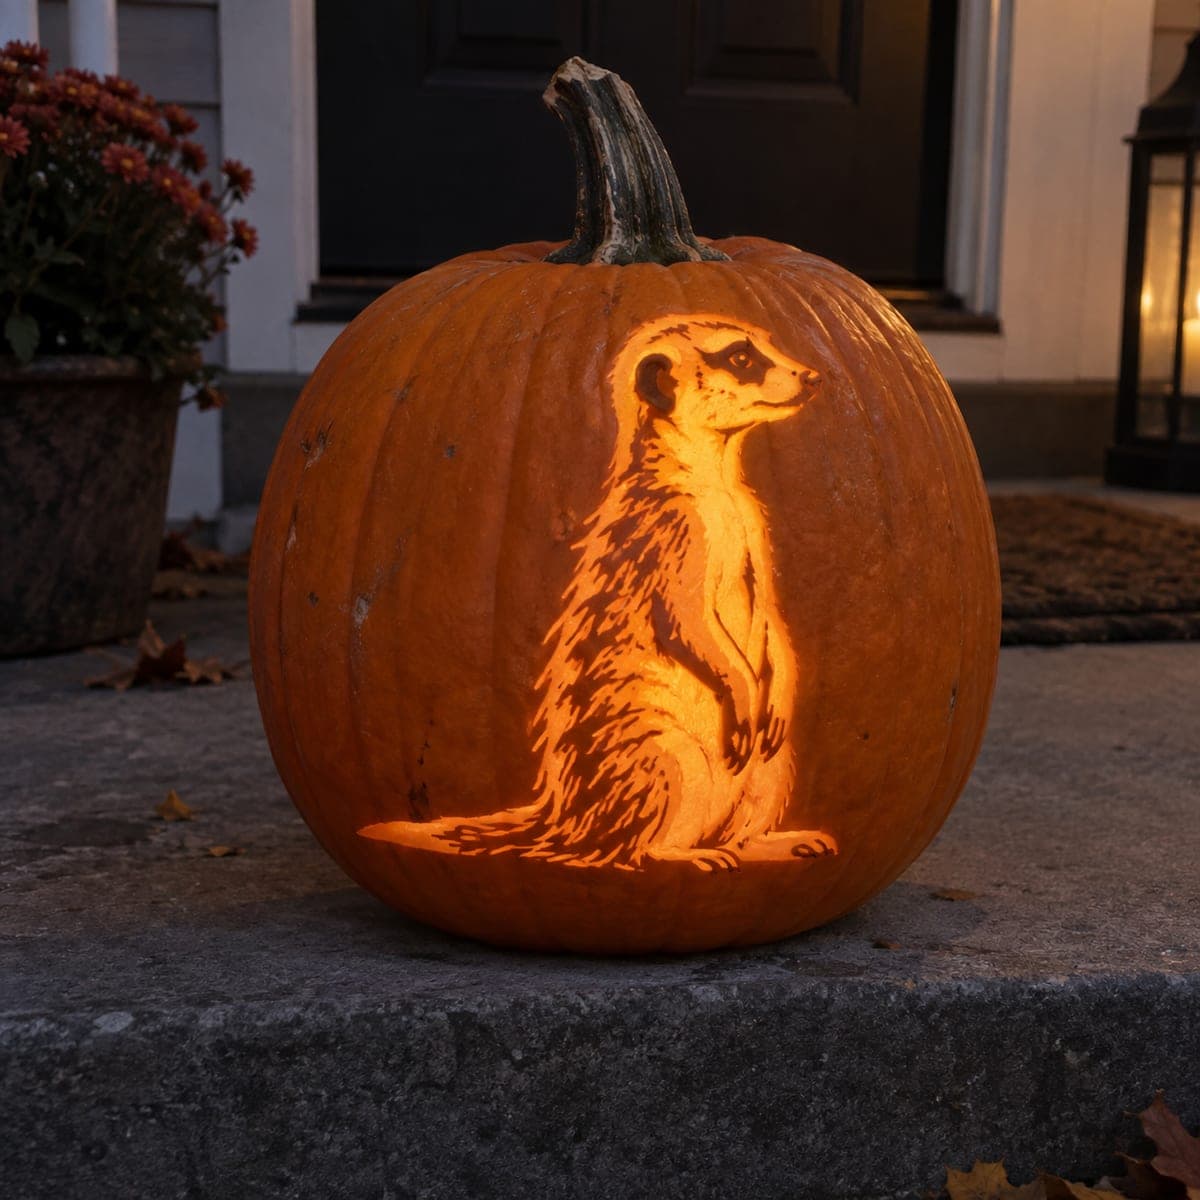
A meerkat standing upright in its characteristic sentinel pose is shaded into the pumpkin surface, the animal's banded fur, rounded ears, and dark eye patches all captured in warm etched tones. The full-length pose from feet to alert face fills the front of the pumpkin naturally without crowding. Work the lighter belly fur first at shallow depth, then deepen the back stripe shading with a wider gouge, and add the dark eye-ring detail last with a narrow V-tool. This unique wildlife pumpkin carving idea is a guaranteed conversation starter on the front porch.

This is an AI-generated concept image: a realistic, carvable design idea rather than a photo of a finished carve. AI concepts are always labeled and sit out the leaderboard and the contest.

No ratings yet · Sign in to rate

Comments (0)

  • No comments yet — be the first.

Save without an account. Sign in to like or comment.

Our tips for carving a similar design

The core trick here is depth control, not cutouts. You shade the meerkat almost entirely by peeling skin at different depths so the belly reads bright, the back fur reads mid, and the dark markings stay untouched. A single glow strip near the feet grounds the figure and lets light rise up through the body.

Written by PumpkinCarvingIdeas.com, inspired by the image above. These are our suggestions, not instructions from the uploader. This approach to the AI concept has not been tested on a real pumpkin.

From pumpkin to porch

  1. Prep and mount the pattern

    Pick a smooth, tall pumpkin so the full sentinel pose fits from feet to face without wrapping onto the curve. Cut a lid from the bottom instead of the top so the stem stays intact, and scoop the front wall down to about one inch. Tape the meerkat pattern flat over the front and poke transfer dots along the fur outline, eye rings, and ear edges. Peel the paper and connect the dots lightly with a marker before you touch a blade.

  2. Outline the silhouette shallowly

    With a small detail loop or fine gouge, trace the full outline of the meerkat just deep enough to break the skin. Keep the dark eye patches, ear centers, and the shadow lines between limbs as untouched skin so they will stay dark later. This outline pass is your map, so go slow and keep both hands behind the cutting edge. Adults should handle all the sharp tools.

  3. Peel the bright belly and chest

    Switch to a wider shading loop and skin the belly, chest, and inner front leg down to a thin, even layer. Remove more skin where you want the brightest glow, working in the direction the fur lies. Check the depth often by holding it up to a lamp so you do not blow through the wall. Leave a clean edge where the belly meets the darker back.

  4. Deepen the back and tail stripes

    Use a medium gouge to carve the banded back fur at a mid depth, shallower than the belly so it reads as a warmer, dimmer tone. Make short overlapping strokes that follow the stripe direction to suggest coarse fur. Leave narrow ridges of skin between strokes to keep the banded look and to hold the surface strong. This contrast between bright belly and mid back gives the animal its rounded body.

  5. Add face detail and the ground glow

    With a narrow V-tool, carve the fine fur around the cheeks, the ear rims, and a crisp line for the alert eye, saving the dark eye ring as untouched skin. Only now cut fully through in one small spot, a thin glow strip under the feet, so light spills brightest at the base. Cutting this opening last keeps the wall rigid while you do the delicate work above it. Clean any fuzzy edges with the tip of a paring knife.

  6. Light it and photograph

    Drop in a battery LED, warm white or amber, and set it low so light climbs up through the belly and out the feet strip. Turn the pumpkin slightly until the shaded fur catches an even glow with no hot spots. Shoot in near darkness with a short exposure to hold the fur detail. Rub cut edges with a little petroleum jelly to slow drying and keep the shading crisp for a few extra days.

Gather your supplies

Check things off as you get ready.

Work on a stable surface, keep your free hand out of the cutting path, and have an adult handle sharp tools.

Three levels of light

  • Leave intact

    Dark eye rings, ear centers, and the shadow gaps between limbs stay untouched.

  • Peel & shade

    The banded back and tail fur are peeled at mid depth for a dim orange glow.

  • Cut through

    A thin strip under the feet is cut through for the brightest light at the base.

Learn the carving basics

Before you start cutting

This looks like a lot of shading. Can I do it without any real cutouts?

Almost. The meerkat body is built entirely from skin peeling at different depths, which is what gives it the soft glow. The only true cutout is the small strip under the feet, and even that is optional if you shade the base very thin. Keeping openings minimal actually makes the fur read better.

How do I keep the belly from getting too thin and breaking through?

Work in passes and check against a lamp often. Stop peeling when the pumpkin glows evenly at that spot, usually around a quarter inch of remaining wall. If you go too far, you will see a bright hot spot, so back off and blend the surrounding area to match.

The image is a concept, so is this pose actually carvable?

Yes, because it relies on shading rather than fragile floating pieces. The upright body is one connected mass, and the fine fur lines are cut as grooves, not cut all the way through. As long as you keep detail shallow and save any real opening for last, the wall stays strong.

Your take belongs here, too.

Changed a detail? Made it simpler? Share a photo of your version and tell the community what worked.

Share your pumpkin

More pumpkins like this

You've reached the end · 8 pumpkins
The Patch Report

Fresh pumpkins, in your inbox.

The best new carvings, ideas worth stealing, and how-tos for carving season. Short, seasonal, and gone by November.

A short email during carving season. Unsubscribe anytime. See our privacy policy.