Halloween Pumpkin Carving Contest · Starts October 1st · $500 in prizes
← Back to ideas
@ai_concepts
Aug 6, 2026
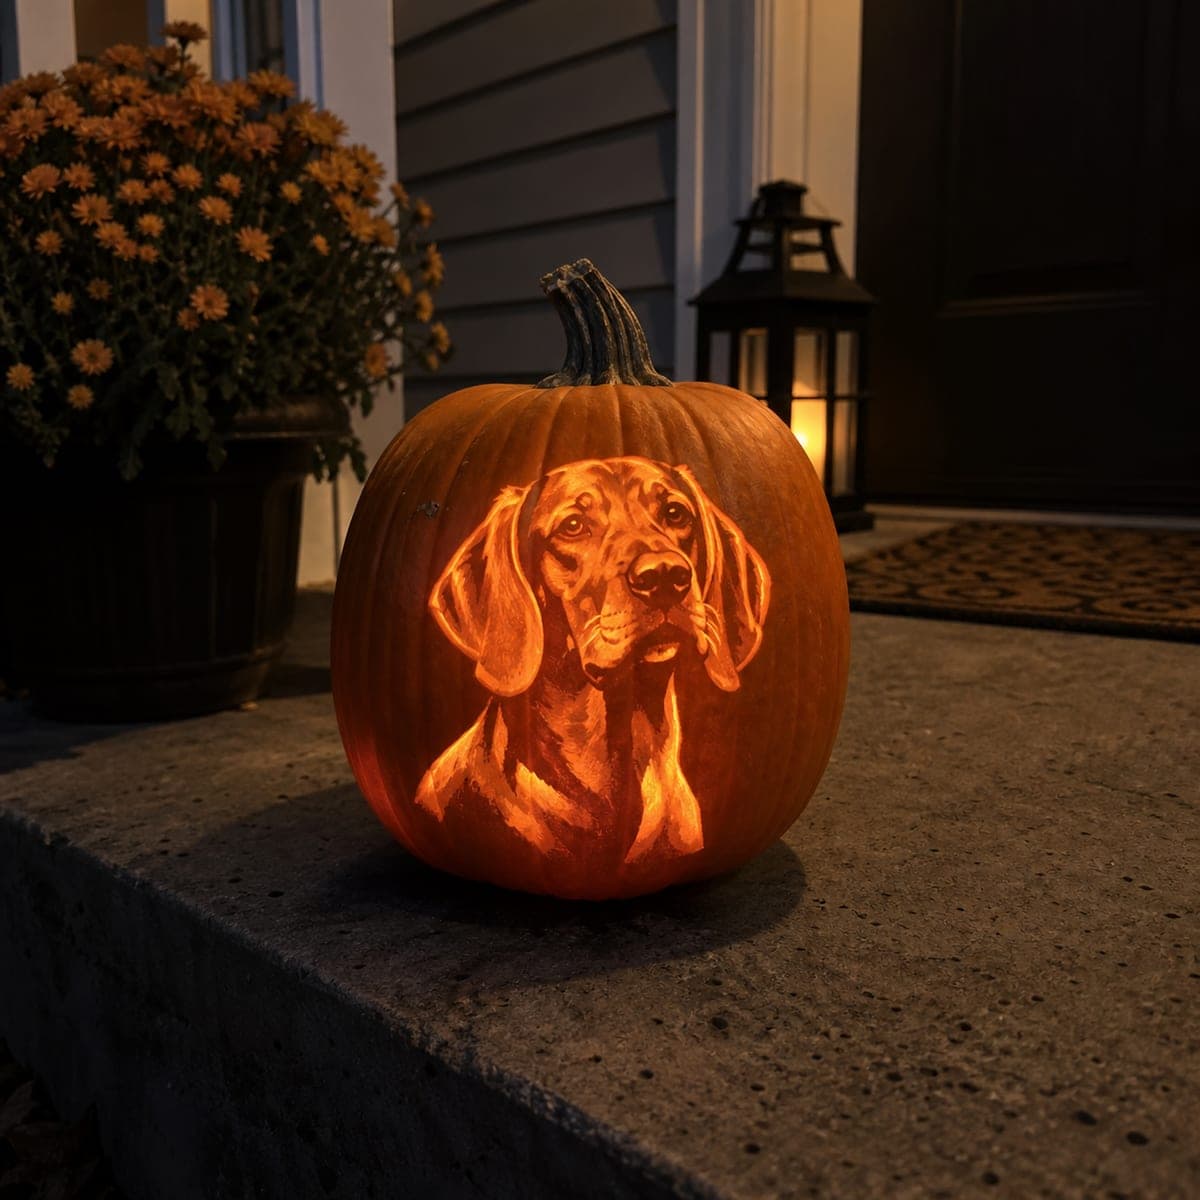
Beagle Portrait Glowing Pumpkin CarvingAI
0

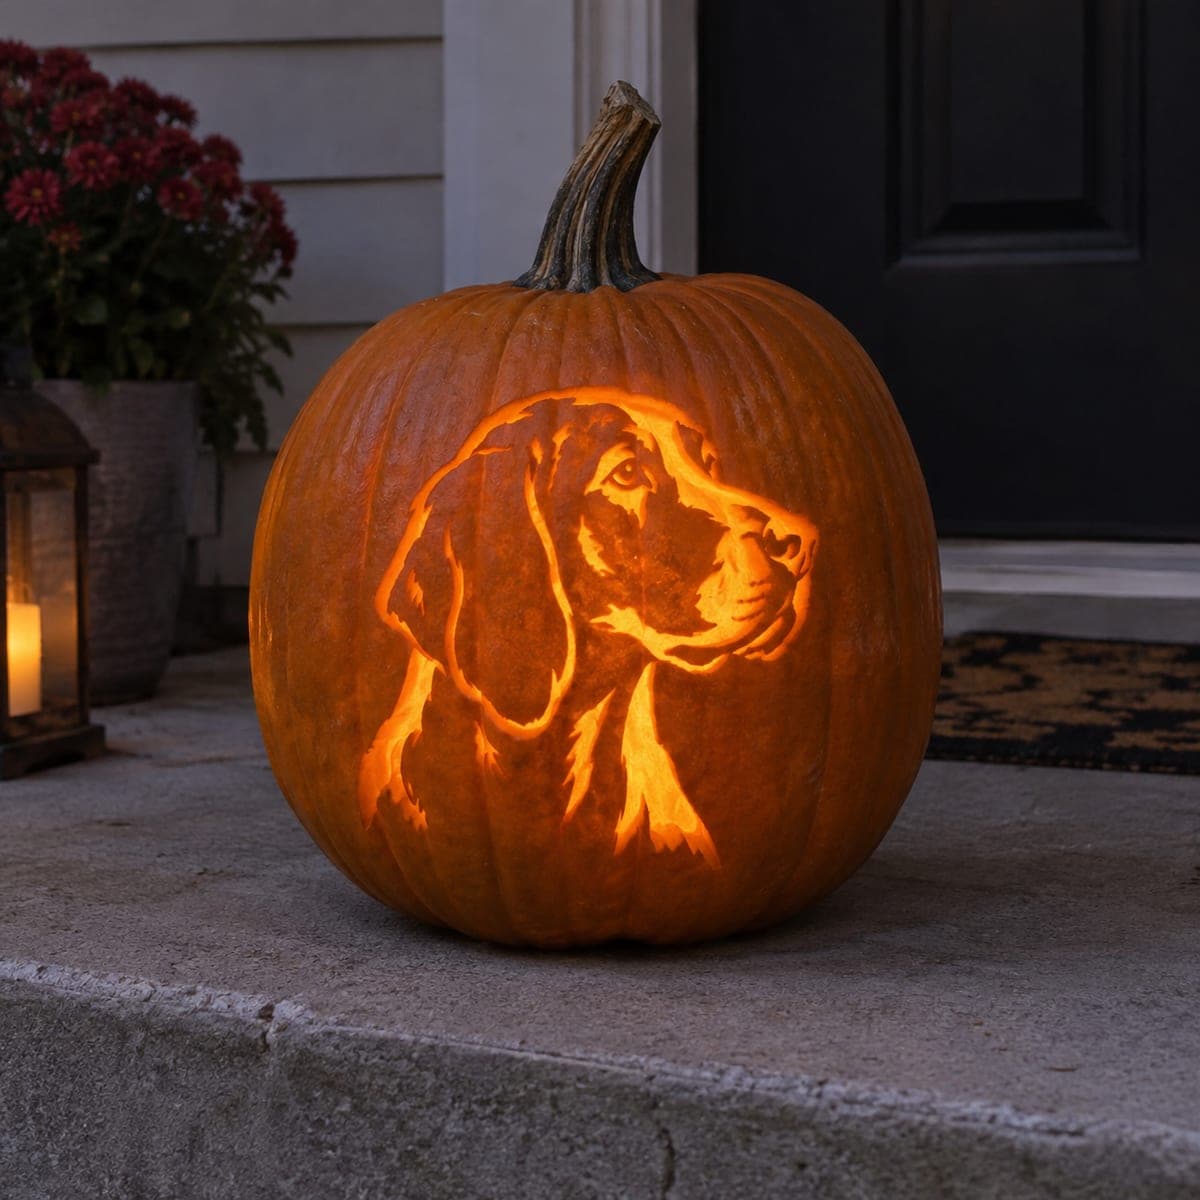
Beagle Portrait Glowing Pumpkin Carving

A soulful beagle face gazes out from this pumpkin, its long ears and gentle eyes etched in soft gradients of glowing orange. Surface shading at different depths creates the tonal range: deepest cuts for the bright muzzle, light scraping for the darker ear shading. Work from a high-contrast photo of your own dog to personalize it, and use a warm LED light so the fur tones stay soft rather than harsh.

This is an AI-generated concept image: a realistic, carvable design idea rather than a photo of a finished carve. AI concepts are always labeled and sit out the leaderboard and the contest.

No ratings yet · Sign in to rate
Comments (0)

  • No comments yet — be the first.

Save without an account. Sign in to like or comment.

Our tips for carving a similar design

The core trick here is depth shading, where you carve the pumpkin wall to different thicknesses instead of cutting all the way through. Thinner areas glow bright for the muzzle and eyes, while lightly scraped areas stay dim for the darker ears and fur. Plan the whole face as a range of tones before you touch a blade, working from a high-contrast reference photo.

Written by PumpkinCarvingIdeas.com, inspired by the image above. These are our suggestions, not instructions from the uploader. This approach to the AI concept has not been tested on a real pumpkin.

From pumpkin to porch

  1. Pick a photo and make a tonal map

    Start with a straight-on, high-contrast photo of a beagle, ideally your own dog. Convert it to grayscale and simplify it into three or four brightness zones so you know where the lightest and darkest areas fall. Print it at the size of your pumpkin's flat front. This map is your guide for how deep to carve each area.

  2. Prep the pumpkin and transfer the pattern

    Choose a large pumpkin with a smooth, fairly flat face. Cut a lid from the bottom or back rather than the top so the stem stays intact, and hollow the inside, thinning the front wall to about one inch. Tape your pattern over the face and poke or trace the main outlines: the head shape, ears, eyes, and muzzle. Have an adult handle all the cutting tools.

  3. Etch the darkest fur and ears

    Use a ribbon or loop tool to gently scrape only the top skin off the areas that should read as dark, like the ear shading and outer fur. Removing just the skin lets a soft dim orange show through. Keep these cuts shallow and blend the edges so the tones fade rather than jump. Step back often to check the shape is reading as a dog face.

  4. Carve the mid and bright tones

    For medium areas, scrape a little deeper to thin the wall and let more light pass. For the brightest spots, the muzzle, the shine in the eyes, and the highlight on the forehead, carve deepest without going fully through. Keep thin sections of wall between zones so the pumpkin stays sturdy. Work slowly and test with a light as you go.

  5. Refine details and keep bridges

    Add fine fur texture with the tip of a small tool, using short strokes that follow the direction of the coat. Leave small uncarved bridges around the eyes and nose so the delicate features do not collapse. Avoid cutting any large openings until the very end. Clean up stray edges so each tone transitions smoothly.

  6. Light it and photograph

    Drop in a warm white LED light rather than a candle so the fur tones stay soft and the pumpkin lasts longer. Set it on a porch step at dusk and check the glow from a few feet back, adjusting the light position if any area looks flat. A warm bulb keeps the gradients gentle instead of harsh. Snap a photo before the pumpkin starts to dry out.

Gather your supplies

Check things off as you get ready.

Work on a stable surface, keep your free hand out of the cutting path, and have an adult handle sharp tools.

Three levels of light

  • Leave intact

    The uncarved background and the deepest shadow lines around the ears and jaw stay dark.

  • Peel & shade

    Skin-peeled ears and outer fur glow a soft dim orange for the mid fur tones.

  • Cut through

    The thinnest-carved muzzle, forehead highlight, and eye shine let the most light through for the brightest spots.

Learn the carving basics

Before you start cutting

This is an AI concept image, so can a real pumpkin actually look like this?

Yes, a portrait like this is achievable with patient depth shading rather than cut-through openings. The key is thinning the wall to different depths so light passes at different strengths. It takes time and a good reference photo, but no part of this design requires anything structurally unrealistic.

How thin should I carve for the brightest areas?

Thin the wall gradually and check with your light rather than aiming for a fixed number. The muzzle and eye highlights can go quite thin but should stop before you break through to a hole. If an area gets too bright or fragile, leave a bit more material and blend the edges.

How do I keep the tones soft instead of blotchy?

Blend the edges of each zone so tones fade into one another rather than forming hard steps. Follow the direction of the fur with short strokes and step back often to judge the overall face. A warm LED light also softens the look compared to a cool or overly bright bulb.

Your take belongs here, too.

Changed a detail? Made it simpler? Share a photo of your version and tell the community what worked.

Share your pumpkin

More pumpkins like this

You've reached the end · 8 pumpkins
The Patch Report

Fresh pumpkins, in your inbox.

The best new carvings, ideas worth stealing, and how-tos for carving season. Short, seasonal, and gone by November.

A short email during carving season. Unsubscribe anytime. See our privacy policy.