Halloween Pumpkin Carving Contest · Starts October 1st · $500 in prizes
← Back to ideas
@ai_concepts
Aug 20, 2026
German Shepherd Portrait Glowing Pumpkin CarvingAI
0

German Shepherd Portrait Glowing Pumpkin Carving

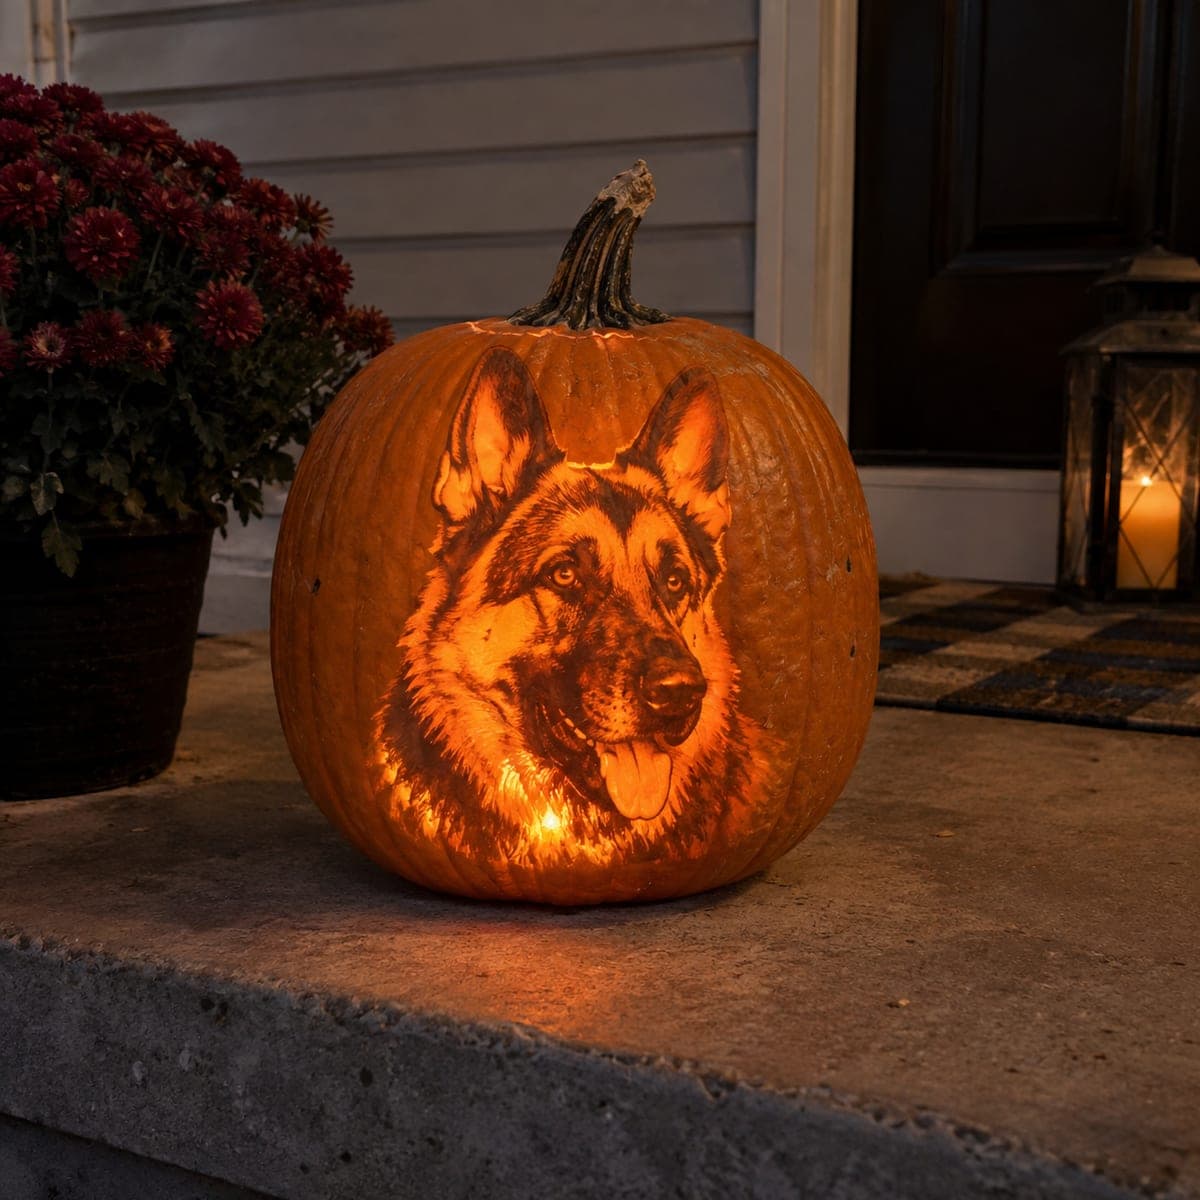
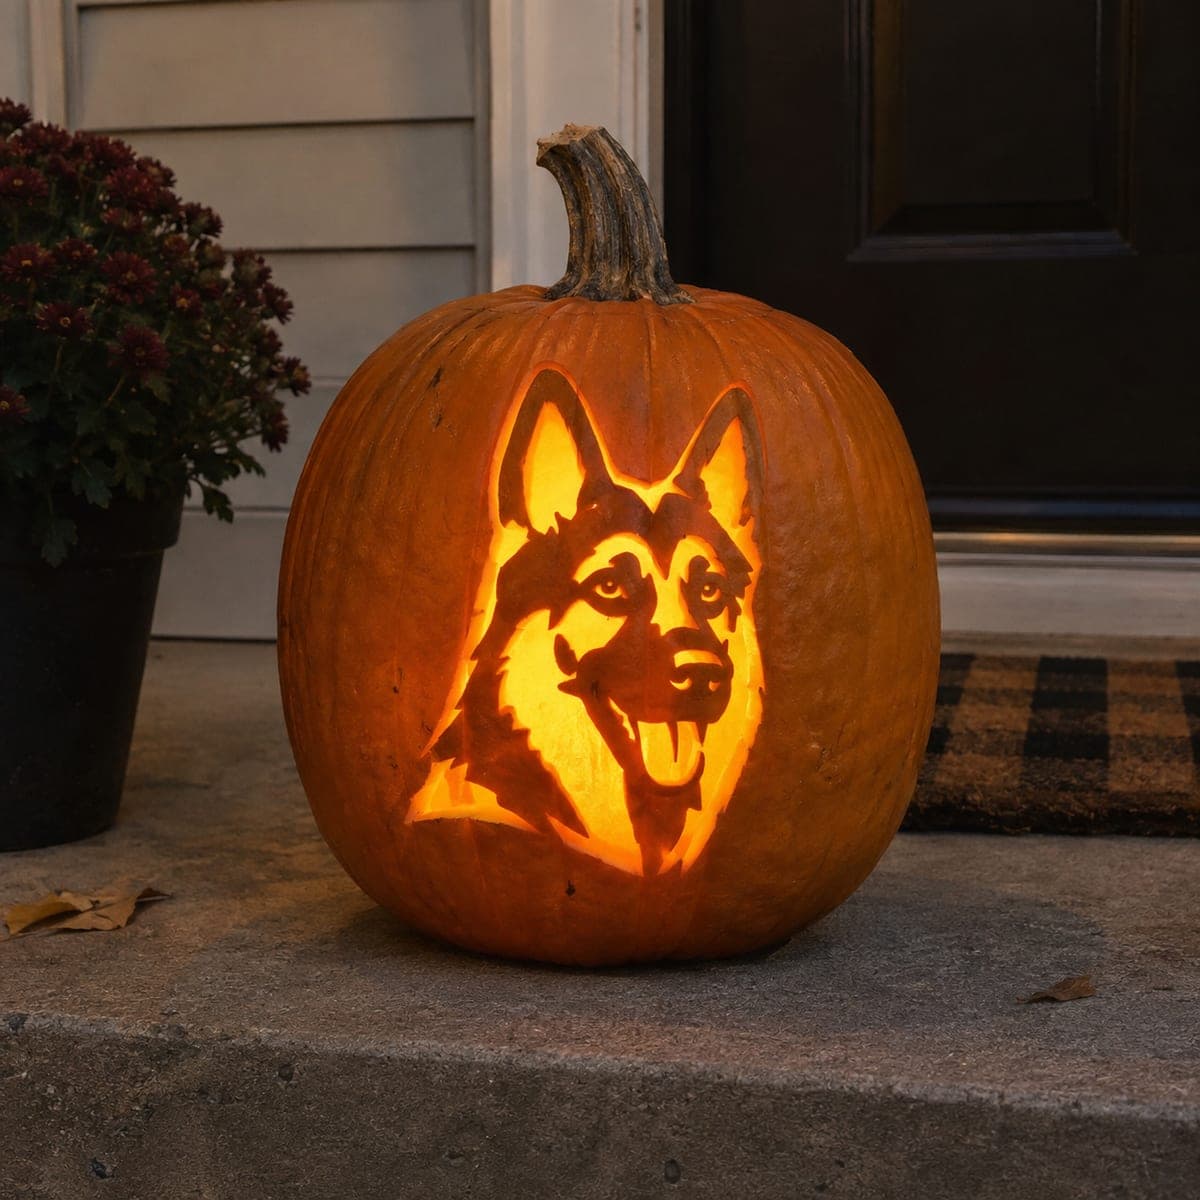
A happy German Shepherd with pricked ears and an open panting mouth beams from this glowing pumpkin portrait. The breed's two-tone coat is handled with two carving depths: bright peeled areas for the tan markings and untouched skin for the black saddle and mask. Poke-transfer a photo template, carve the brightest areas first, then step back with a light inside to judge the contrast before finishing.

This is an AI-generated concept image: a realistic, carvable design idea rather than a photo of a finished carve. AI concepts are always labeled and sit out the leaderboard and the contest.

No ratings yet · Sign in to rate

Comments (0)

  • No comments yet — be the first.

Save without an account. Sign in to like or comment.

Our tips for carving a similar design

The core trick here is playing two carving depths against each other so the dog's coat reads in orange and shadow. Peeled skin becomes the bright tan markings and open mouth, while untouched skin holds the dark saddle, mask, and ear tips. Plan your light and dark zones on the template before you touch a blade, because the contrast is what makes the face pop.

Written by PumpkinCarvingIdeas.com, inspired by the image above. These are our suggestions, not instructions from the uploader. This approach to the AI concept has not been tested on a real pumpkin.

From pumpkin to porch

  1. Pick your pumpkin and prep it

    Choose a tall pumpkin with a broad, smooth front face so the portrait has room to breathe. Cut a wide access hole in the bottom rather than the top so the stem stays intact and the pumpkin sits flat. Scrape the inside wall behind the face down to about one inch thick with a loop tool. A thinner wall peels and cuts far more predictably for shading work.

  2. Transfer the template

    Size a German Shepherd portrait stencil to fit the front and tape it smoothly, clipping the edges so it hugs the curve. Use a poke tool or pin to dot along every outline, marking the borders between the tan areas, the black areas, and the full cutouts. Space the dots close together on the ears and muzzle where detail matters. Lift the paper and connect the dots lightly in pencil so you can read the whole map.

  3. Peel the bright tan markings

    With a shallow gouge or ribbon tool, skin off just the top layer of skin across the tan zones: the cheeks, the brow above the eyes, the chest fur, and the inside of the ears. Aim for an even depth so these areas glow the same soft orange. Leave a clean border where each peeled patch meets an untouched black area. Test with a light inside now and again to check the tone.

  4. Leave the dark saddle and mask

    Do not touch the skin over the black saddle, the mask around the muzzle, the ear tips, and the outline strokes of fur. These stay as raw pumpkin skin so they read as deep shadow against the glow. Resist the urge to peel here, since the contrast between untouched skin and peeled areas is what defines the breed's coat pattern.

  5. Cut the brightest openings last

    Save the full cutouts for the end, when the pumpkin is at its strongest. Carve through only the very brightest spots: the open panting mouth, the tongue gap, and small highlights in the eyes. Use a fine saw and short strokes, and leave thin skin bridges between close cuts so the muzzle and jaw stay supported. Cutting these last keeps the face rigid while you do the delicate peeling.

  6. Light it and judge the contrast

    Set a battery LED or two inside, never a candle, and place it low so light rises evenly across the face. Step back several feet in a dark room to read the portrait the way a viewer will. If the tan areas look muddy, peel them a touch thinner; if the dark saddle is washing out, leave more skin nearby. Wipe the cut edges, then set it on the porch out of direct rain.

Gather your supplies

Check things off as you get ready.

Work on a stable surface, keep your free hand out of the cutting path, and have an adult handle sharp tools.

Three levels of light

  • Leave intact

    The black saddle, muzzle mask, ear tips, and dark fur outlines stay untouched.

  • Peel & shade

    The tan cheeks, brow, chest fur, and inner ears get skin-peeled for a soft glow.

  • Cut through

    The open panting mouth, tongue gap, and eye highlights are cut through for full light.

Learn the carving basics

Before you start cutting

How do I keep the two coat colors from blending together?

Keep a crisp, clean edge wherever a peeled tan area meets untouched black skin. The eye reads contrast at those borders, so a sharp line does more than perfect shading. Check with the light on and deepen a peel only if a zone looks muddy.

The muzzle and open mouth look fragile. How do I keep them from breaking?

Cut all the full openings last, after every peel is done, so the wall stays rigid while you work. Leave thin skin bridges between the mouth cutout and nearby cuts to brace the jaw. A thinned inner wall of about one inch also cuts cleaner and cracks less.

This is an AI concept image, so can a real pumpkin look like this?

Yes, a portrait like this is achievable with patient two-depth carving, though the exact glow will vary with your pumpkin's wall and flesh color. Treat the image as a target and lean on your light test to guide how thin to peel. Real fruit rewards checking contrast often as you go.

Your take belongs here, too.

Changed a detail? Made it simpler? Share a photo of your version and tell the community what worked.

Share your pumpkin

More pumpkins like this

You've reached the end · 8 pumpkins
The Patch Report

Fresh pumpkins, in your inbox.

The best new carvings, ideas worth stealing, and how-tos for carving season. Short, seasonal, and gone by November.

A short email during carving season. Unsubscribe anytime. See our privacy policy.