Halloween Pumpkin Carving Contest · Starts October 1st · $500 in prizes
← Back to ideas
@ai_concepts
Aug 13, 2026
Great Dane Portrait Etched PumpkinAI
0

Great Dane Portrait Etched Pumpkin

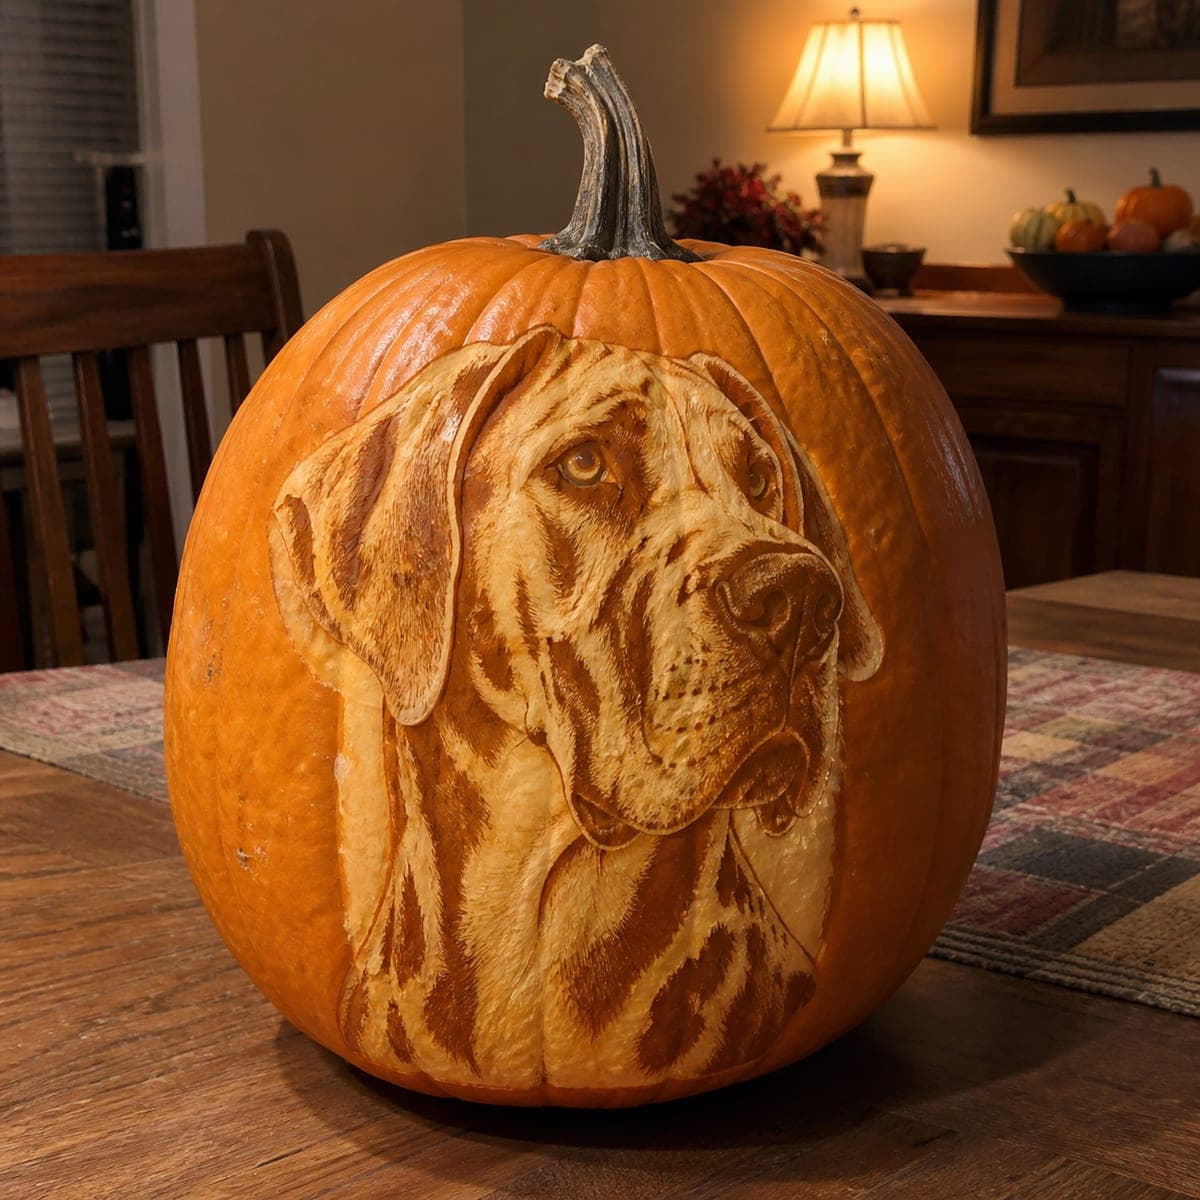
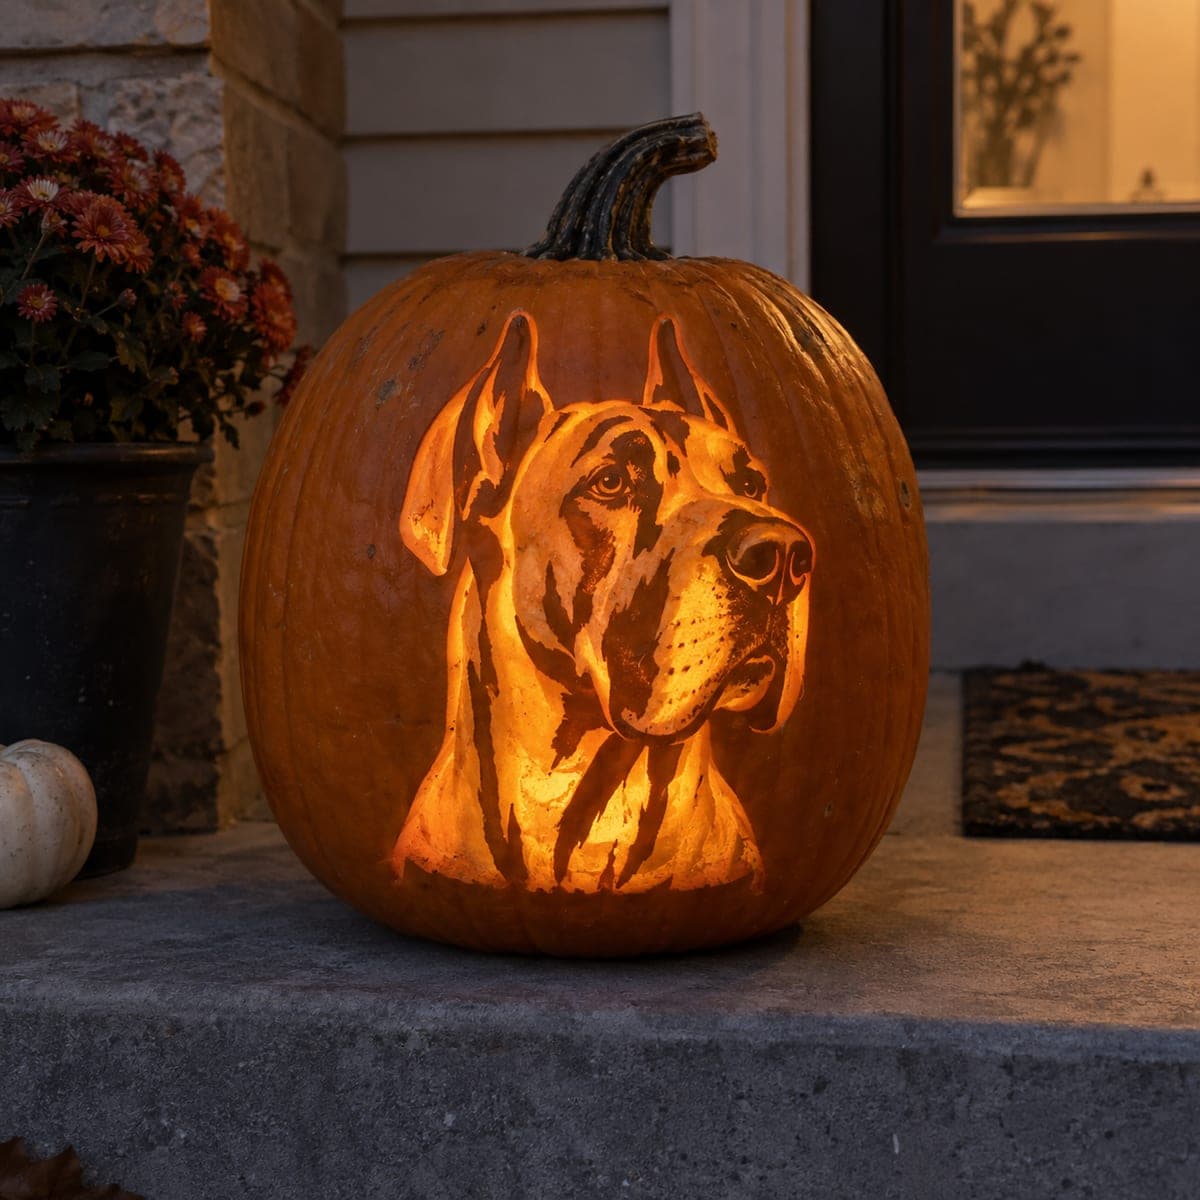
A soulful Great Dane gazes from this pumpkin in a skin-carved portrait, its brindle-style patches formed by alternating areas of peeled flesh and untouched orange skin. Using the pumpkin's own two tones as the palette means no paint and no through-cuts, just careful mapping of light and dark. Trace a high-contrast photo of your dog, decide which regions stay skin, and peel the rest, refining the jowls and ears with shallow shading strokes.

This is an AI-generated concept image: a realistic, carvable design idea rather than a photo of a finished carve. AI concepts are always labeled and sit out the leaderboard and the contest.

No ratings yet · Sign in to rate
Comments (0)

  • No comments yet — be the first.

Save without an account. Sign in to like or comment.

Our tips for carving a similar design

The whole portrait lives in the difference between untouched orange skin and peeled dim-glowing flesh, so the trick is treating the pumpkin like a two-tone drawing rather than a lantern. You map where the Great Dane's dark markings, eyes, and shadows fall, leave those as skin, and peel everything else to varying depths. There are no through-cuts at all, which keeps the surface strong and the detail crisp.

Written by PumpkinCarvingIdeas.com, inspired by the image above. These are our suggestions, not instructions from the uploader. This approach to the AI concept has not been tested on a real pumpkin.

From pumpkin to porch

  1. Pick a smooth pumpkin and a high-contrast photo

    Choose a large pumpkin with a broad, even face and as few ribs as possible so the portrait does not distort. Find or print a clear photo of a Great Dane where the light and dark areas read strongly. Simplify it in your mind into three zones: darkest markings, mid tones, and highlights. This planning is what makes a shaded portrait work, so spend real time here before any blade touches the pumpkin.

  2. Transfer and map your three tones

    Tape the pattern to the front of the pumpkin and poke or trace the main outlines: the head, ears, muzzle, and the edges of the dark patches. Once the guide lines are on, lightly mark which regions will stay full skin (the darkest brindle patches and the pupils) and which will be peeled. A washable marker or light score lines help you keep track. Getting this map right prevents you from peeling something that should have stayed dark.

  3. Peel the background and lightest areas first

    Using a shallow ribbon or loop tool, remove the skin from the brightest zones such as the bridge of the muzzle, the forehead highlight, and the light fur. Peel only the top skin layer for a soft even glow, keeping your cuts shallow and controlled. Let an adult handle the sharp tools and always cut away from your hand. Work from large open areas inward so you build confidence before the fine detail.

  4. Build the mid tones with depth

    For the mid-value fur and the folds of the jowls, peel slightly deeper or thin the flesh a touch more so those areas glow a hair brighter than the skin but softer than the highlights. Vary your pressure to create the gradient along the cheeks and ears. Short directional strokes that follow the fur direction sell the texture. Step back often and compare against your photo to check the balance.

  5. Refine the eyes, nose, and fine shading

    The eyes carry the whole portrait, so leave the pupils as untouched skin and peel a thin ring around them for that soulful catchlight. Use a fine detail tool for the wrinkles around the muzzle and the delicate hairs along the ear edges. Keep these strokes shallow so no area breaks through to the inside. Soften any hard transitions by feathering the edge with light scraping.

  6. Light it and photograph in the dark

    Drop a battery LED or a short string of warm LED lights inside through a lid or a hole cut in the back, never a candle, since a low flame will not push light through solid skin anyway. The dim internal glow makes the peeled flesh warm up while the skin stays dark. Dim the room and shoot from straight on to capture the full range of tones. Mist the surface lightly and refrigerate between showings to slow drying.

Gather your supplies

Check things off as you get ready.

Work on a stable surface, keep your free hand out of the cutting path, and have an adult handle sharp tools.

Three levels of light

  • Leave intact

    The darkest brindle patches, the pupils, and deep shadow lines under the jowls and ears stay as untouched skin.

  • Peel & shade

    The mid-tone fur, cheek folds, and the softer body markings get a shallow skin peel for a dim orange glow.

  • Cut through

    No full cutouts here. The brightest highlights on the muzzle, forehead, and eye rings are the deepest peels, not holes.

Learn the carving basics

Before you start cutting

Since this is a concept image, can a real pumpkin actually hold this much detail with no cutouts?

Yes, this style is very achievable because it relies entirely on skin-etching rather than through-cuts. With no openings, the surface stays strong and can carry fine fur and wrinkle detail. The main challenge is patience and tone mapping, not structural risk.

How do I make the portrait glow if I am not cutting all the way through?

Etched pumpkins glow through the thinned flesh, so the deeper you peel, the brighter that spot appears. A warm battery LED inside pushes enough light through the peeled areas to create the gradient. Untouched skin blocks the light and reads as your dark tones.

What if I peel a highlight too deep and break through?

Work shallow and check the wall thickness often, especially near the eyes and muzzle. If you do break through a small spot, you can back it with a piece of thin wax paper or simply let it become a bright accent. Keeping the biggest peels shallow from the start is the best insurance.

Your take belongs here, too.

Changed a detail? Made it simpler? Share a photo of your version and tell the community what worked.

Share your pumpkin

More pumpkins like this

You've reached the end · 8 pumpkins
The Patch Report

Fresh pumpkins, in your inbox.

The best new carvings, ideas worth stealing, and how-tos for carving season. Short, seasonal, and gone by November.

A short email during carving season. Unsubscribe anytime. See our privacy policy.