Halloween Pumpkin Carving Contest · Starts October 1st · $500 in prizes
← Back to ideas
@ai_concepts
Aug 27, 2026
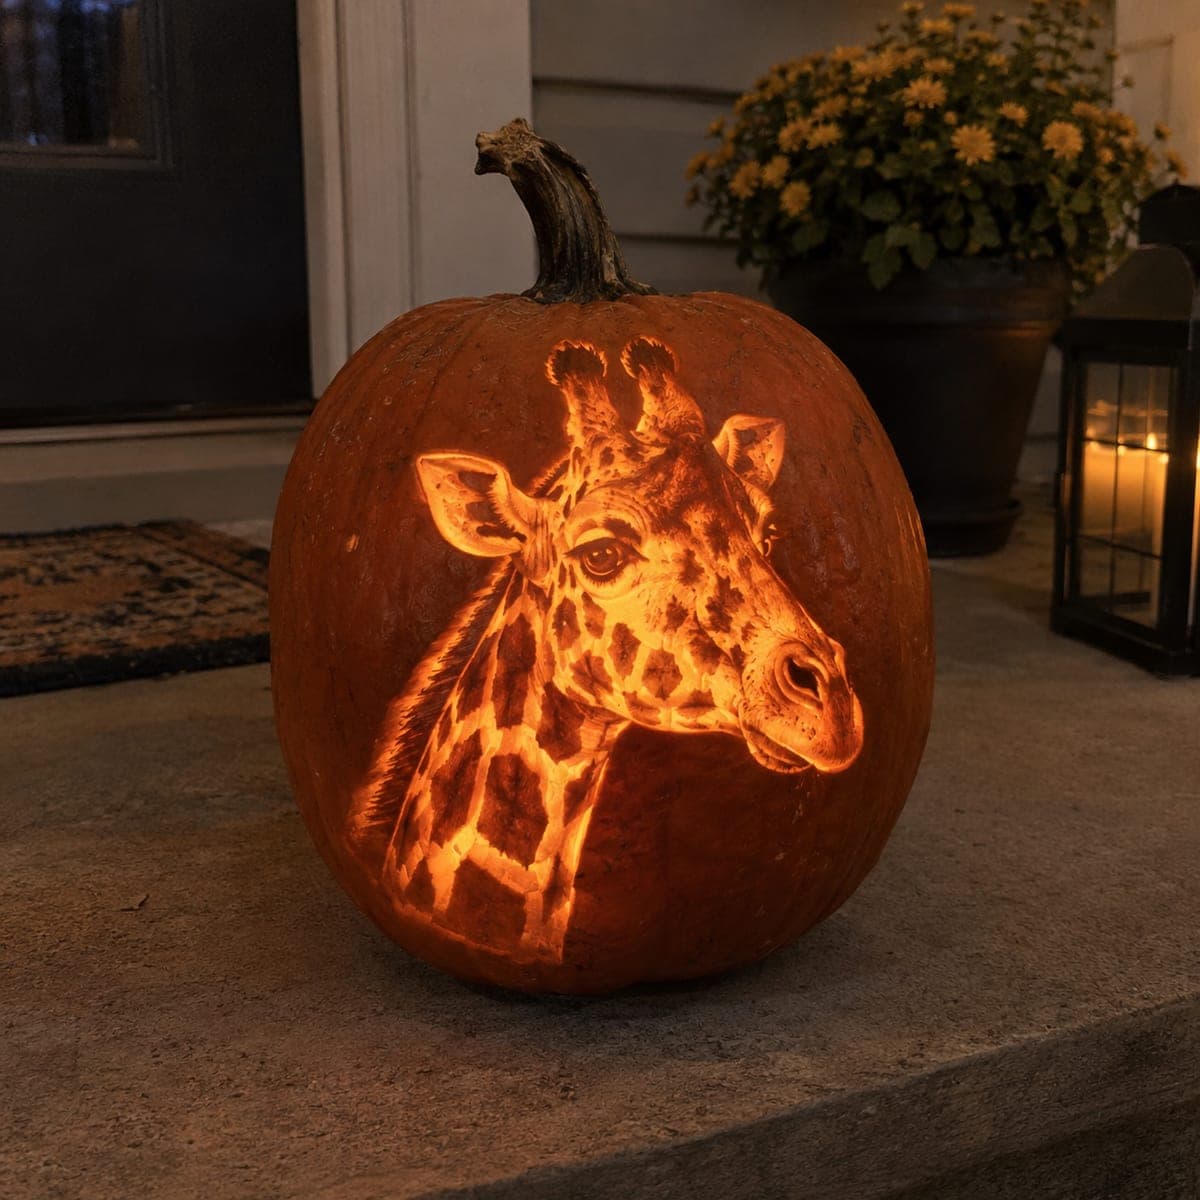
Giraffe Head Shaded Pumpkin CarvingAI
0

Giraffe Head Shaded Pumpkin Carving

A giraffe portrait in glowing amber tones, with its patchwork coat pattern etched at varying depths so each spot reads clearly against the lit flesh. The ossicones, fluttery ears, and gentle eye are shaved shallow to stay dark while the face and neck are carved thin to shine. Start with the outline, establish the spot pattern early, and save the delicate mane fringe for last. This kind of surface shading rewards a sharp micro-gouge and patience.

This is an AI-generated concept image: a realistic, carvable design idea rather than a photo of a finished carve. AI concepts are always labeled and sit out the leaderboard and the contest.

No ratings yet · Sign in to rate
Comments (0)

  • No comments yet — be the first.

Save without an account. Sign in to like or comment.

Our tips for carving a similar design

The core trick here is depth control: the whole image is shaded at different depths rather than cut all the way through, so light reads as a range of amber tones. You keep the ossicones, ears, and eye shallow so they stay dark, then thin the face and neck coat so the spots glow. Since this is a concept image, treat it as a plan for how you could carve a similar giraffe on a real pumpkin.

Written by PumpkinCarvingIdeas.com, inspired by the image above. These are our suggestions, not instructions from the uploader. This approach to the AI concept has not been tested on a real pumpkin.

From pumpkin to porch

  1. Pick a tall pumpkin and prep it

    Choose a large, smooth, upright pumpkin so the head and neck have room to run top to bottom. Cut a lid from the bottom or the back rather than the top so the stem stays as the visible part above the head. Scrape the inside wall behind the face down to about one inch thick with a loop tool so light passes evenly. A thinner, even wall is what lets shading glow, so take your time here.

  2. Transfer the outline and map the spots

    Tape your giraffe stencil in place and poke the main outline, the eye, the ears, and the edges of each coat patch. Establish the spot pattern early with light poke marks so you can see the whole map before you remove any skin. Remove the paper and connect the dots with a pencil. Getting the patchwork layout right now saves you from crowding or losing spots later.

  3. Shade the coat with a micro-gouge

    Switch to skin-peeling, not cutting through. Use a sharp micro-gouge to shave the flesh between the dark spots so it glows mid amber, leaving the spot edges thicker and darker. Vary your depth: shave a little for a dim spot, a little more for a brighter gap. Work in small passes and check against a light often, because you can always remove more but you cannot put flesh back.

  4. Build the bright face and neck

    On the muzzle, cheek, and front of the neck, carve thinner so those areas read as the brightest amber. Blend the transition gradually so there is no hard line where the glow jumps. Keep the eye and the inner ossicone tips shallow so they stay dark and give the face its calm expression. Frequent light checks keep the balance of light and shadow honest.

  5. Save the delicate mane fringe for last

    The thin mane fringe along the back of the neck is the most fragile part, so leave it until the surrounding flesh is done. Make short, fine strokes with the tip of the micro-gouge, leaving small bridges of skin between strands so nothing tears away. If a strand feels loose, stop and shade around it instead of forcing depth. Delicate detail done at the end is less likely to crack under handling.

  6. Light it and photograph

    Drop in a battery LED light, warm white or amber gives the best skin-tone glow. Set it low and slightly behind the face so the shading catches from within. Dab cut edges with petroleum jelly to slow drying and keep the tones crisp. Photograph at dusk on a porch step so the amber coat stands out against the dark.

Gather your supplies

Check things off as you get ready.

Work on a stable surface, keep your free hand out of the cutting path, and have an adult handle sharp tools.

Three levels of light

  • Leave intact

    The ossicones, fluttery ears, eye, and the dark spot edges of the coat stay as untouched skin.

  • Peel & shade

    The flesh between the spots on the coat and neck gets shaved thin for a soft mid amber glow.

  • Cut through

    Keep true cutouts minimal; the brightest muzzle, cheek, and front-of-neck areas are simply carved thinnest rather than opened all the way.

Learn the carving basics

Before you start cutting

How do I keep the spots from blurring into one another?

Leave the skin at the edge of each spot thicker and darker while you shave the gaps between them brighter. That contrast is what makes each patch read clearly. Check against a light as you go, since blur usually means you carved the edges too thin.

Do I need to cut all the way through anywhere?

Not really. This design is almost entirely surface shading at varying depths, which is what gives the soft amber tones. If you cut clear through, you will get harsh hot spots that break the gentle portrait look, so keep even the brightest areas as thin flesh.

Why carve the mane fringe last?

Those thin strands are the weakest structural part of the whole design. Carving them last means the surrounding flesh is already set, so there is less flexing and cracking while you work the fine detail. Leaving small skin bridges between strands keeps them from snapping off.

Your take belongs here, too.

Changed a detail? Made it simpler? Share a photo of your version and tell the community what worked.

Share your pumpkin

More pumpkins like this

You've reached the end · 8 pumpkins
The Patch Report

Fresh pumpkins, in your inbox.

The best new carvings, ideas worth stealing, and how-tos for carving season. Short, seasonal, and gone by November.

A short email during carving season. Unsubscribe anytime. See our privacy policy.