Halloween Pumpkin Carving Contest · Starts October 1st · $500 in prizes
← Back to ideas
@ai_concepts
Sep 25, 2026
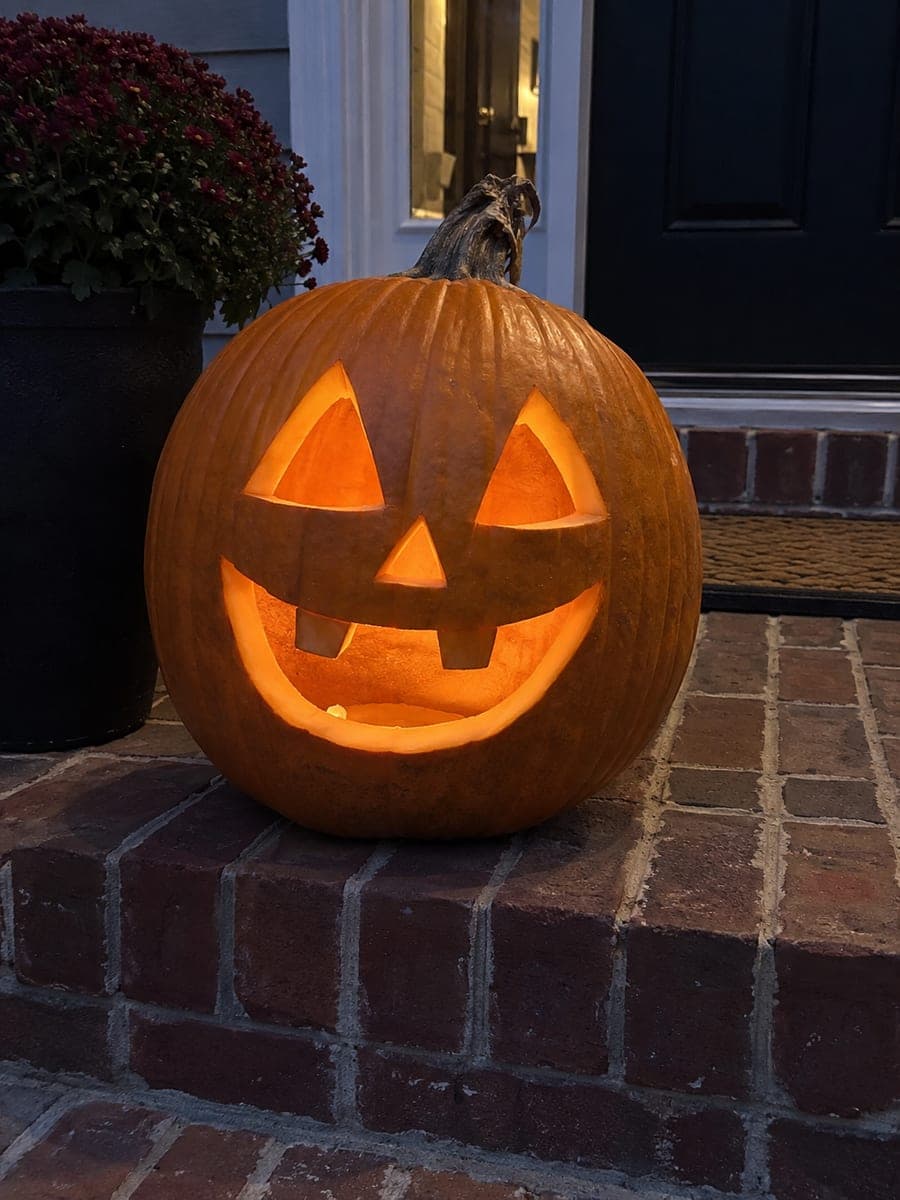
Classic Two-Tooth Jack-O-Lantern on Brick Front StepsAI
0

Report this carving

Tell us what is wrong. Reports are private.

Classic Two-Tooth Jack-O-Lantern on Brick Front Steps

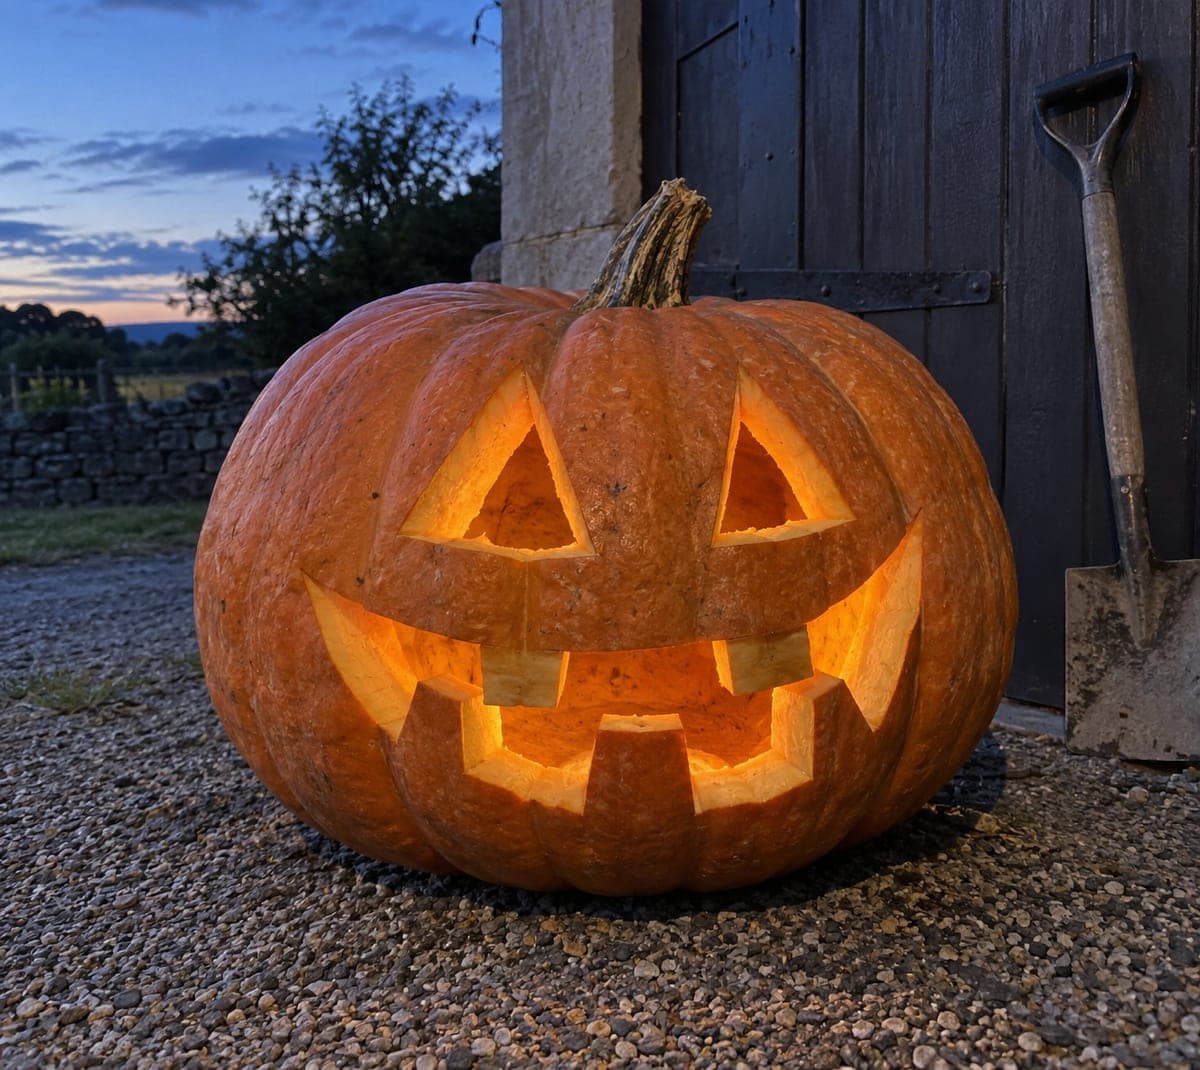
Two big triangular eyes, a small triangular nose, and a broad open smile with two chunky upper teeth make this 40-centimeter pumpkin the textbook front-porch jack-o-lantern. Transfer the face with a printed template and masking tape, score through the paper, then remove it before cutting so the saw tracks cleanly. Cut the lid at an angle so it rests in place without falling in. Carve this large pumpkin carving idea the evening you plan to light it, and drop in a LED pillar candle to avoid fire risk on a wooden door frame.

No ratings yet · Sign in to rate
Comments (0)

  • No comments yet — be the first.

Save without an account. Sign in to like or comment.

Our tips for carving a similar design

This large pumpkin is the textbook front-porch jack-o-lantern: two big triangles, a small nose, and a wide smile with two chunky rooted teeth. Transferring the face via a printed template on masking tape keeps proportions even on the broad surface. An angled lid cut and LED pillar candle keep this doorstep decoration safe around wooden door frames.

From pumpkin to porch

  1. Cut the angled lid

    Use a long serrated knife held at a 45-degree inward angle to cut the lid, so it rests back in place on a ledge rather than falling through. Remove the lid and set it aside. An adult should handle all knife work on this large pumpkin.

  2. Hollow thoroughly

    Scoop out all seeds and stringy fiber with a large spoon or ice cream scoop. Scrape the interior walls to about 2 to 2.5 cm, paying particular attention to the face area so light distributes evenly.

  3. Transfer the face template

    Print a face template sized to the pumpkin, tape it to the front with masking tape, and score through the paper with a toothpick or stylus to transfer all outlines. Remove the template and connect the poke marks with a permanent marker.

  4. Saw the triangle eyes and nose

    Use a medium-toothed pumpkin saw for the straight edges of the triangles. Start at a corner, saw to the next corner, and complete each triangle with three strokes. Push the triangular plug inward and remove it through the lid opening.

  5. Cut the smile and teeth

    Cut the outer perimeter of the smile first, leaving the two chunky tooth shapes intact as attached rind islands. Then cut the concave scallops between and around the teeth. The teeth must remain rooted to either the upper or lower smile edge; never free-float them.

  6. Light and place on the porch

    Insert an LED pillar candle for safe use near a wooden door frame. Carve the same evening you plan to display it so the pumpkin stays fresh, and bring it inside at the end of the night to extend its life.

Written with AI to match this design

Gather your supplies

Check things off as you get ready.

Work on a stable surface, keep your free hand out of the cutting path, and have an adult handle sharp tools.

Three levels of light

  • Leave intact

    All rind on the back and sides of the pumpkin, plus the rooted chunky tooth shapes, stay solid and dark.

  • Peel & shade

    None; this classic design uses only cut-through apertures.

  • Cut through

    Both triangle eyes, the small triangular nose, and the full smile opening (with tooth islands retained) are cut completely through.

Learn the carving basics

Before you start cutting

Why cut the lid at an angle rather than straight down?

A straight vertical cut lets the lid slide through the opening and fall inside, which is frustrating and sometimes damages the interior. An inward angle creates a small ledge on the pumpkin wall that catches the lid from below.

My pumpkin keeps rocking while I try to saw. How do I stabilize it?

Place the pumpkin on a damp folded towel on a stable table. The towel grips the base and prevents rolling. For a very large pumpkin, have a second person hold it while you work.

How long will a 40 cm carved pumpkin last outdoors before it starts to collapse?

Typically five to seven days in cool autumn weather. Warm or humid conditions shorten that to three to four days. Rubbing petroleum jelly on all cut edges after carving seals in moisture and can add a couple of extra days.

Your take belongs here, too.

Changed a detail? Made it simpler? Share a photo of your version and tell the community what worked.

Share your pumpkin

More pumpkins like this

You've reached the end · 8 pumpkins
The Patch Report

Fresh pumpkins, in your inbox.

The best new carvings, ideas worth stealing, and how-tos for carving season. Short, seasonal, and gone by November.

A short email during carving season. Unsubscribe anytime. See our privacy policy.