Halloween Pumpkin Carving Contest · Starts October 1st · $500 in prizes
← Back to ideas
@ai_concepts
Sep 25, 2026
Ornate Owl Jack-O-Lantern With Crossbar Eyes and Feather RowsAI
0

Report this carving

Tell us what is wrong. Reports are private.

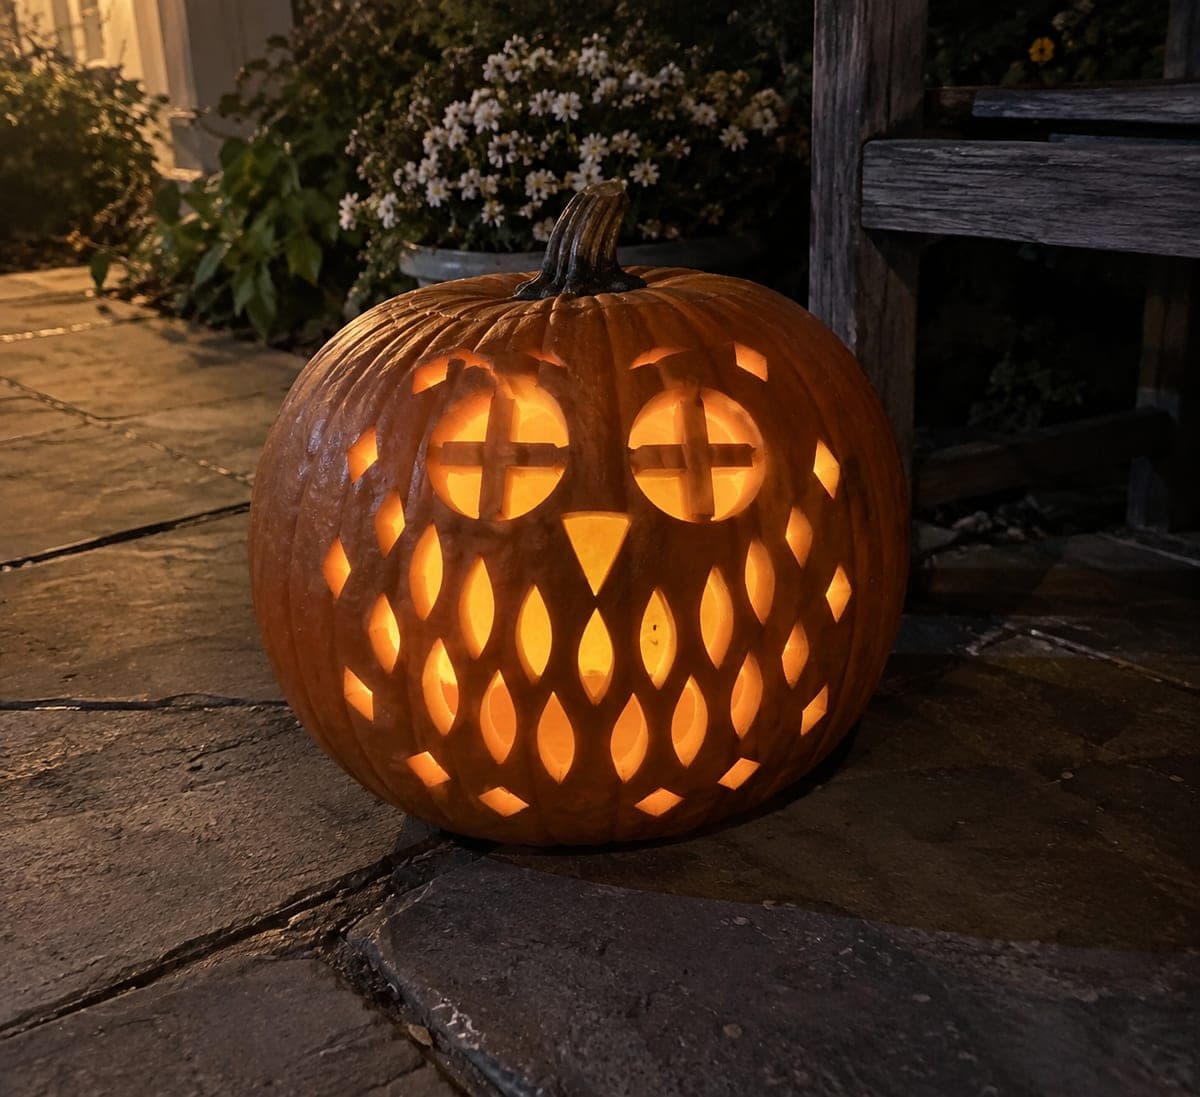
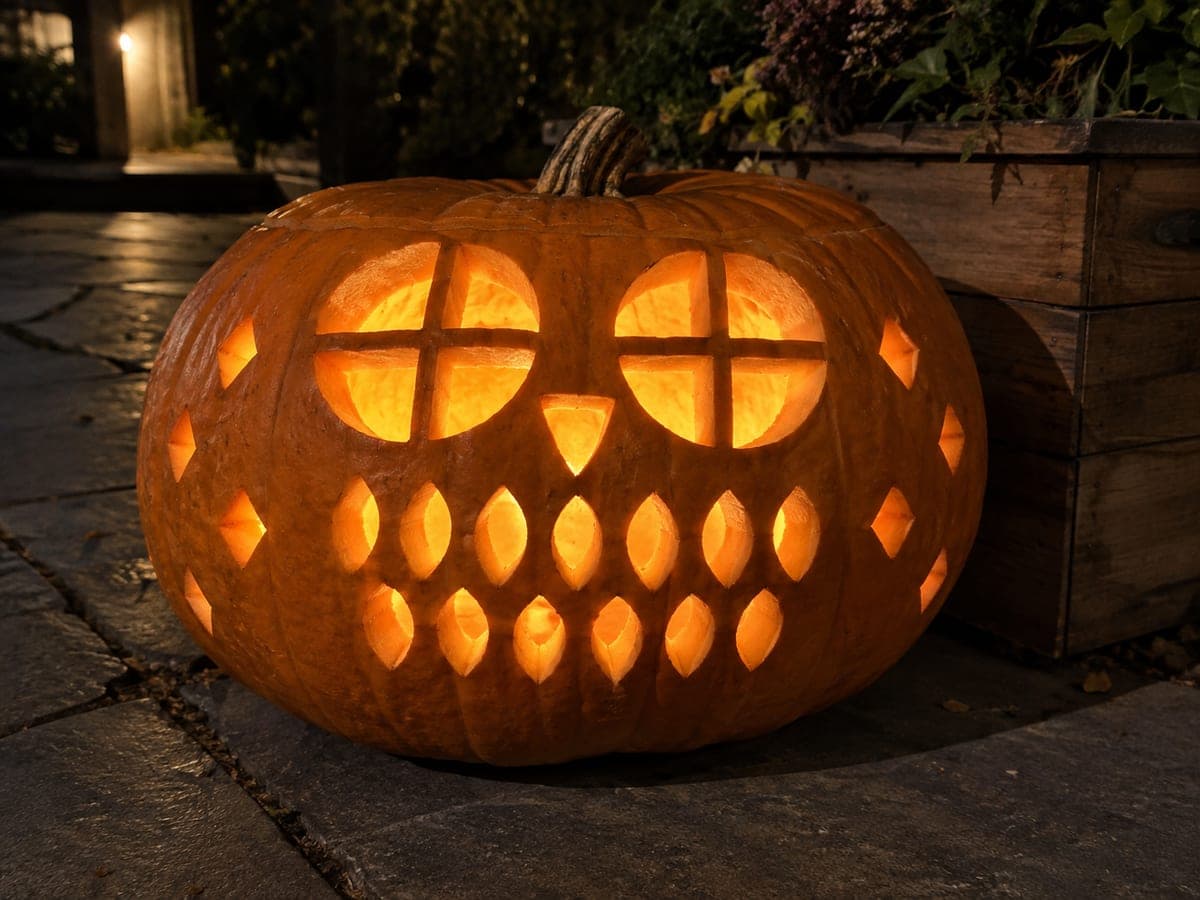
Ornate Owl Jack-O-Lantern With Crossbar Eyes and Feather Rows

This 45-centimeter pumpkin carries an ornate owl made of two crossbar-divided round eyes, a triangular beak, twenty separate feather-shaped holes in rows, and twelve small diamond accents, all held together by broadly connected rind with no outer owl outline. Plan the two eyes first since the four-way crossbar must attach at all edges; any crossbar that is too thin will break under the weight of the adjacent rind. Cut feathers row by row from top to bottom, clearing each aperture fully before advancing. A color LED inside shifts the owl between amber, green, and blue tones.

No ratings yet · Sign in to rate
Comments (0)

  • No comments yet — be the first.

Save without an account. Sign in to like or comment.

Our tips for carving a similar design

Two crossbar-divided round eyes, a triangular beak, twenty feather-shaped holes in rows, and twelve diamond accents fill a 45-centimeter pumpkin with an ornate owl, all connected by broad rind with no floating sections. The four-way crossbar inside each eye must attach at all four edges or it will break under the adjacent rind's weight. Cutting feather rows from top to bottom distributes stress progressively and prevents lower rind from cracking under upper weight.

From pumpkin to porch

  1. Hollow and prep

    Cut an angled lid and fully clear seeds and fiber. Scrape the interior to about 2 cm evenly across the full face area. The large number of apertures means uneven thinning will create visibly brighter and darker patches.

  2. Plan the crossbar eyes carefully

    The crossbar inside each eye must be wide enough to hold the rind: aim for 8 to 10 mm per crossbar arm. Sketch both eyes on paper and verify all four crossbar ends attach to the outer ring before transferring. A crossbar arm that is too thin will crack when the adjacent rind is removed.

  3. Transfer the full design

    Tape a full-size paper sketch of the owl to the pumpkin and toothpick-poke all outlines. Remove the paper and connect poke marks with a marker, then confirm every crossbar end, every feather boundary, and every diamond outline is clearly visible.

  4. Cut the crossbar eyes and beak

    For each eye, cut the outer circle first to establish the ring, then cut the four sections around the crossbar using a fine detail knife. Work slowly around each crossbar arm to keep all four attachment points intact. Cut the triangular beak below the eyes and remove its plug.

  5. Cut feather rows top to bottom

    Work through the feather shapes one row at a time from the top of the design downward, clearing each aperture completely before advancing to the next row. This prevents the upper rind from becoming unsupported while lower rows are still being cut.

  6. Cut diamond accents and light

    Finish with the twelve diamond holes, keeping all four corner cuts clean and meeting precisely. Insert a color LED strip or color-changing puck and replace the lid. The color shifts cycle through amber, green, and blue tones across the full feather array.

Written with AI to match this design

Gather your supplies

Check things off as you get ready.

Work on a stable surface, keep your free hand out of the cutting path, and have an adult handle sharp tools.

Three levels of light

  • Leave intact

    The broad rind connecting all sections, the crossbar arms inside each eye, and all rind between feather rows stay solid and dark.

  • Peel & shade

    None; every glow effect is produced by the cut-through apertures.

  • Cut through

    The four quadrants of each eye (around the crossbar), the triangular beak, all twenty feather holes, and all twelve diamond holes are cut completely through.

Learn the carving basics

Before you start cutting

The four-way crossbar sounds fragile. What is the minimum crossbar arm width?

Eight millimeters per arm is the practical minimum on a pumpkin this size. Thinner crossbars look elegant but tend to crack when the outer circle is cut, since removing the surrounding rind releases pressure that was holding the crossbar rigid.

How do I keep twenty feather shapes consistent in size and spacing?

Cut a single feather template from cardstock and trace it for each hole rather than drawing each one freehand. Consistent template use is faster and produces a much more professional-looking result than trying to match proportions by eye across twenty shapes.

The design has a lot of detail packed close together. Is there a risk of the whole face cracking in?

The key protection is the broad connected rind between every section. As long as no rib is narrower than 10 mm and the feathers are cut top to bottom so upper rind is never left unsupported for long, the face holds together reliably.

Your take belongs here, too.

Changed a detail? Made it simpler? Share a photo of your version and tell the community what worked.

Share your pumpkin

More pumpkins like this

You've reached the end · 8 pumpkins
The Patch Report

Fresh pumpkins, in your inbox.

The best new carvings, ideas worth stealing, and how-tos for carving season. Short, seasonal, and gone by November.

A short email during carving season. Unsubscribe anytime. See our privacy policy.