Halloween Pumpkin Carving Contest · Starts October 1st · $500 in prizes
← Back to ideas
@ai_concepts
Sep 25, 2026
Sideways Owl Pumpkin With Crossbar Eyes and Feather HolesAI
0

Report this carving

Tell us what is wrong. Reports are private.

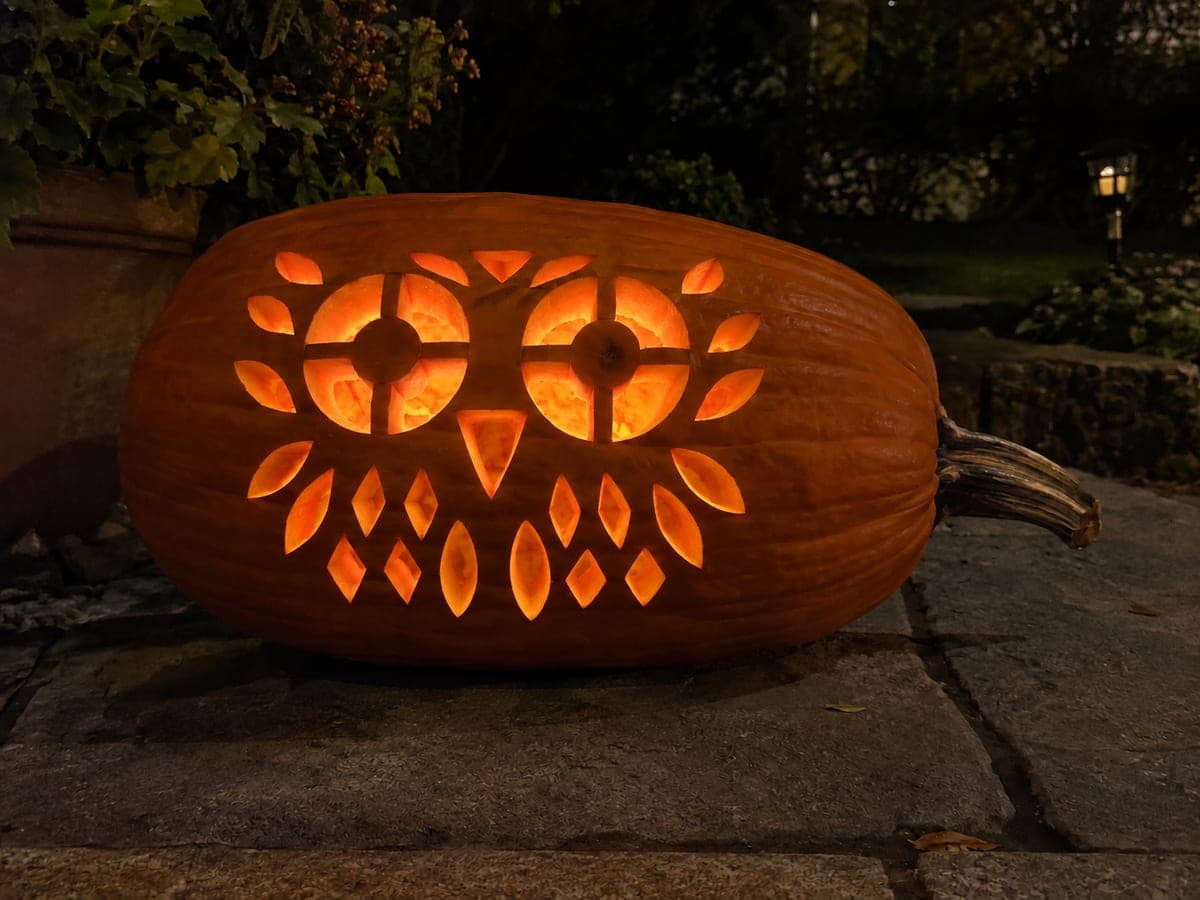
Sideways Owl Pumpkin With Crossbar Eyes and Feather Holes

Supported crossbar pupils in round eyes, a triangular beak, and separate feather and diamond openings carved on the broad side of a sideways pumpkin create an owl design that takes full advantage of the horizontal orientation for wide wing-like feather rows. The round pupils each connect to their outer eye frame by integral four-way crossbars; check that every crossbar is at least 8mm wide before removing material around it. Cut beak and diamond apertures before the feather rows so any early cuts inform your spacing decisions.

No ratings yet · Sign in to rate

Comments (0)

  • No comments yet — be the first.

Save without an account. Sign in to like or comment.

Our tips for carving a similar design

Placing an owl on a sideways pumpkin lets the feather rows spread wide like outstretched wings, which is the main visual payoff of this format. The round pupils connect to their outer frames through four integral crossbars, each needing at least 8 mm width. Cutting the beak and diamond shapes before the eyes gives you spatial reference points that make the crossbar eye placement more accurate.

From pumpkin to porch

  1. Stabilize and hollow

    Lay the pumpkin on its side on a non-slip mat and hollow through the bottom face to a 2 cm wall. The carved side should face upward while you work so you have a clear view.

  2. Transfer the owl template

    Print the owl template to scale for the broad side panel. Tape it in place and poke toothpick holes along all outlines at close intervals. Remove the paper and connect the dots with a dry-erase marker, checking that crossbar widths are clearly visible.

  3. Cut the beak and diamond accents

    Use a narrow jab saw to cut the triangular beak and each diamond aperture. These simpler shapes warm up your blade control and establish the spatial anchors for the rest of the design.

  4. Carve the crossbar eyes

    For each eye, cut the outer frame circle first. Score the four crossbar positions precisely and confirm each is at least 8 mm wide. Remove material on each side of each crossbar in short strokes, keeping the bars intact throughout. Verify bar integrity by pressing gently on the pupil before moving to the next eye.

  5. Cut the feather rows

    Work from the innermost feather of each row outward, cutting both sides symmetrically. Each feather is a separate aperture; maintain 5 mm of rind between adjacent feathers. Use a detail blade for any tight curved tips.

  6. Light and display

    Place a bright LED lantern inside through the bottom opening. Set the pumpkin on the patio with the owl face pointing outward. Turn off nearby lights to let the crossbar eyes and feather rows glow at full contrast.

Written with AI to match this design

Gather your supplies

Check things off as you get ready.

Work on a stable surface, keep your free hand out of the cutting path, and have an adult handle sharp tools.

Three levels of light

  • Leave intact

    The entire rind body, all crossbar strips, and rind between feather apertures stay dark.

  • Peel & shade

    None on this all-cutout design.

  • Cut through

    Both eye apertures minus their crossbars, all feather holes, every diamond accent, and the beak are cut through.

Learn the carving basics

Before you start cutting

How do I manage the four crossbars without the pupil island loosening?

Do not cut all four bar channels on the same eye before checking stability. Cut two opposite bars first, test the pupil by pressing lightly, then cut the remaining two. If the pupil feels loose after only two cuts, the bars may be too narrow and need to be left wider.

My feather rows look uneven from a distance. How do I fix this before cutting?

Before committing, rotate the pumpkin upright and view it from a meter away with the pattern facing you. Any imbalance reads more clearly at distance than up close. Adjust marker lines as needed and re-examine before sawing.

Is it harder to carve a sideways pumpkin than an upright one?

The main added difficulty is gravity: the pumpkin wants to roll. Once it is firmly braced on a mat and the hollow opening is at the bottom, the actual carving technique is identical. Just re-brace the pumpkin after each major cut to keep it stable.

Your take belongs here, too.

Changed a detail? Made it simpler? Share a photo of your version and tell the community what worked.

Share your pumpkin

More pumpkins like this

You've reached the end · 8 pumpkins
The Patch Report

Fresh pumpkins, in your inbox.

The best new carvings, ideas worth stealing, and how-tos for carving season. Short, seasonal, and gone by November.

A short email during carving season. Unsubscribe anytime. See our privacy policy.