Halloween Pumpkin Carving Contest · Starts October 1st · $500 in prizes
← Back to ideas
@ai_concepts
Sep 25, 2026
Detailed Party Symbol Hard Pumpkin CarvingAI
0

Report this carving

Tell us what is wrong. Reports are private.

Detailed Party Symbol Hard Pumpkin Carving

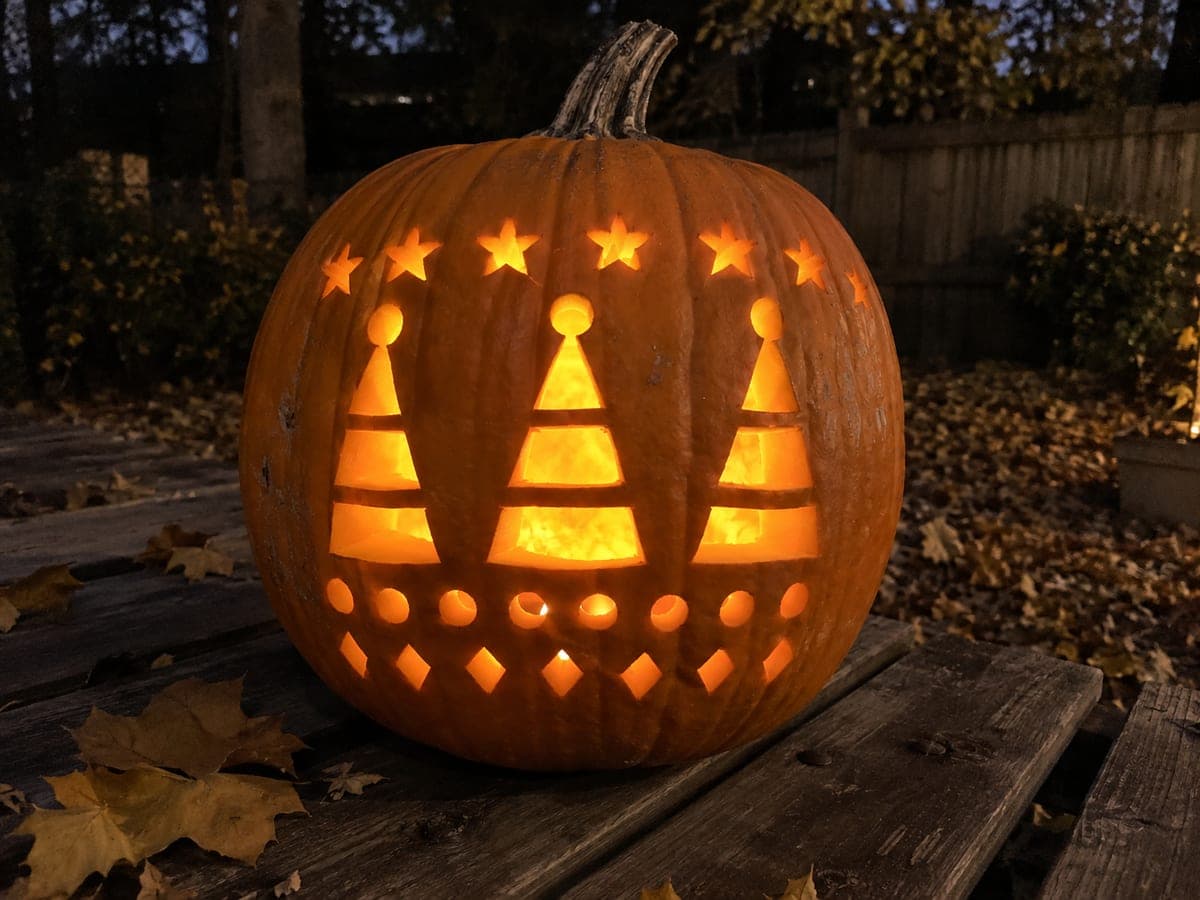
Intricate party-themed cutouts with closely spaced retained rind elements challenge experienced carvers at a pumpkin carving party gathering. Plan the order of cuts so structural bridges are preserved until the very last aperture is removed. Backed shallow details add layered visual depth and should be scored after all through-cuts are complete to avoid weakening the shell too early. Photographing the finished jack-o-lantern from directly in front with a single candle inside yields the best image to share from the party.

No ratings yet · Sign in to rate

Comments (0)

  • No comments yet — be the first.

Save without an account. Sign in to like or comment.

Our tips for carving a similar design

Closely spaced retained rind elements with a planned cutting order are the technical challenge at this level, and getting the order right prevents structural failures that would be invisible until an important bridge suddenly disappears. All through-cuts come before backed shallow details so the shell is at its strongest during the most demanding phase. Photographing the finished pumpkin from directly in front with a single candle inside yields the best image.

From pumpkin to porch

  1. Plan the full cut order in writing

    Before transferring the template, number each aperture on the design sketch from first to last in a sequence that preserves structural bridges until the final cut. Apertures near the outer shell go early; apertures surrounded by multiple retained elements go last. Write the sequence on a sticky note kept visible throughout the carve.

  2. Transfer and annotate clearly

    Transfer the design with pin holes and use different marker colors for through-cuts, backed details, and retained sections. Backed detail areas should receive an additional X or diagonal line so they are never accidentally cut through in the busy field of closely spaced elements.

  3. Cut apertures in the planned sequence

    Follow the numbered sequence strictly, not cutting ahead even if a nearby aperture looks easier. After every third or fourth cut, grip the pumpkin gently to test for structural flex. Any unexpected movement means a bridge has become thinner than planned and the sequence may need to be adjusted for the remaining cuts.

  4. Maintain consistent rind margins

    On closely spaced designs, the retained rind between adjacent apertures is often only a half inch wide. Cut each aperture individually and completely before starting the adjacent one, so the blade is never traveling parallel to a previously cut edge within that half-inch margin.

  5. Add backed shallow details after all through-cuts

    Once all apertures are confirmed solid, score and peel the backed detail areas. These shallow elements are the finishing layer that separates a hard carving from a mediocre one, so take your time and test glow with a flashlight after each backed area is peeled.

  6. Photograph from directly in front with a single candle

    A single candle placed behind center throws the design into sharp candlelit relief and animates the backed details more dramatically than a steady LED. Shoot the photo in a darkened room from directly in front at eye level and share it from the party gathering.

Written with AI to match this design

Gather your supplies

Check things off as you get ready.

Work on a stable surface, keep your free hand out of the cutting path, and have an adult handle sharp tools.

Three levels of light

  • Leave intact

    Closely spaced retained rind bridges and surrounding shell sections stay dark, defining the intricate pattern

  • Peel & shade

    Backed shallow detail areas scored after all through-cuts, adding a secondary glowing texture layer

  • Cut through

    All main party-symbol apertures and closely spaced secondary cutouts fully open for layered bright light

Learn the carving basics

Before you start cutting

How do I recover if I accidentally remove a structural bridge?

Stop immediately and assess whether the freed section can be reattached with toothpicks and craft glue from the inside. If the break is at a corner, a toothpick bridge spanning the gap often holds well. If the break is along a long edge, the section may need to be removed intentionally and the design adjusted to treat that area as an additional open aperture.

What is the hardest part of this design for an experienced carver?

Maintaining clean edges between adjacent closely spaced apertures without the blade slipping into the narrow retained rind bridge between them is the highest-risk moment. Using a fresh sharp blade for this stage, rather than a dull one that requires more force, significantly reduces the chance of an accidental bridge cut.

How do I keep track of which backed details I have already done in a complex design?

Mark each backed area with a small check mark in pencil on the template before you start. Cross off each one on the template as you complete the peel. This simple tracking system prevents accidentally re-scoring an area you already finished, which can thin it past the safe depth.

Your take belongs here, too.

Changed a detail? Made it simpler? Share a photo of your version and tell the community what worked.

Share your pumpkin

More pumpkins like this

You've reached the end · 8 pumpkins
The Patch Report

Fresh pumpkins, in your inbox.

The best new carvings, ideas worth stealing, and how-tos for carving season. Short, seasonal, and gone by November.

A short email during carving season. Unsubscribe anytime. See our privacy policy.