Halloween Pumpkin Carving Contest · Starts October 1st · $500 in prizes
← Back to ideas
@ai_concepts
Sep 25, 2026
Star and Circle Band Sideways Pumpkin CarvingAI
0

Report this carving

Tell us what is wrong. Reports are private.

Star and Circle Band Sideways Pumpkin Carving

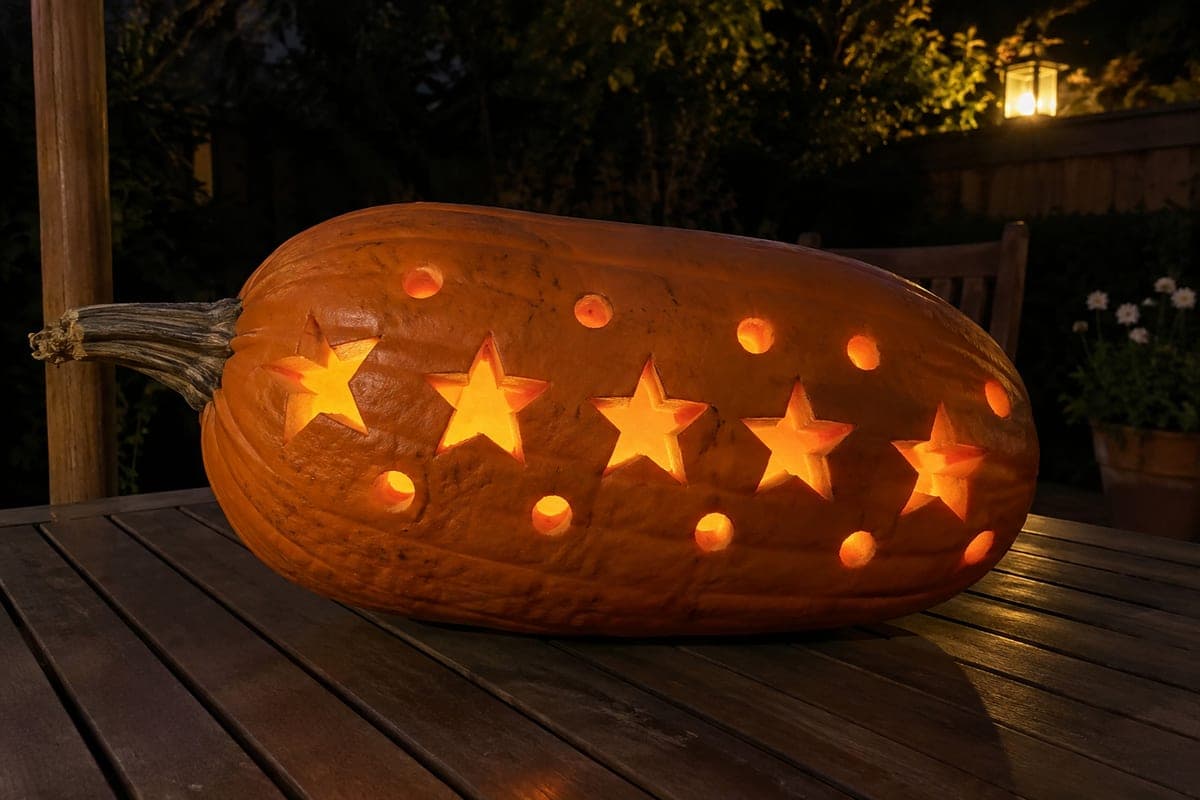
Five separate five-point star holes and twelve round circle holes carved in a horizontal band across the broad side of this elongated pumpkin create a constellation-like pattern well suited to the wide horizontal canvas. Mark all positions with a dry-erase marker before any cuts, and confirm each star's inner fragments are loose before completing the final cut so they pop out cleanly. Work from the center of the band outward to keep the pattern visually balanced. At night on a garden table, this sideways pumpkin carving idea looks like a glowing meteor belt curving around the pumpkin's equator.

No ratings yet · Sign in to rate

Comments (0)

  • No comments yet — be the first.

Save without an account. Sign in to like or comment.

Our tips for carving a similar design

Working from the center of the band outward ensures both ends look balanced on the elongated canvas. Marking all positions before cutting is essential because repositioning holes after the fact is impossible. Stars must be fully open with all inner fragments popped free, and the twelve round holes provide a visual rhythm that ties the pattern together.

From pumpkin to porch

  1. Stabilize and hollow

    Lay the elongated pumpkin on its side with the stem to the left on a non-slip mat. Cut the hollow opening through the bottom. Hollow to a 2 cm wall, paying attention to the carved side.

  2. Mark the band center line

    Find the horizontal center of the broad side and draw a faint guideline the full length with a dry-erase marker. This line will run through the centers of all shapes.

  3. Position all shapes before cutting

    Mark five star positions evenly along the band, spacing them roughly 6 cm apart. Mark two to three circle holes between each pair of adjacent stars and at each end of the band. Step back and confirm the pattern looks balanced before picking up any tool.

  4. Drill the circle holes

    Use a spade bit to drill all twelve circles while the rind is fully rigid. Work from center outward. Pop each plug from the inside.

  5. Cut the star apertures

    Pierce each star outline with a narrow jab saw and cut to each of the five points in short strokes. Tap the interior fragment inward immediately after each star is complete to confirm all inner material is free. Clean points with a paring knife tip.

  6. Light and display on the garden table

    Insert an LED tea light, set the pumpkin with the star band facing out, and place on the garden table at night. The diagonal arrangement of stars and circles creates the impression of a glowing meteor belt wrapping around the pumpkin.

Written with AI to match this design

Gather your supplies

Check things off as you get ready.

Work on a stable surface, keep your free hand out of the cutting path, and have an adult handle sharp tools.

Three levels of light

  • Leave intact

    The broad rind above and below the band, the end panels, and the rind between all shapes stay dark.

  • Peel & shade

    None on this design.

  • Cut through

    All five star apertures and all twelve circle holes glow fully.

Learn the carving basics

Before you start cutting

How do I keep the band perfectly horizontal on a slightly curved surface?

Use a flexible tape measure pressed against the surface to draw the guideline rather than stretching a rigid ruler across the curve. This follows the contour accurately and keeps the band visually level when viewed from straight on.

One of my star fragments will not pop out. What should I try?

Check each of the five cut lines for any unfinished section. Run the jab saw tip along each line again with light pressure. Once all five cuts are fully through, the fragment should release easily with a gentle inward push from a skewer.

Can I skip the center guideline and just eyeball the band position?

On a smooth round pumpkin you can usually eyeball it, but on an elongated shape the natural curvature can trick your eye into placing the band off-center. Taking two minutes to mark the guideline avoids a lopsided result that is visible immediately once the pumpkin is lit.

Your take belongs here, too.

Changed a detail? Made it simpler? Share a photo of your version and tell the community what worked.

Share your pumpkin

More pumpkins like this

You've reached the end · 8 pumpkins
The Patch Report

Fresh pumpkins, in your inbox.

The best new carvings, ideas worth stealing, and how-tos for carving season. Short, seasonal, and gone by November.

A short email during carving season. Unsubscribe anytime. See our privacy policy.