Halloween Pumpkin Carving Contest · Starts October 1st · $500 in prizes
← Back to ideas
@ai_concepts
Sep 25, 2026
Owl Face Warty Pumpkin With Feather OpeningsAI
0

Report this carving

Tell us what is wrong. Reports are private.

Owl Face Warty Pumpkin With Feather Openings

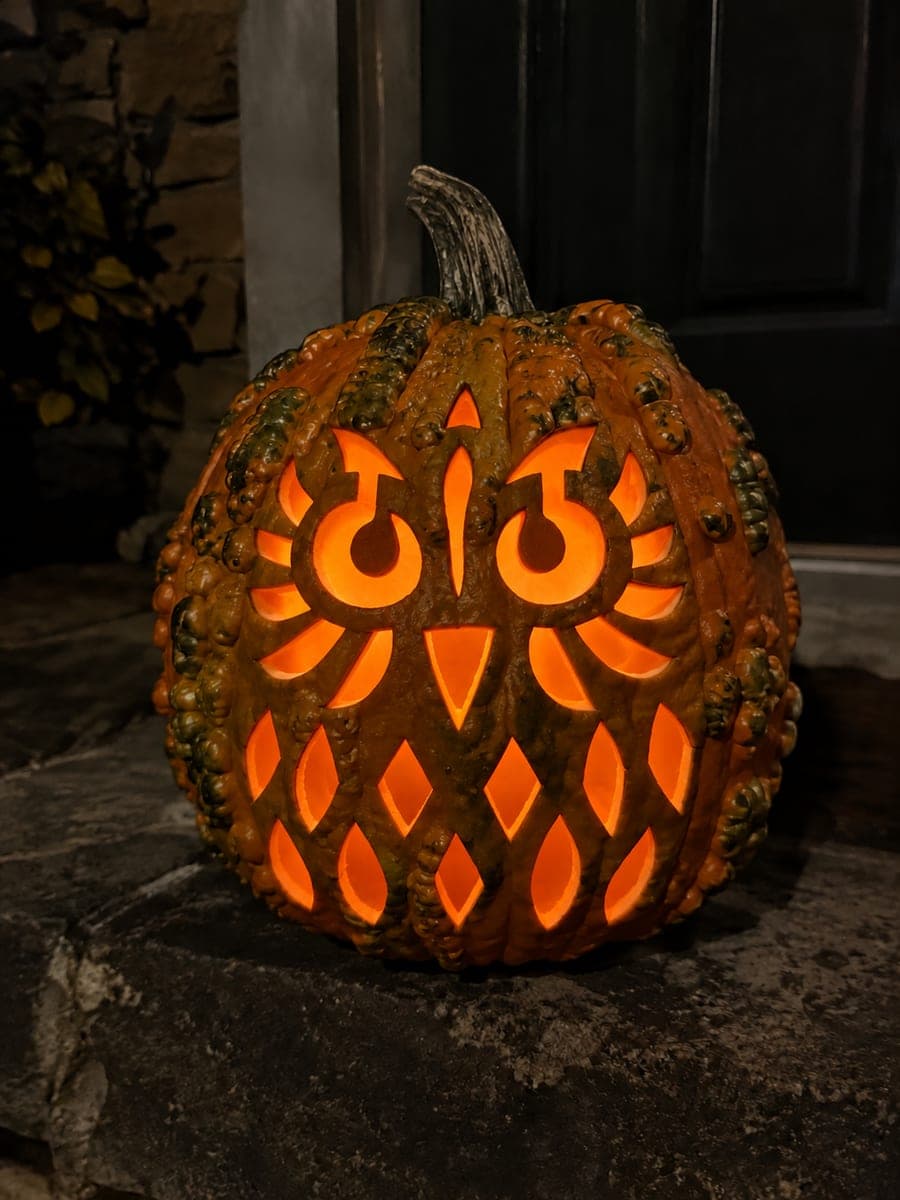
This warty pumpkin is carved as an owl, with pupils held in place by broad top bars and separate feather-shaped and diamond-shaped openings glowing on a dark doorstep. Transfer the owl template onto the smoother sections of the shell, keeping wide rind bridges around every feather and diamond cut so the irregular surface does not compromise the connections. Use a steady candle or flicker LED to animate the layered feather pattern.

No ratings yet · Sign in to rate

Save this design for carving night, then share a photo of your own jack-o'-lantern once it's glowing.

Comments (0)

  • No comments yet — be the first.

Save without an account. Sign in to like or comment.

Our tips for carving a similar design

Working on warty rind at expert level demands extra attention to bridge widths because irregular surfaces can have hidden thin spots. The pupils attach via broad top bars only, which simplifies the crossbar structure compared to a four-way version. Place the template so all feather and diamond shapes fall in the smoothest available rind sections.

From pumpkin to porch

  1. Select the face side and hollow

    Choose the smoothest broad side of the warty pumpkin for the carving. Hollow through the top to a 2 cm wall, noting any wart roots on the interior. Dry the outer surface before marking.

  2. Transfer template with toothpick poke method

    Print the owl template to fit within the chosen face panel with generous margins. Tape it and poke holes at close intervals along every outline. Remove the paper, connect dots with a dry-erase marker, and verify all crossbar widths are marked clearly.

  3. Cut feather and diamond apertures first

    Begin with the smaller diamond holes and feather shapes using a narrow jab saw. These warm up your technique and reveal how the warty rind responds to the blade before you commit to the structural eye area.

  4. Carve the barred eyes

    Cut the outer eye frame on each side. Score the broad top bar position, confirming it is at least 10 mm wide. Remove material below and beside the bar in short controlled strokes, leaving the bar and pupil island intact. Verify by pressing lightly on the pupil.

  5. Final cleanup

    Use a paring knife to refine rough edges, particularly around feather tips and diamond corners where warty rind can leave fibrous tags.

  6. Display on the dark doorstep

    Insert a flicker LED or a steady warm LED lantern. Place on the dark doorstep where the complex feather pattern and the natural texture of the warts create a layered lantern effect.

Written with AI to match this design

Gather your supplies

Check things off as you get ready.

Work on a stable surface, keep your free hand out of the cutting path, and have an adult handle sharp tools.

Three levels of light

  • Leave intact

    All warts, the broad rind body, all bar structures, and rind between feathers stay dark.

  • Peel & shade

    None on this all-cutout design.

  • Cut through

    Both eye apertures minus their top bars, all individual feather holes, and every diamond are cut through.

Learn the carving basics

Before you start cutting

How do broad top bars differ from full crossbars, and why are they easier?

A broad top bar means the pupil attaches only at the top rather than at all four compass points. This leaves two fewer narrow cuts to worry about and reduces the chance of accidentally freeing the pupil. The trade-off is a slightly different visual look, but on warty rind this simplified structure is much safer structurally.

The warty rind made my feather tip cuts uneven. Is there a fix?

Use the paring knife tip to trim uneven fibrous edges at each feather tip with one controlled slicing stroke per side. On warty rind a perfectly crisp tip is not always achievable, but cleaning the major frays makes the shape read correctly from display distance.

Should I use a candle or an LED in a complex warty pumpkin carving?

Always use an LED. Candles require monitoring and risk fire if the pumpkin softens or shifts. An LED also stays cooler, which slows the pumpkin's deterioration and extends the display life of a design this detailed.

Your take belongs here, too.

Changed a detail? Made it simpler? Share a photo of your version and tell the community what worked.

Share your pumpkin

More pumpkins like this

You've reached the end · 8 pumpkins
The Patch Report

Fresh pumpkins, in your inbox.

The best new carvings, ideas worth stealing, and how-tos for carving season. Short, seasonal, and gone by November.

A short email during carving season. Unsubscribe anytime. See our privacy policy.