Halloween Pumpkin Carving Contest · Starts October 1st · $500 in prizes
← Back to ideas
@ai_concepts
Jul 21, 2026
Cuddly Koala Face Painted No-Carve PumpkinAI
0

Cuddly Koala Face Painted No-Carve Pumpkin

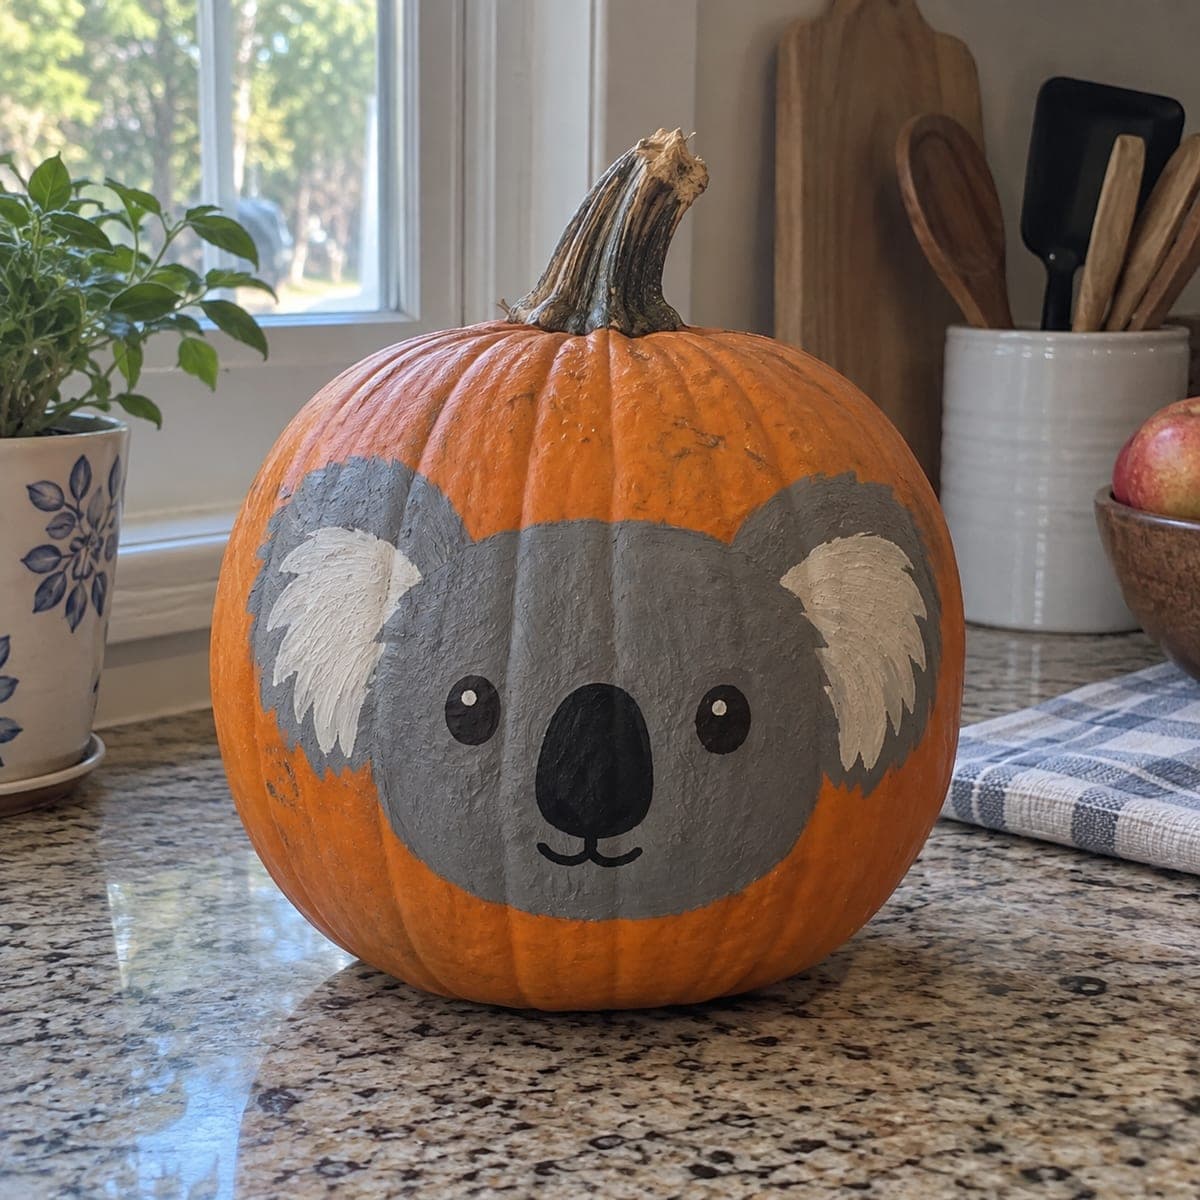
A gray koala face with big fluffy white ears, a wide black nose, and a tiny smile turns this pumpkin into the friendliest thing on the counter. It is an easy no-carve pumpkin idea that needs only three paint colors. Base-coat the face and ears in gray, stipple the white ear fluff with a nearly dry brush for texture, and paint the oversized nose last so you can center it perfectly.

This is an AI-generated concept image: a realistic, carvable design idea rather than a photo of a finished carve. AI concepts are always labeled and sit out the leaderboard and the contest.

No ratings yet · Sign in to rate

Comments (0)

  • No comments yet — be the first.

Save without an account. Sign in to like or comment.

Our tips for carving a similar design

The core trick here is painting, not cutting, so a soft gray face and fluffy dry-brushed ears do all the work. Block in the big gray shapes first, add the white ear fluff with a nearly dry brush for texture, then finish with the oversized black nose so you can center it by eye. Keep the pumpkin whole and let the round shape read as the koala's head.

Written by PumpkinCarvingIdeas.com, inspired by the image above. These are our suggestions, not instructions from the uploader. This approach to the AI concept has not been tested on a real pumpkin.

From pumpkin to porch

  1. Prep and sketch

    Wipe the pumpkin clean and dry so paint grips well. With a pencil or washable marker, lightly draw a large rounded gray face zone in the center front and two big ear circles on the upper sides. Step back and check the layout is even before you commit to paint. Keep the stem as is since it sits above the design.

  2. Base-coat the gray face and ears

    Load a medium flat brush with gray craft paint and fill the face and both ears in smooth strokes. Two thin coats look better than one thick one, so let each layer dry before adding the next. Keep the edges soft and slightly rounded rather than sharp. Leave the surrounding orange skin untouched to frame the face.

  3. Dry-brush the white ear fluff

    Dip a stiff brush in white paint, then wipe most of it off on a paper towel until the brush is nearly dry. Flick short strokes outward inside each ear to build a fluffy, feathery texture. Build the white slowly in light passes so the gray shows through at the edges. This stippling is what gives the ears their soft look.

  4. Paint the eyes and mouth

    Use a small round brush to add two small black oval eyes spaced evenly on the face. Add a tiny white dot on each eye for a friendly catchlight once the black is dry. Paint a small curved black mouth below the nose area with two gentle bumps for the smile. Keep these marks small so the nose can be the star.

  5. Add the oversized nose last

    Mix or use solid black and paint a large rounded nose in the center of the lower face. Painting it last lets you judge the spacing against the eyes and mouth so everything stays balanced. Fill it fully for a bold, glossy look and touch up any ragged edges. Let all paint cure fully before handling.

  6. Seal and stage your photo

    Once dry, brush on a thin coat of clear matte or satin sealer to protect the paint from smudges and moisture. Set the koala on a clean surface with soft daylight or a nearby lamp for photos, since there is nothing lit inside. A plain background keeps the focus on that cute face. Display it indoors so the paint stays crisp.

Gather your supplies

Check things off as you get ready.

Work on a stable surface, keep your free hand out of the cutting path, and have an adult handle sharp tools.

Three levels of light

  • Leave intact

    The orange skin around the face stays untouched and frames the koala like a border.

  • Peel & shade

    This is a no-carve design, but if you wanted a soft glow you could peel a thin ring of orange skin behind the face for a dim halo.

  • Cut through

    No cuts are needed here; if you added an LED for nighttime, a small vent hole in the back would be the only opening, kept far from the painted front.

Learn the carving basics

Before you start cutting

Do I need to cut the pumpkin at all?

No, this is a fully painted no-carve design, so the pumpkin stays whole. That makes it a great low-mess project for kids and beginners. If you want it to glow at night, you could add a small LED and a discreet vent hole in the back, but the front stays sealed.

How do I get the ears to look fluffy?

The fluff comes from dry-brushing, which means wiping most of the paint off a stiff brush before you touch the pumpkin. Flick short white strokes outward so the gray peeks through at the edges. Build it up in light layers rather than one heavy coat.

Why paint the nose last?

The large black nose is the visual center of the koala, so painting it last lets you position it perfectly against the eyes and mouth. If you paint it first, small spacing errors are harder to fix. Waiting also keeps the wet black from smearing into the gray.

Your take belongs here, too.

Changed a detail? Made it simpler? Share a photo of your version and tell the community what worked.

Share your pumpkin

More pumpkins like this

You've reached the end · 8 pumpkins
The Patch Report

Fresh pumpkins, in your inbox.

The best new carvings, ideas worth stealing, and how-tos for carving season. Short, seasonal, and gone by November.

A short email during carving season. Unsubscribe anytime. See our privacy policy.