Halloween Pumpkin Carving Contest Β· Starts October 1st Β· $500 in prizes
← Back to ideas
@ai_concepts
Jul 27, 2026
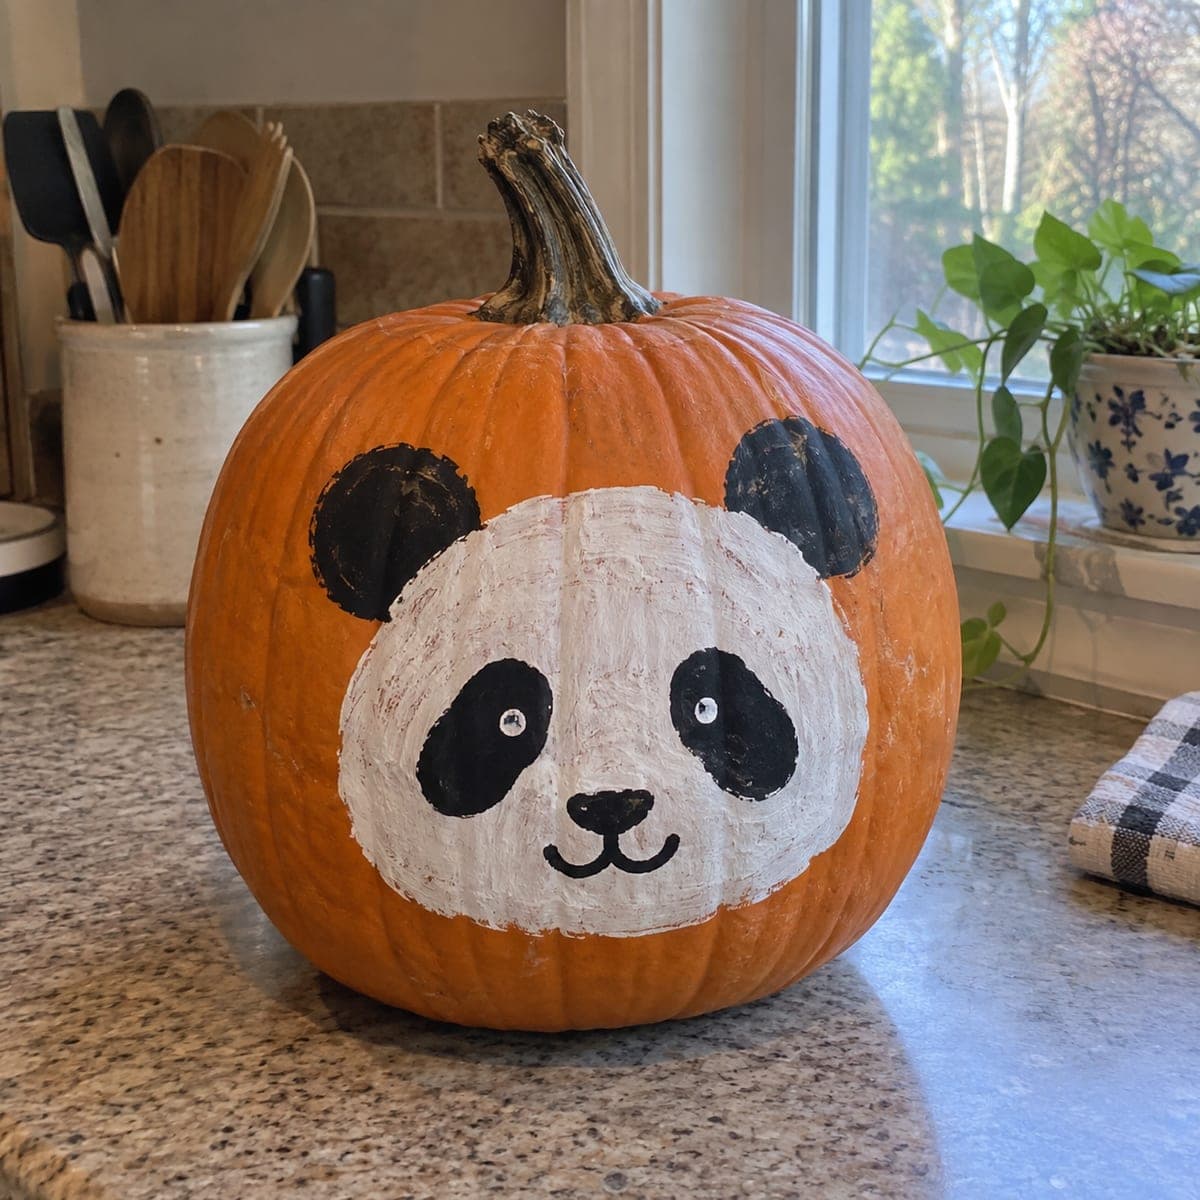
Smiling Panda Face Painted PumpkinAI
0

Smiling Panda Face Painted Pumpkin

A cheerful panda face painted right onto the pumpkin, with a big white muzzle, black eye patches, round ears, and a tiny smile. This no-carve pumpkin idea takes about thirty minutes with white and black acrylic and works on any size pumpkin, making it a favorite for classrooms and toddlers. Paint the white base first and let it dry fully before adding the black, then dot the eyes with a paint pen for clean highlights.

This is an AI-generated concept image: a realistic, carvable design idea rather than a photo of a finished carve. AI concepts are always labeled and sit out the leaderboard and the contest.

No ratings yet Β· Sign in to rate

Comments (0)

  • No comments yet β€” be the first.

Save without an account. Sign in to like or comment.

Our tips for carving a similar design

The whole design rests on one simple trick: paint a big white muzzle base, let it dry completely, then lay the black shapes on top so the edges stay crisp. Since this is a no-carve concept, nothing gets cut, which makes it safe for classrooms and toddlers. Work light to dark and save the shiny eye dots for last.

Written by PumpkinCarvingIdeas.com, inspired by the image above. These are our suggestions, not instructions from the uploader. This approach to the AI concept has not been tested on a real pumpkin.

From pumpkin to porch

  1. Clean and sketch the face

    Wipe the pumpkin down so paint grips well and let it dry. With a soft pencil, lightly draw the rounded muzzle in the center, two ear circles up top, and two big teardrop eye patches. Keep the panda features low and centered on the fattest part of the pumpkin so the face reads clearly. Do not press hard, since heavy pencil lines can show through white paint.

  2. Paint the white muzzle base

    Fill the whole muzzle shape with white acrylic using a flat brush. Two thin coats look far better than one thick, gloppy coat, so let the first dry before adding the second. Feather the outer edge slightly so it looks soft and furry rather than like a hard sticker. Let this base dry fully, at least an hour, before you touch it with black.

  3. Add the black ears and eye patches

    Load a smaller round brush with black acrylic and fill the two ear circles at the top. Then paint the large teardrop eye patches, keeping them angled inward so the panda looks sweet, not fierce. Because the white is bone dry, you can ride right up to its edge for a clean line. Rinse your brush often so the black stays true and does not turn gray.

  4. Paint the nose and smile

    With the tip of the round brush, add a small rounded black nose just below the muzzle center. Draw a short line down from the nose, then two gentle upward curves for the little smile. Keep these strokes tiny and even, since the whole charm here is a simple, cheerful face. Step back and check symmetry before it dries so you can still fix a wobble.

  5. Dot the eye highlights

    Once the black eye patches are dry, use a white paint pen to add a small solid oval inside each patch. A paint pen gives a cleaner, rounder dot than a brush and keeps the eyes bright. Add one tiny highlight per eye rather than filling them, which is what makes the panda look alive. Let everything cure before handling.

  6. Style and photograph

    Set the finished pumpkin on a counter or shelf with soft daylight from a window for the best photo. If you want a little nighttime glow without carving, place a battery LED puck behind or beside it, never a candle near acrylic paint. Group it with smaller painted pumpkins for a family scene. Snap your picture and share it with the community.

Gather your supplies

Check things off as you get ready.

Work on a stable surface, keep your free hand out of the cutting path, and have an adult handle sharp tools.

Three levels of light

  • Leave intact

    The orange skin around the face is left bare and unpainted, staying as the natural background.

  • Peel & shade

    There is no peeling here since it is a painted design, but the white muzzle acts as the soft, glowing midtone of the face.

  • Cut through

    Nothing is cut open on this no-carve panda; if you want brightness, set a battery LED beside it rather than inside.

Learn the carving basics

Before you start cutting

Do I need to carve or gut this pumpkin at all?

No. This is a fully no-carve painted design, so the pumpkin stays whole and lasts longer. Skipping the knife also makes it safe for kids to help with the painting.

Why paint the white before the black?

White is the base layer and needs full drying time so the black shapes sit crisply on top without smearing into gray. If you rush and paint black onto damp white, the colors blend and the panda loses its clean, cute look. Patience between coats is the real secret.

Will acrylic paint stay on the pumpkin skin?

Yes, as long as you wipe the pumpkin clean and dry first so the paint has a good surface to grip. Two thin coats bond better than one thick coat. A light spray sealer once everything cures can add extra durability if the pumpkin will be handled a lot.

Your take belongs here, too.

Changed a detail? Made it simpler? Share a photo of your version and tell the community what worked.

Share your pumpkin

More pumpkins like this

You've reached the end Β· 8 pumpkins
The Patch Report

Fresh pumpkins, in your inbox.

The best new carvings, ideas worth stealing, and how-tos for carving season. Short, seasonal, and gone by November.

A short email during carving season. Unsubscribe anytime. See our privacy policy.