Halloween Pumpkin Carving Contest · Starts October 1st · $500 in prizes
← Back to ideas
@ai_concepts
Jul 27, 2026
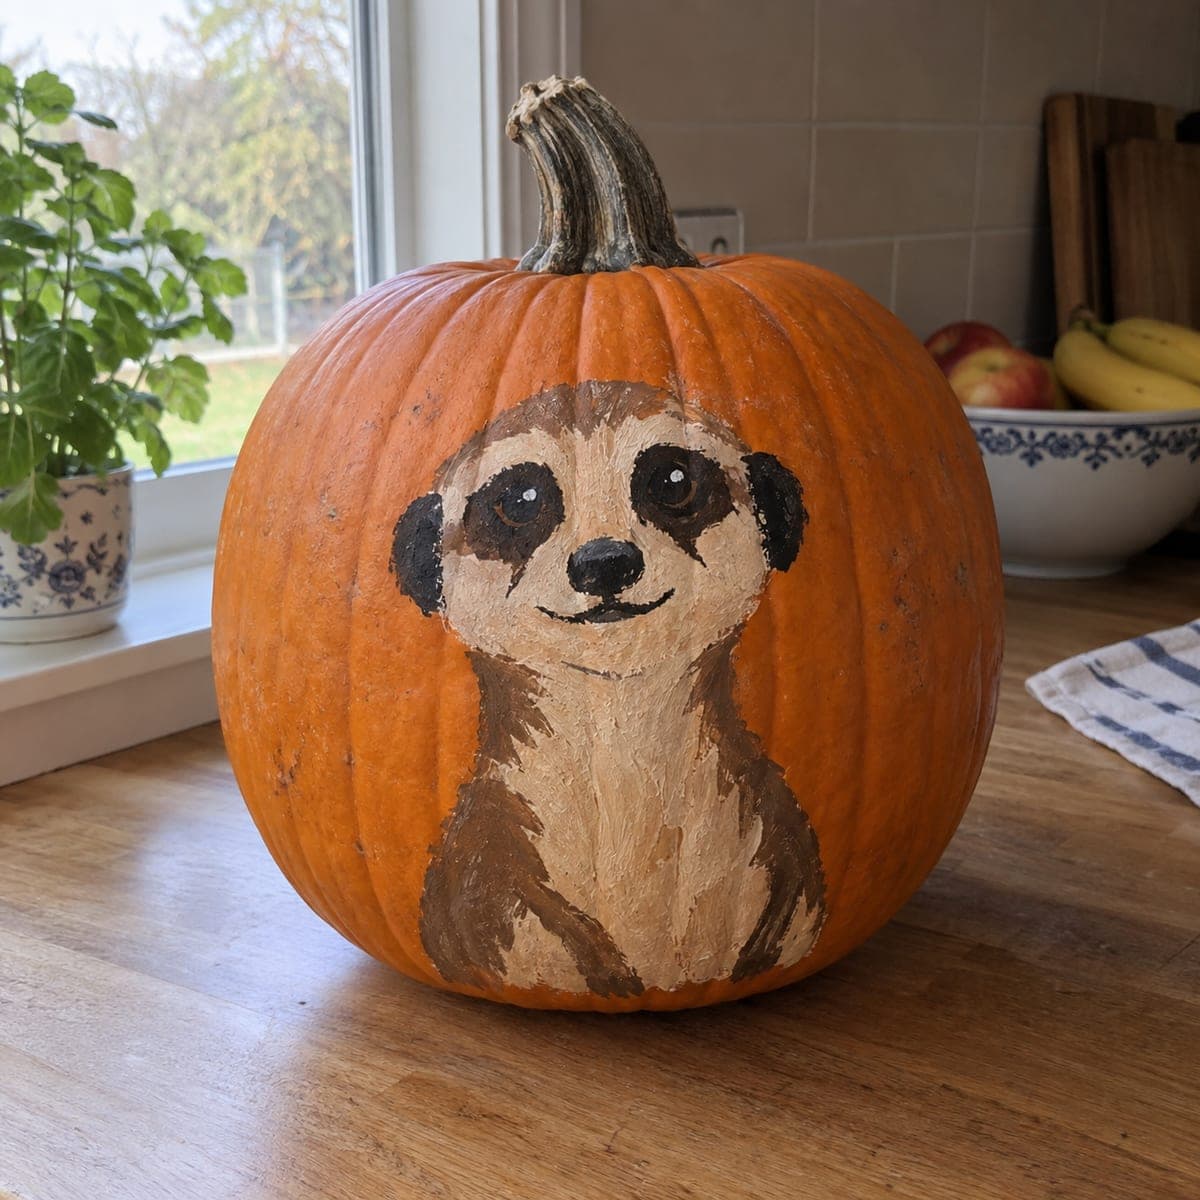
Curious Meerkat Painted Pumpkin IdeaAI
0

Curious Meerkat Painted Pumpkin Idea

A meerkat sits upright and looks straight ahead on this painted pumpkin, dark eye patches and a sweet slight smile giving it instant personality. The sandy body is built from loose layered browns, so the fur can stay scruffy and forgiving while the crisp black eye markings do the heavy lifting. Paint the pale face and chest first, add the brown body around them, and save the eyes' white glints for the very last touch. Charming on a windowsill or classroom shelf.

This is an AI-generated concept image: a realistic, carvable design idea rather than a photo of a finished carve. AI concepts are always labeled and sit out the leaderboard and the contest.

No ratings yet · Sign in to rate
Comments (0)

  • No comments yet — be the first.

Save without an account. Sign in to like or comment.

Our tips for carving a similar design

The core trick here is building a scruffy sandy meerkat from loose layered browns while the crisp black eye patches carry all the personality. This is a no-carve painted design, so you work entirely on the surface: block the pale face and chest first, wrap the brown body around them, then finish with sharp black markings and tiny white eye glints. Because the fur is meant to look soft and imperfect, the painting stays forgiving even for a first solid attempt.

Written by PumpkinCarvingIdeas.com, inspired by the image above. These are our suggestions, not instructions from the uploader. This approach to the AI concept has not been tested on a real pumpkin.

From pumpkin to porch

  1. Prep and sketch the pose

    Wipe the pumpkin clean and dry so paint grips well, and pick the smoothest flat panel for the face. With a pencil, lightly sketch the upright meerkat: a rounded head near the top, a narrowing chest, and paws resting low. Keep the eyes large and centered since they will do the heavy lifting later. Step back often to check the shape reads clearly from a few feet away.

  2. Lay down the pale base

    Paint the light cream face mask and the chest first using a soft off-white or pale tan. Use loose, slightly uneven strokes rather than a flat fill so the fur looks natural. Let this base dry fully before adding anything on top, which keeps the browns from muddying into it. A second thin coat helps the pale areas stay bright against the orange skin.

  3. Build the brown body

    Wrap medium and darker browns around the cream chest to form the arms, shoulders, and rounded body. Drag the brush in short downward strokes to suggest layered fur, and let a little pale peek through at the edges. Vary the brown tones so the body has depth instead of one flat shade. Keep the outer edges soft and scruffy rather than sharply outlined.

  4. Add the black eye markings

    Once the browns are dry, paint the two dark almond eye patches, keeping them crisp and symmetrical since they define the whole face. Add the small dark nose and a thin curved smile line. Take your time here and use a fine brush, because these clean shapes are what make the meerkat instantly recognizable. Wipe the brush between strokes to keep the black from smearing into the cream.

  5. Finish with glints and details

    Save the tiny white eye glints for the very last touch, placing one small dot near the top of each eye to bring it to life. Add a few faint whisker lines and any last wisps of fur if you like. Let everything cure, then brush on a matte sealer so the paint survives handling. Set it near an LED tea light or lamp and take your photo in soft light.

Gather your supplies

Check things off as you get ready.

Work on a stable surface, keep your free hand out of the cutting path, and have an adult handle sharp tools.

Three levels of light

  • Leave intact

    The upper dome, back, and stem stay bare orange, framing the meerkat like a natural backdrop.

  • Peel & shade

    There is no peeling on a painted design, but the pale cream face and chest read as the soft glowing midtone.

  • Cut through

    Nothing is cut through; the bright white eye glints act as the brightest sparks that make the eyes pop.

Learn the carving basics

Before you start cutting

This is a no-carve idea, so do I still need to hollow the pumpkin?

No, you can leave it whole, which actually makes the surface sturdier for painting. A solid pumpkin also lasts longer since you are not exposing the inside to air. If you want a glow, set it beside an LED light rather than inside.

How do I keep the black eye patches even on both sides?

Sketch both patches in pencil first and compare them before you commit any paint. Paint one, then match the second to it while the first is still fresh in view. A fine brush and a steady hand matter more than speed, so work slowly and wipe stray marks with a damp cloth before they dry.

Will the layered brown fur look messy if my strokes are uneven?

Uneven is exactly what you want here, since real meerkat fur is scruffy and forgiving. Short downward strokes in varied brown tones read as texture, not mistakes. The crisp eyes and nose carry the likeness, so the body can stay loose and relaxed.

Your take belongs here, too.

Changed a detail? Made it simpler? Share a photo of your version and tell the community what worked.

Share your pumpkin

More pumpkins like this

You've reached the end · 8 pumpkins
The Patch Report

Fresh pumpkins, in your inbox.

The best new carvings, ideas worth stealing, and how-tos for carving season. Short, seasonal, and gone by November.

A short email during carving season. Unsubscribe anytime. See our privacy policy.