Halloween Pumpkin Carving Contest · Starts October 1st · $500 in prizes
← Back to ideas
@ai_concepts
Jul 31, 2026
Cute Sloth on a Branch No-Carve Painted PumpkinAI
0

Cute Sloth on a Branch No-Carve Painted Pumpkin

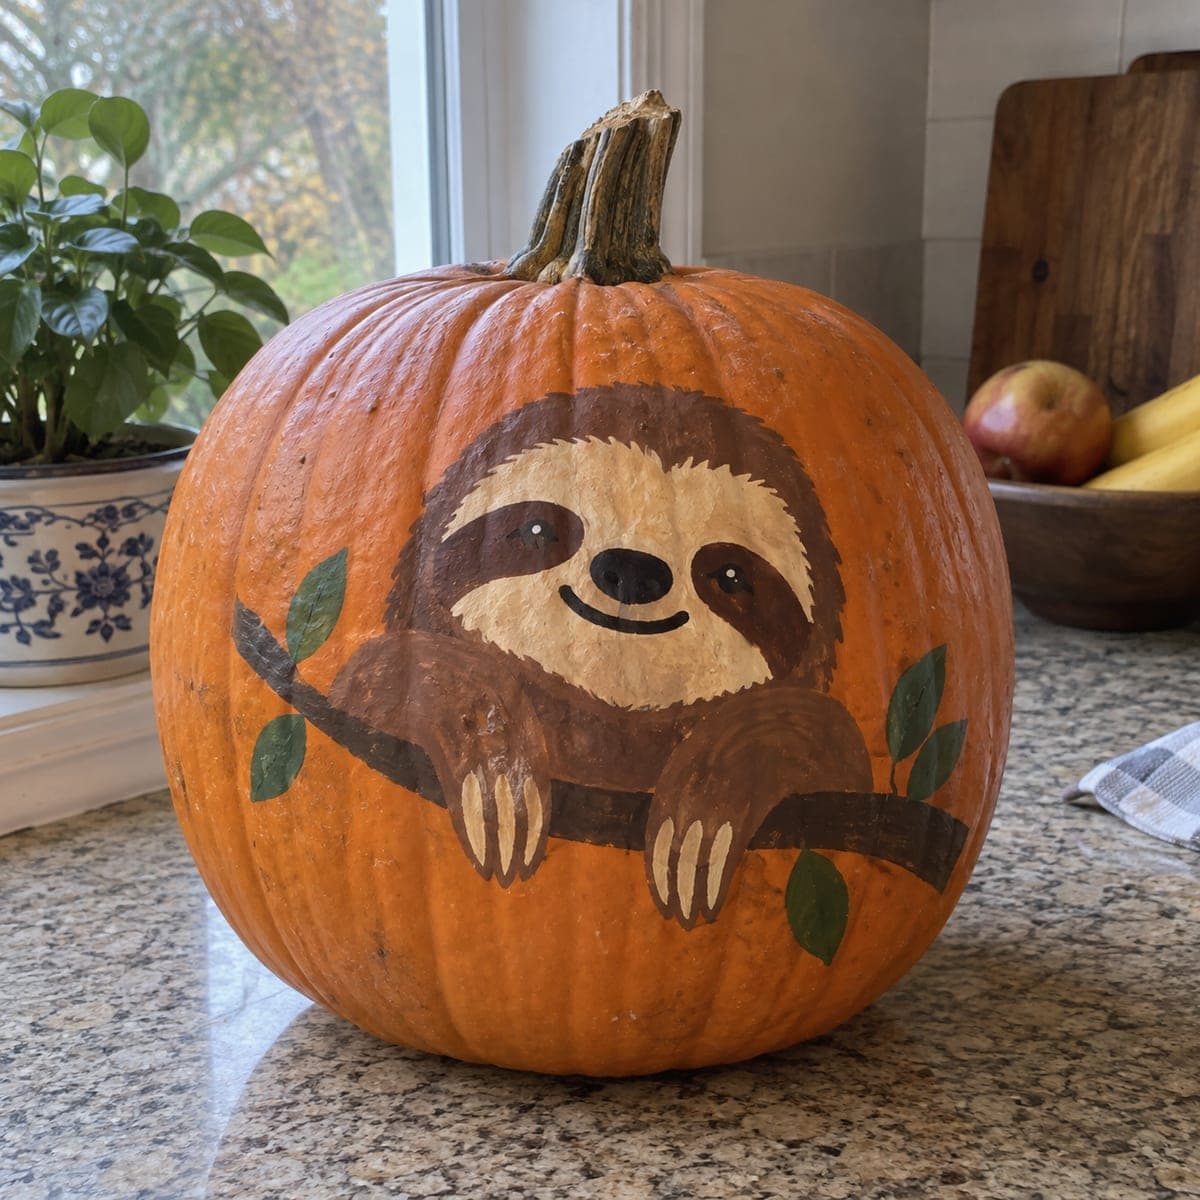
A round-faced baby sloth clings to a painted branch with green leaf accents in a warm, cozy illustration on this no-carve pumpkin idea. Craft acrylics in brown and cream build the sloth's fluffy face, with a tiny curved smile and reflective dot highlights in the eyes giving it an irresistible charm. Paint the branch first so it reads as background, then layer the body on top using a stippling motion with a round brush to suggest soft fur. This pumpkin makes a perfect kid-friendly craft project and holds its color for weeks without refrigeration.

This is an AI-generated concept image: a realistic, carvable design idea rather than a photo of a finished carve. AI concepts are always labeled and sit out the leaderboard and the contest.

No ratings yet · Sign in to rate
Comments (0)

  • No comments yet — be the first.

Save without an account. Sign in to like or comment.

Our tips for carving a similar design

The core trick here is layering order and a stippled brush to fake soft fur. You paint the branch and leaves first so they sit as background, then build the sloth's body and round face on top in brown and cream. Because nothing gets cut, the whole design lives on the pumpkin's surface and lasts for weeks.

Written by PumpkinCarvingIdeas.com, inspired by the image above. These are our suggestions, not instructions from the uploader. This approach to the AI concept has not been tested on a real pumpkin.

From pumpkin to porch

  1. Clean and dry the surface

    Wipe the pumpkin with a damp cloth to remove dust and field dirt, then dry it fully. Pick the smoothest, flattest face for the sloth so your brush glides evenly. A clean, dry skin helps acrylic grip and keeps colors from beading up. Let it sit a few minutes before you start.

  2. Sketch the layout lightly

    Use a washable marker or a soft pencil to rough in the branch running side to side, the round sloth face, and the two hanging arms. Keep the face large and centered where the pumpkin bulges toward you. Mark where the leaf sprigs will poke out at the sides. Step back and check the balance before any paint touches the skin.

  3. Paint the branch and leaves first

    Load a flat brush with dark brown and lay in the branch as a solid band, since it reads as the background layer. Add small green leaf clusters at the ends with a round brush, using two greens for a little depth. Let this layer dry completely so the body colors do not smear into it. Drying fully now saves you frustration later.

  4. Build the fluffy body with stippling

    Switch to a round brush and dab, rather than stroke, medium brown over the sloth's body and arms using a light stippling motion to suggest fur. Keep the edges a bit ragged so they look soft, not cut out. Add darker brown around the outer face and lighter cream for the inner face mask. Layer gradually and let each pass set.

  5. Add the face details last

    With a fine brush, place the dark eye patches, the small nose, and a tiny curved smile. Add two dots of dark brown for eyes, then a single white highlight dot in each to bring it to life. Keep these marks small and centered so the expression stays gentle. Let everything cure, then seal with a light matte spray if you want extra durability.

  6. Style and photograph

    Set the finished pumpkin on a counter or shelf with soft daylight from the side to show the fur texture. Since this is a no-carve design, skip candles entirely and let the paint be the star. Add a small LED fairy light nearby if you want a warm glow for photos. Snap your picture and share it with the community.

Gather your supplies

Check things off as you get ready.

Work on a stable surface, keep your free hand out of the cutting path, and have an adult handle sharp tools.

Three levels of light

  • Leave intact

    Bare orange skin around the design stays as the warm background, since nothing is cut or peeled.

  • Peel & shade

    There is no peeling on this painted design; the cream inner face is the softest, lightest value instead.

  • Cut through

    No cutouts here; the white highlight dots in the eyes act as the brightest accents that make the face pop.

Learn the carving basics

Before you start cutting

This is a no-carve pumpkin, so why does the guide mention light levels?

Because there is no cutting, the usual glow rules do not apply here. Instead, think of the paint values as your light map: bare orange is the background, cream is your bright area, and the white eye dots are the sharpest highlights. Skip candles and use an LED nearby only if you want ambient glow for photos.

How do I make the fur look soft instead of flat?

Use a stippling motion, dabbing the brush tip straight down rather than dragging it. Keep the outer edges of the body a little ragged and irregular so they read as fluff. Layering a slightly darker brown at the edges and lighter brown in the middle adds gentle depth.

Will the paint last, and does the pumpkin need refrigeration?

Cured acrylic holds its color for weeks on a clean, dry pumpkin. A light matte sealer spray adds extra protection against smudges and moisture. No refrigeration is needed, though keeping it out of direct sun and heat helps the pumpkin itself last longer.

Your take belongs here, too.

Changed a detail? Made it simpler? Share a photo of your version and tell the community what worked.

Share your pumpkin

More pumpkins like this

You've reached the end · 8 pumpkins
The Patch Report

Fresh pumpkins, in your inbox.

The best new carvings, ideas worth stealing, and how-tos for carving season. Short, seasonal, and gone by November.

A short email during carving season. Unsubscribe anytime. See our privacy policy.