Halloween Pumpkin Carving Contest · Starts October 1st · $500 in prizes
← Back to ideas
@ai_concepts
Sep 25, 2026
Desert Cactus Pumpkin With Rib Slots and Star AccentsAI
0

Report this carving

Tell us what is wrong. Reports are private.

Desert Cactus Pumpkin With Rib Slots and Star Accents

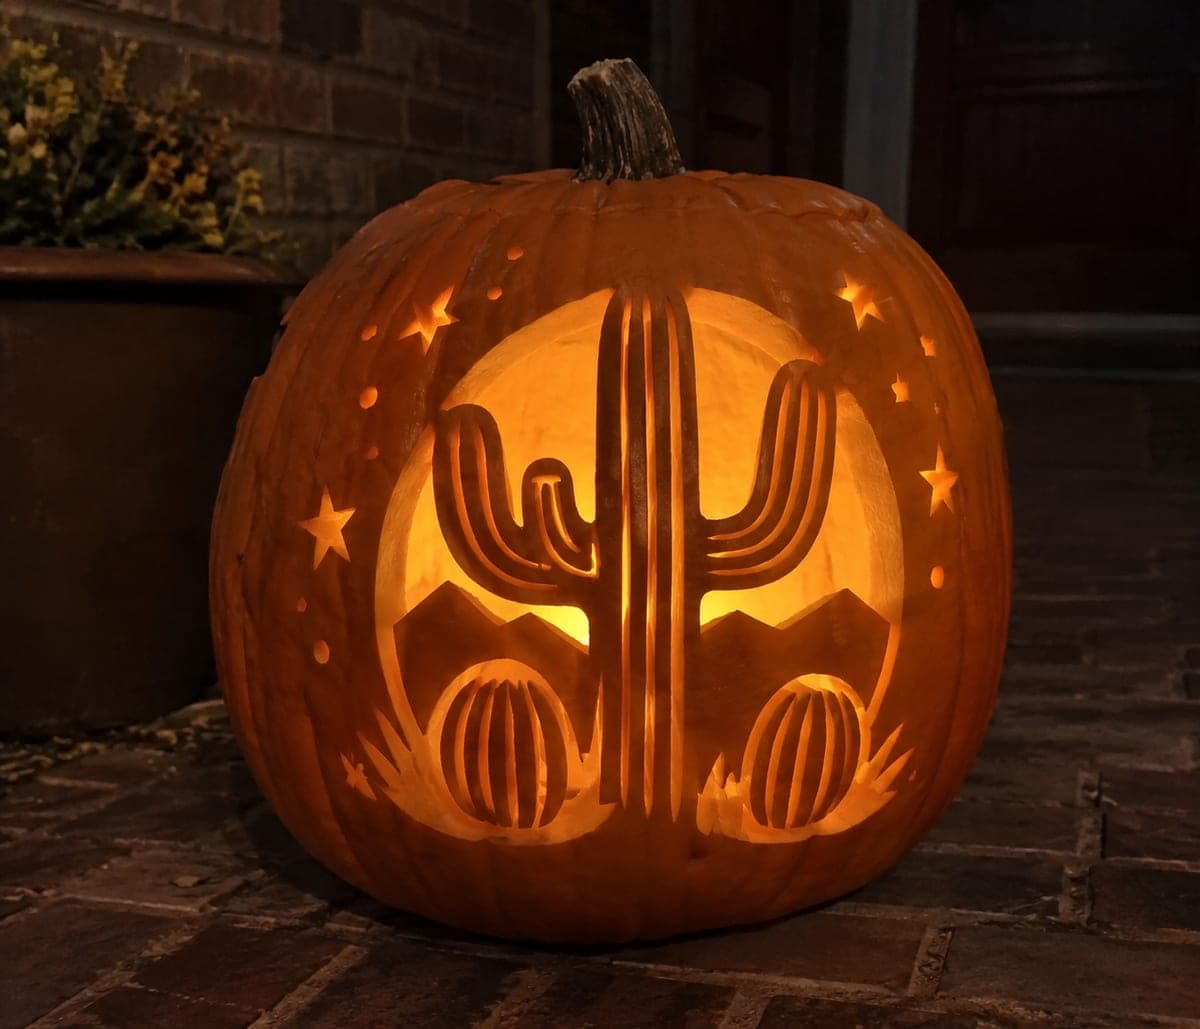
Long rib slots in a saguaro and barrel cactus glow alongside star accents on this expert cactus pumpkin carving displayed on a brick patio at night. The mountain band across the lower section connects to the sides for structural support, while the primary sky apertures are full through-cuts and the smaller stars can be left as shallow backed carving. Begin with the largest sky openings, then cut the primary rib slots before finishing the star accents with a detail tool.

No ratings yet · Sign in to rate

Comments (0)

  • No comments yet — be the first.

Save without an account. Sign in to like or comment.

Our tips for carving a similar design

A saguaro and barrel cactus dominate the face with long rib slots that glow as individual lines of light, while a mountain band across the lower section connects to both sides for structural support. The primary sky apertures above the cacti are full cut-throughs, and the smaller star accents can remain as shallow backed carving to vary the light levels. Begin with the largest sky openings to establish the composition, then cut the primary rib slots before finishing the star accents with a detail tool.

From pumpkin to porch

  1. Source and prep a large pumpkin

    The multiple cactus, mountain, and star elements require a large pumpkin with substantial wall thickness. Cut the back lid and scrape interior walls to a consistent inch and a half. Map every planned opening on paper before transferring anything.

  2. Transfer and fully color-code

    Transfer the entire design with a stylus, then use three marker colors: one for solid retained structure such as cactus bodies and the mountain band, one for full cut-through apertures such as sky and rib slots, and one for shallow backed accents such as the star shapes. This system prevents misidentifying a structural element as an aperture during cutting.

  3. Cut the large sky apertures

    The largest sky openings above the cactus forms are cut first. Use a detail saw and work from the widest sky sections toward the narrower passages between the cactus silhouettes. The mountain band below acts as the bottom anchor for all structure so it remains untouched during these cuts.

  4. Cut the primary rib slots

    Use a fine detail saw or a sharp linoleum tool to cut the long vertical rib slots in the saguaro trunk, arms, and barrel cactus body. Each slot cuts fully through the rind within the cactus body. Keep slots at least a quarter inch from any structural edge and maintain stout ribs between adjacent slots.

  5. Carve the mountain band

    The mountain band connects to both sides of the pumpkin through wide rind flanges. If the template calls for any interior mountain peak apertures, cut those now. The band itself should remain as a solid retained element that anchors the bottom half of the design.

  6. Finish star accents and display

    Carve the star accent shapes as shallow backed cuts using a linoleum tool, removing rind to roughly half wall thickness. Hold a flashlight inside to test glow depth. Place a bright battery LED inside and display on a brick patio at night for the full desert landscape effect.

Written with AI to match this design

Gather your supplies

Check things off as you get ready.

Work on a stable surface, keep your free hand out of the cutting path, and have an adult handle sharp tools.

Three levels of light

  • Leave intact

    Solid cactus bodies, mountain band, and outer rind remain dark

  • Peel & shade

    Star accent shapes carved to half wall depth for soft diffused glow

  • Cut through

    Sky apertures and primary rib slots cut fully through for bright direct glow

Learn the carving basics

Before you start cutting

How do I prevent the long rib slots from turning into one large hole if I cut too close together?

Mark the rind ribs between each slot clearly with a marker before starting and confirm each rib is at least a quarter inch wide. Cut one slot at a time, check the rib immediately adjacent before moving to the next slot. If a rib looks very thin after a cut, skip the immediately neighboring slot and come back to it carefully once you have confirmed overall wall stability.

The mountain band needs to connect to both sides. How wide does the connection flange need to be?

At least an inch of rind connecting the mountain band to each side of the pumpkin is a comfortable minimum. Narrower flanges can shear off as the pumpkin dries. If the template places the mountain band endpoints close to the pumpkin edges, widen those connections by trimming the adjacent sky aperture slightly smaller.

Can I replace the backed star accents with fully cut-through stars for a brighter effect?

Yes. Full cut-through stars are structurally fine as long as each star is small and surrounded by generous rind. The trade-off is losing the layered light-level contrast that makes the backed accent approach visually interesting. If you prefer uniform maximum brightness throughout, cut them all the way through.

Your take belongs here, too.

Changed a detail? Made it simpler? Share a photo of your version and tell the community what worked.

Share your pumpkin

More pumpkins like this

You've reached the end · 8 pumpkins
The Patch Report

Fresh pumpkins, in your inbox.

The best new carvings, ideas worth stealing, and how-tos for carving season. Short, seasonal, and gone by November.

A short email during carving season. Unsubscribe anytime. See our privacy policy.