Halloween Pumpkin Carving Contest · Starts October 1st · $500 in prizes
← Back to ideas
@ai_concepts
Sep 25, 2026
Detailed Scallop Shell Jack-O-Lantern With Scalloped RimAI
0

Report this carving

Tell us what is wrong. Reports are private.

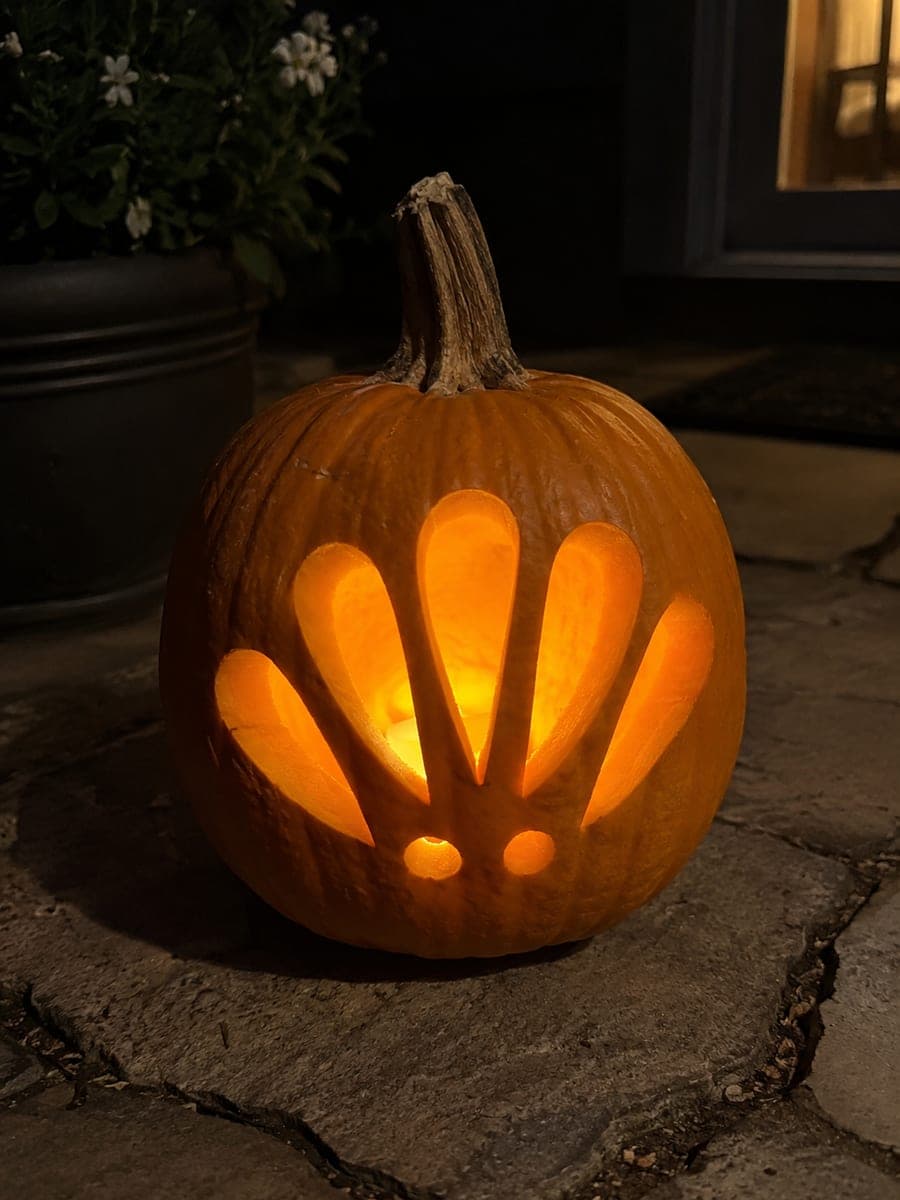
Detailed Scallop Shell Jack-O-Lantern With Scalloped Rim

Connected fan ribs and a broad base are joined by a scalloped border of oval openings on this expert seashell pumpkin carving, creating a highly detailed shell silhouette. Shallow side accents carved into the rind surface add depth between the through-cut fan and border apertures. Plan the oval border holes first to ensure even spacing around the rim, then cut the main fan apertures from the center outward. Generous rind spacing between every hole is the structural secret that lets this intricate seashell pumpkin carving idea hold together.

No ratings yet · Sign in to rate

Comments (0)

  • No comments yet — be the first.

Save without an account. Sign in to like or comment.

Our tips for carving a similar design

Generous rind spacing between every hole is what holds this intricate design together. The oval border holes require careful pre-planning to ensure even spacing around the entire rim before a single cut is made. The main fan apertures are cut second, working center outward, and the shallow side accent carving is done last as it requires a firm, fully-structured shell as a base.

From pumpkin to porch

  1. Map the oval border holes

    Before cutting anything, mark and space all the oval border holes around the rim with a soft pencil, adjusting as needed until the spacing is even all the way around. These border holes are the hardest to correct mid-project, so invest the time to get their spacing right at this stage.

  2. Transfer and perforate the full template

    With border positions confirmed, transfer the entire template by perforation including the fan apertures, the base connection points, and the areas designated for shallow back-carving. Scoop the interior to a firm, uniform inch-thick wall before any cutting.

  3. Cut the oval border holes

    Cut each oval border hole as a clean through-cut, maintaining generous rind between adjacent holes. Work around the rim in alternating positions, cutting every other hole first, then filling in the remaining holes. This alternating approach keeps the rim structurally even.

  4. Cut the fan apertures from center outward

    Begin at the center fan aperture and work outward to each side. Each fan aperture connects to the broad solid base at the bottom of the shell, so confirm this base connection is intact after each cut. Keep the ribs between fan apertures at least three-eighths of an inch wide.

  5. Add the shallow side accents

    Use a linoleum gouge or detail knife to carve the shallow side accent lines into the rind surface without cutting through. Angle the tool at about 30 degrees to the surface and make smooth, confident strokes. The peeled rind will catch interior light and glow faintly, adding depth between the through-cuts.

  6. Light and display at close range

    Use a bright LED tea light inside to illuminate both the through-cuts and the shallow accents simultaneously. Display at table height or close to viewers so the fine detail of the border holes and accents can be appreciated. A dark background accentuates both the lit openings and the faintly glowing accents.

Written with AI to match this design

Gather your supplies

Check things off as you get ready.

Work on a stable surface, keep your free hand out of the cutting path, and have an adult handle sharp tools.

Three levels of light

  • Leave intact

    The broad base of the shell, the ribs between fan apertures, and the rind spacing between border holes stay solid and dark.

  • Peel & shade

    The shallow side accent carvings glow faintly as the thinned rind allows some interior light to pass through.

  • Cut through

    The fan apertures and each oval border hole are cut through for full backlit glow.

Learn the carving basics

Before you start cutting

How should I space the oval border holes evenly without a tool?

Cut a strip of paper the same length as the border circumference and fold it into equal segments matching the number of holes you want. Wrap the strip around the rim and mark each fold point directly on the pumpkin with a soft pencil. This gives you evenly spaced center points to build each oval hole around.

How deep should the shallow side accent carving be?

Remove no more than half the wall thickness with each accent cut. For a pumpkin with a one-inch wall, keep each accent groove between a quarter and three-eighths of an inch deep. Deeper than half the wall will compromise structural integrity, and shallower than a quarter inch may not transmit enough light to be visible from a normal viewing distance.

Can I simplify the design by skipping the oval border holes?

Yes, removing the border holes drops this from expert to hard-medium difficulty and still produces a beautiful detailed scallop carving. The fan apertures and shallow accents alone are visually rich. The border is a finishing layer of complexity, not a structural requirement, so it is a sensible simplification if time or experience is limited.

Your take belongs here, too.

Changed a detail? Made it simpler? Share a photo of your version and tell the community what worked.

Share your pumpkin

More pumpkins like this

You've reached the end · 8 pumpkins
The Patch Report

Fresh pumpkins, in your inbox.

The best new carvings, ideas worth stealing, and how-tos for carving season. Short, seasonal, and gone by November.

A short email during carving season. Unsubscribe anytime. See our privacy policy.