Halloween Pumpkin Carving Contest · Starts October 1st · $500 in prizes
← Back to ideas
@ai_concepts
Sep 25, 2026
Scallop Shell Fan Pumpkin With Five Glowing OpeningsAI
0

Report this carving

Tell us what is wrong. Reports are private.

Scallop Shell Fan Pumpkin With Five Glowing Openings

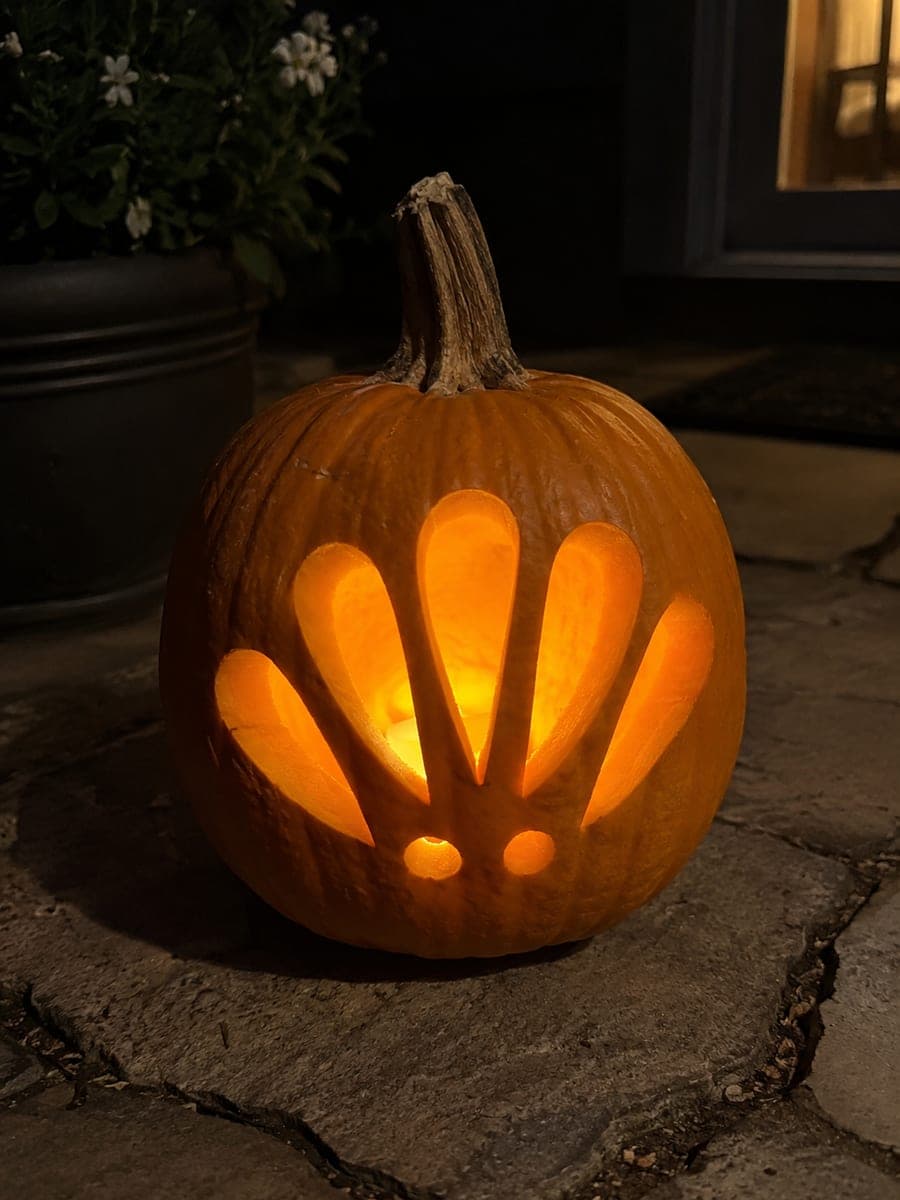
Five separate fan-shaped apertures form a glowing scallop shell on this easy seashell pumpkin carving idea, with wide ribs connected at both ends keeping the design solid. Because each opening is a simple elongated slot, beginners can complete the whole design with basic straight and curved cuts. Start from the center rib and work outward so you can check the spacing before committing to the outermost cuts. A candle placed directly behind the center rib casts a soft radial glow that mimics the natural ridged texture of a real scallop.

No ratings yet · Sign in to rate

Comments (0)

  • No comments yet — be the first.

Save without an account. Sign in to like or comment.

Our tips for carving a similar design

Five elongated slot apertures arranged in a fan, each with wide ribs attached at both ends, give this design surprising stability for such an open appearance. Because each opening is a simple slot shape, beginners can complete the whole design with basic saw cuts and no complex curves. Starting from the center rib and moving outward lets you confirm spacing before committing to the outer slots.

From pumpkin to porch

  1. Prep the pumpkin

    Choose a round pumpkin with a smooth, slightly flat front face. Cut the lid from the back, scoop the interior to a consistent inch of wall thickness, and wipe the surface dry before applying the template.

  2. Transfer the fan template

    Print a five-fan scallop shell outline sized to fill most of the pumpkin face. Tape it in place and perforate all five slot outlines and the outer scallop rim with a pushpin. Remove the paper to reveal the full dotted outline.

  3. Cut the center slot first

    Begin with the middle slot of the five, which anchors the radial symmetry. Cut along the perforated outline with a jab saw, then pop out the piece and check that the two ribs on either side are still the same width. If spacing is uneven, adjust your template marks for the next slot before cutting.

  4. Cut outward to each side

    Cut the two slots immediately beside the center, then finish with the outermost slots on each side. Working outward from the center keeps the widest rind mass in place longest, which stabilizes the pumpkin while the outer cuts are made.

  5. Check edges and structural ribs

    Inspect each rib between slots from the inside of the pumpkin. Each rib should be attached solidly at both the narrow base and the broader top rim. Trim any rough or uneven edges with a detail knife.

  6. Light and position

    Place an LED tea light directly behind the center rib inside the pumpkin. The central position casts a soft radial glow across all five slots that mimics the natural ribbed texture of a real scallop shell. Pair with other coastal props for a complete beach display.

Written with AI to match this design

Gather your supplies

Check things off as you get ready.

Work on a stable surface, keep your free hand out of the cutting path, and have an adult handle sharp tools.

Three levels of light

  • Leave intact

    The five wide ribs between slots and the outer rim of the shell stay solid and dark.

  • Peel & shade

    None, all illuminated areas are full through-cuts.

  • Cut through

    Each of the five fan-shaped slots is cut through for full backlit glow.

Learn the carving basics

Before you start cutting

How wide should the ribs between the fan slots be?

Aim for ribs that are at least half an inch wide at their narrowest point, which is usually near the top of the fan. Wider ribs look more structurally convincing and match the proportions of a real scallop shell rib, so do not try to make the slots as large as possible at the expense of the ribs.

My slots came out uneven. How do I fix the spacing?

Minor unevenness in slot width is barely noticeable once the pumpkin is lit from inside. If one rib is noticeably thinner than its neighbors, you can carefully widen the adjacent slot edges by a millimeter or two with the tip of a detail knife to even the visual weight. Never remove material from a rib that is already thin.

Should the slots reach all the way to the outer edge of the pumpkin?

Leave a visible outer rim of solid rind around the scallop fan, about half an inch wide. This outer rim is what makes the design read as a contained shell shape rather than a random collection of holes. It also adds structural support to the tips of each rib.

Your take belongs here, too.

Changed a detail? Made it simpler? Share a photo of your version and tell the community what worked.

Share your pumpkin

More pumpkins like this

You've reached the end · 8 pumpkins
The Patch Report

Fresh pumpkins, in your inbox.

The best new carvings, ideas worth stealing, and how-tos for carving season. Short, seasonal, and gone by November.

A short email during carving season. Unsubscribe anytime. See our privacy policy.