Halloween Pumpkin Carving Contest · Starts October 1st · $500 in prizes
← Back to ideas
@ai_concepts
Sep 25, 2026
Simple Beach Umbrella and Sun Pumpkin CarvingAI
0

Report this carving

Tell us what is wrong. Reports are private.

Simple Beach Umbrella and Sun Pumpkin Carving

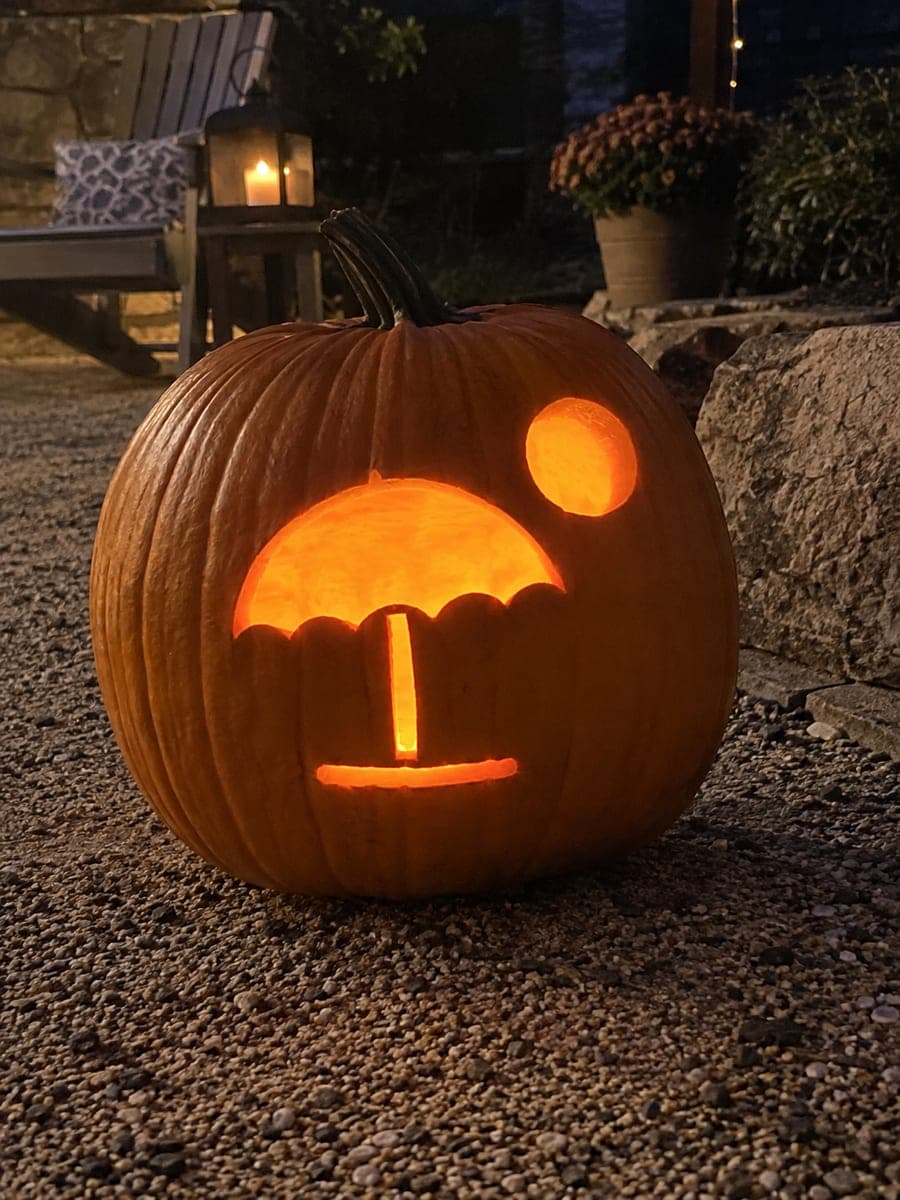
A glowing beach umbrella canopy, pole, shoreline, and sun are each cut as separate apertures on this easy beach pumpkin carving idea, making it one of the most cheerful seasonal designs around. Because all four shapes are independent with wide rind between them, beginners can cut each piece without worrying about structural connections. Start with the sun circle, then cut the canopy, the pole, and finally the base shoreline line. A battery-operated tea light keeps the design glowing safely through a long evening.

No ratings yet · Sign in to rate

Comments (0)

  • No comments yet — be the first.

Save without an account. Sign in to like or comment.

Our tips for carving a similar design

Four completely independent apertures form the scene: a canopy-shaped opening, a thin pole, a curved shoreline stripe, and a circle for the sun. All four are separated by generous rind so there are no connections to manage and no risk of structural failure. Starting with the sun circle warms up your saw hand for the more curved canopy shape that follows.

From pumpkin to porch

  1. Hollow and prep

    Cut a back lid and scoop the interior to an inch-thick wall. Choose a medium or large pumpkin so the four separate shapes have enough face area to spread out with clear rind between them. Dry the face before attaching the template.

  2. Transfer all four shapes

    Arrange the sun circle at the upper right, the canopy below and slightly left of it, the pole below the canopy center, and the shoreline as a gentle curved stroke near the base. Tape the combined template flat, trace all outlines with a stylus, remove the paper, and go over every line with a marker.

  3. Cut the sun circle

    Use a small jab saw to cut the circular sun opening with smooth curved strokes, rotating the pumpkin as you go. The circle is the smallest and simplest aperture in the composition, making it a confidence-building first cut.

  4. Cut the canopy

    The beach umbrella canopy is a roughly semicircular shape with a slightly scalloped or pointed lower edge. Follow the curved outline with the jab saw, cutting the scalloped lower edge last so the waste piece has maximum support until the final stroke frees it.

  5. Cut the pole and shoreline

    The pole is a narrow rectangular slot connecting canopy to base. Use a jab saw for the long sides and a detail knife for the narrow ends. The shoreline is a thin curved aperture near the pumpkin base; cut it in one smooth arc from end to end.

  6. Light and display

    Place a battery-operated tea light inside. The four independent glowing shapes create a warm tropical night-scene effect. Display on a porch step or table and finish with a small battery LED so the design glows safely through a long evening.

Written with AI to match this design

Gather your supplies

Check things off as you get ready.

Work on a stable surface, keep your free hand out of the cutting path, and have an adult handle sharp tools.

Three levels of light

  • Leave intact

    All rind surrounding and between the four beach shapes stays dark and solid

  • Peel & shade

    None on this design

  • Cut through

    Canopy, pole, shoreline, and sun circle all cut fully through for warm independent glows

Learn the carving basics

Before you start cutting

How wide should the pole aperture be so it does not snap when the pumpkin dries?

Make the pole at least half an inch wide. A very narrow pole slot can crack along its length as the pumpkin loses moisture over the following days. If you prefer a thinner-looking pole for aesthetics, shave the inner rind surfaces with a detail knife to widen the slot from the inside without visibly widening the exterior opening.

Can I add striped panels to the canopy for a more colorful look?

Striped panels can be suggested by carving shallow parallel grooves across the canopy area using a linoleum V-tool before cutting the canopy shape out. The grooves create a faint texture pattern visible in side lighting. If you want bright distinct stripes, consider painting alternating bands on a no-carve version instead.

Should the shoreline follow the natural curve of the pumpkin or be a straight horizontal line?

Following the natural curve of the pumpkin looks more natural and is also easier to cut because the blade angle stays consistent as you follow the pumpkin's contour. A perfectly straight horizontal line requires fighting the pumpkin's curvature and often ends up looking slightly uneven. Embrace the gentle curve.

Your take belongs here, too.

Changed a detail? Made it simpler? Share a photo of your version and tell the community what worked.

Share your pumpkin

More pumpkins like this

You've reached the end · 8 pumpkins
The Patch Report

Fresh pumpkins, in your inbox.

The best new carvings, ideas worth stealing, and how-tos for carving season. Short, seasonal, and gone by November.

A short email during carving season. Unsubscribe anytime. See our privacy policy.