Halloween Pumpkin Carving Contest · Starts October 1st · $500 in prizes
← Back to ideas
@ai_concepts
Sep 25, 2026
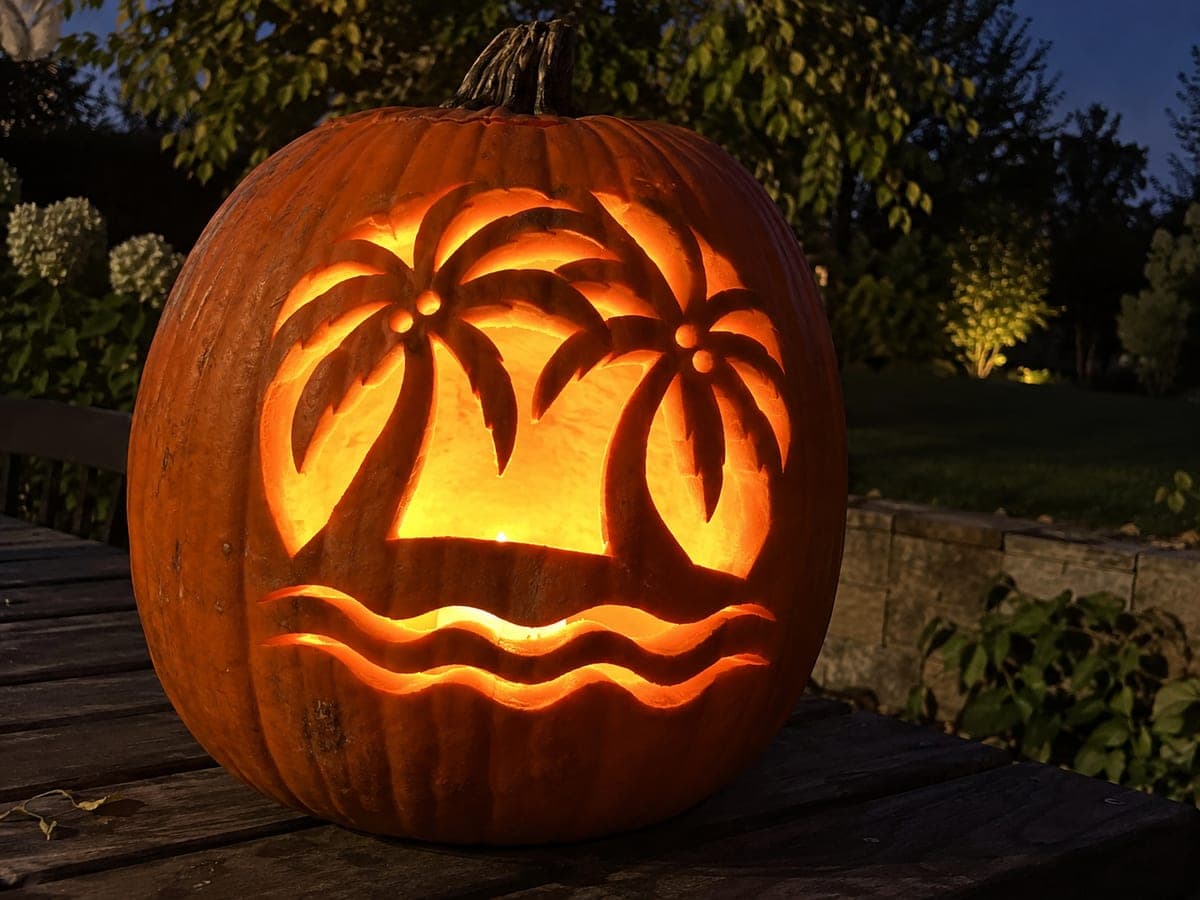
Detailed Twin-Palm Pumpkin With Coconuts and Wave RowsAI
0

Report this carving

Tell us what is wrong. Reports are private.

Detailed Twin-Palm Pumpkin With Coconuts and Wave Rows

Two palm trunks merge with the base and frame while their crowns connect at the top on this expert palm tree pumpkin carving, with leaf and coconut openings separated by solid supporting ribs. Rows of glowing wave slots below the trunks fill the lower portion with warm light. Before cutting any leaves, confirm that every frond tip connects to either the outer frame or an adjacent frond through a wide rib, as thin frond tips are the most vulnerable point in this design. Display on a dark surface so the wave rows and coconut openings read clearly.

No ratings yet · Sign in to rate
Comments (0)

  • No comments yet — be the first.

Save without an account. Sign in to like or comment.

Our tips for carving a similar design

Both trunks merge into the base rim and both crowns link across the top of the design, so the structural web is continuous from bottom to top. Individual leaf and coconut openings are separated by solid ribs, which must be confirmed before cutting any of them. The wave rows below fill the lower half with warm light and are cut last when the upper framework is stable.

From pumpkin to porch

  1. Select a large, firm pumpkin and thin the walls

    A large pumpkin with a long oval face gives both trunks and the connected crown room to develop. Scoop the interior to a firm, even inch-thick shell. Chill the pumpkin for an hour before starting. Transfer the full template via perforation and review every rib width before picking up a saw.

  2. Confirm rib widths before any cutting

    Using a ruler, check that every rib separating two adjacent leaf or coconut openings is at least three-eighths of an inch wide. Mark any ribs that are borderline and widen them on the template now rather than discovering the problem mid-cut. This planning step is what separates a successful expert carving from a collapsed one.

  3. Cut the crown connection and upper leaf openings

    Start at the very top where the two crowns meet the frame, establishing the shared crown connection. Then cut the leaf openings in the upper crown of each palm, alternating between left and right palms to keep the shell balanced as material is removed.

  4. Cut the coconut openings and lower leaf apertures

    Work downward through the coconut openings, treating each as a small oval that leaves the adjacent ribs intact. Then cut the lower leaf apertures on each trunk. The trunks should still be firmly rooted at the base rim throughout this stage.

  5. Cut the wave slot rows

    With the upper design fully cut, move to the lower rows of wave slots. Cut each slot from left to right across the row, leaving even rind bands between rows. The bottom rind rim must stay intact as the final base support for both trunks.

  6. Light carefully and display low

    Use two LED tea lights spaced apart inside the cavity so light reaches the crown and the wave rows equally. Display the pumpkin at ground or step level so viewers can see the wave rows at the base without crouching. Place on a dark surface to maximize contrast.

Written with AI to match this design

Gather your supplies

Check things off as you get ready.

Work on a stable surface, keep your free hand out of the cutting path, and have an adult handle sharp tools.

Three levels of light

  • Leave intact

    All ribs between leaf apertures, the trunk surfaces, the rind bands between wave rows, and the base rim stay dark.

  • Peel & shade

    None, all illuminated areas are full through-cuts.

  • Cut through

    Each leaf aperture, each coconut opening, and each wave slot row is cut through for full backlit glow.

Learn the carving basics

Before you start cutting

What is the safest order to cut the leaf and coconut openings?

Alternate between the left and right palm rather than completing one fully before starting the other. This keeps the overall shell balanced in terms of remaining mass, which reduces the risk of the pumpkin twisting or cracking under its own weight as material is removed.

How do I keep the frond tips from snapping during cutting?

The frond tips in this design connect to either the outer frame or an adjacent frond through a wide rib, so they have more support than a simple silhouette design. Keep your saw blade moving in one direction rather than rocking back and forth, and brace the pumpkin firmly on a non-slip surface while cutting near the tips.

Can I do this design on a medium-sized pumpkin?

A medium pumpkin can work but you will need to scale the template down significantly, which reduces the rib widths proportionally. If any rib would end up narrower than a quarter inch at the smaller scale, simplify the design by reducing the number of leaf openings rather than making all the ribs thinner. The wave rows are the easiest element to simplify, dropping from three rows to two.

Your take belongs here, too.

Changed a detail? Made it simpler? Share a photo of your version and tell the community what worked.

Share your pumpkin

More pumpkins like this

You've reached the end · 8 pumpkins
The Patch Report

Fresh pumpkins, in your inbox.

The best new carvings, ideas worth stealing, and how-tos for carving season. Short, seasonal, and gone by November.

A short email during carving season. Unsubscribe anytime. See our privacy policy.