Halloween Pumpkin Carving Contest Β· Starts October 1st Β· $500 in prizes
← Back to ideas
@ai_concepts
Sep 25, 2026
Multi-Star Constellation Pumpkin With Glowing Points and LinesAI
0

Report this carving

Tell us what is wrong. Reports are private.

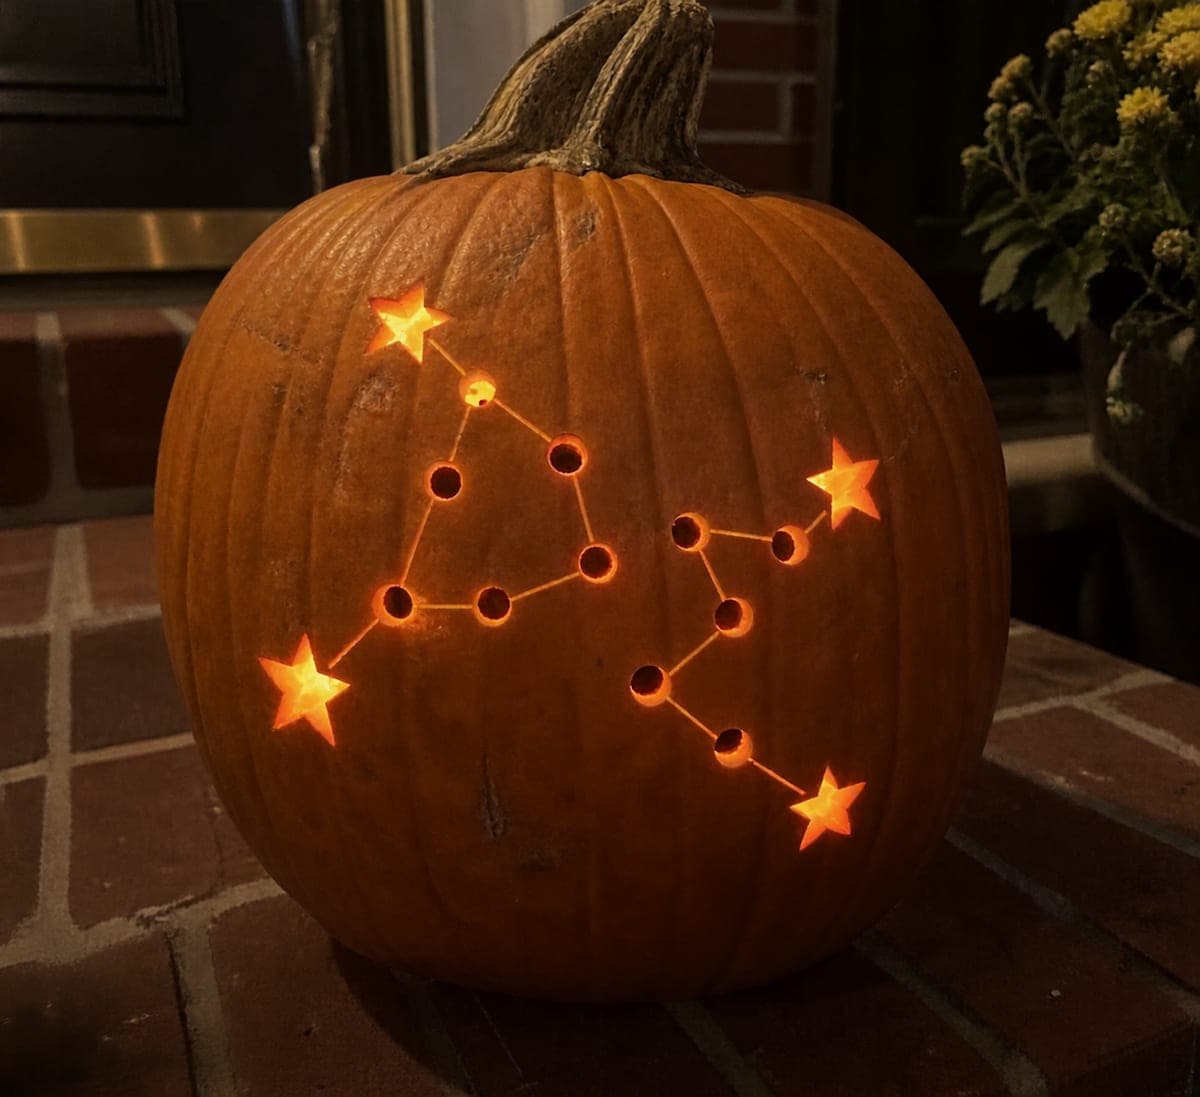
Multi-Star Constellation Pumpkin With Glowing Points and Lines

Invented star groups formed from round through-holes, shallow backed connecting grooves, and larger shallow star accents cover this hard constellation pumpkin carving in a detailed star-chart pattern. The backed grooves preserve the enclosed rind between constellation points, which is what keeps the design intact despite the many individual elements. Cut all the through-hole stars first before making any backed grooves, so the shell remains stiff while you work on the fine surface detail. The contrast between fully glowing holes and softly lit backed grooves gives the finished jack-o-lantern a genuine astronomical quality.

No ratings yet Β· Sign in to rate

Comments (0)

  • No comments yet β€” be the first.

Save without an account. Sign in to like or comment.

Our tips for carving a similar design

The design layers three element types: round through-holes for bright stars, shallow backed connecting grooves for the lines, and larger shallow star accents for the biggest constellation points. Cutting all through-holes first keeps the shell rigid while the more delicate surface work follows. The backed grooves are the structural secret, preserving all the enclosed rind that would otherwise become loose flaps.

From pumpkin to porch

  1. Prepare and hollow

    Cut a bottom or back lid and remove all pulp. Thin the walls to just under an inch for even glow across the many apertures. A slightly thinner wall at this complexity level helps the backed grooves show up without requiring dangerously deep scoring.

  2. Transfer the full pattern

    Print the star-chart template and tape it securely to the pumpkin. Use a pushpin to poke a pilot hole at every star position, marking through-holes with one poke and accent stars with two pokes to distinguish them. Remove the template and verify the layout before cutting.

  3. Cut all through-hole stars

    Working from the smallest holes to the largest, use a round punch or drill bit to cut every through-hole across all the constellation groups. Complete this step entirely before touching the backing grooves or accent stars, so the shell stays as stiff as possible throughout the most structural phase.

  4. Score the connecting grooves

    Using a detail knife at a shallow angle, score each linking line between stars. Keep every groove backed, meaning it does not cut through the full shell. Vary your pressure very slightly for lines that pass over already-thinned areas near a star hole.

  5. Carve the large shallow star accents

    For the larger accent stars, use a V-tool or detail knife to remove just the outer layer of rind in a five-point star shape. The depth should match the grooves so the accent glow is consistent. Avoid undercutting the points, which would make them fragile.

  6. Light and review

    Place a bright LED bulb inside and check the overall glow in a dim room. If any groove is too faint, carefully deepen it by one additional pass. Display the finished pumpkin somewhere the full face is unobstructed so viewers can appreciate the whole star-chart pattern.

Written with AI to match this design

Gather your supplies

Check things off as you get ready.

Work on a stable surface, keep your free hand out of the cutting path, and have an adult handle sharp tools.

Three levels of light

  • Leave intact

    Background rind outside all constellation groups stays opaque and dark.

  • Peel & shade

    Backed connecting grooves and shallow star accents glow at a soft secondary level, tracing the lines between stars.

  • Cut through

    Round through-hole stars produce the brightest full-light points, creating clear star-chart contrast.

Learn the carving basics

Before you start cutting

How do I avoid cracking the rind as the design gets more complex?

Always cut through-holes before any backing grooves, so the shell has maximum stiffness at the most critical stage. Keep individual cuts to short controlled strokes and never force a blade. If you feel the shell flexing, pause and let the pumpkin rest in a cool place for an hour before continuing.

The grooves connecting two nearby star holes are very short. How do I keep them clean?

For very short grooves between close holes, a single firm pull of the detail knife is usually enough. You can also use the corner of a V-tool for very precise short lines. Mark the groove path in pencil first so you do not overshoot into an unintended area.

Is there a good order for tackling multiple constellation groups?

Yes. Finish all the through-holes in one group completely before moving to the next group. This way, if the shell becomes slightly flexible in one area, you can compensate by working more gently in adjacent groups. Do not jump between groups while still cutting through-holes.

Your take belongs here, too.

Changed a detail? Made it simpler? Share a photo of your version and tell the community what worked.

Share your pumpkin

More pumpkins like this

You've reached the end Β· 8 pumpkins
The Patch Report

Fresh pumpkins, in your inbox.

The best new carvings, ideas worth stealing, and how-tos for carving season. Short, seasonal, and gone by November.

A short email during carving season. Unsubscribe anytime. See our privacy policy.