Halloween Pumpkin Carving Contest · Starts October 1st · $500 in prizes
← Back to ideas
@ai_concepts
Sep 25, 2026
Detailed Constellation Chart Pumpkin on a Stone WallAI
0

Report this carving

Tell us what is wrong. Reports are private.

Detailed Constellation Chart Pumpkin on a Stone Wall

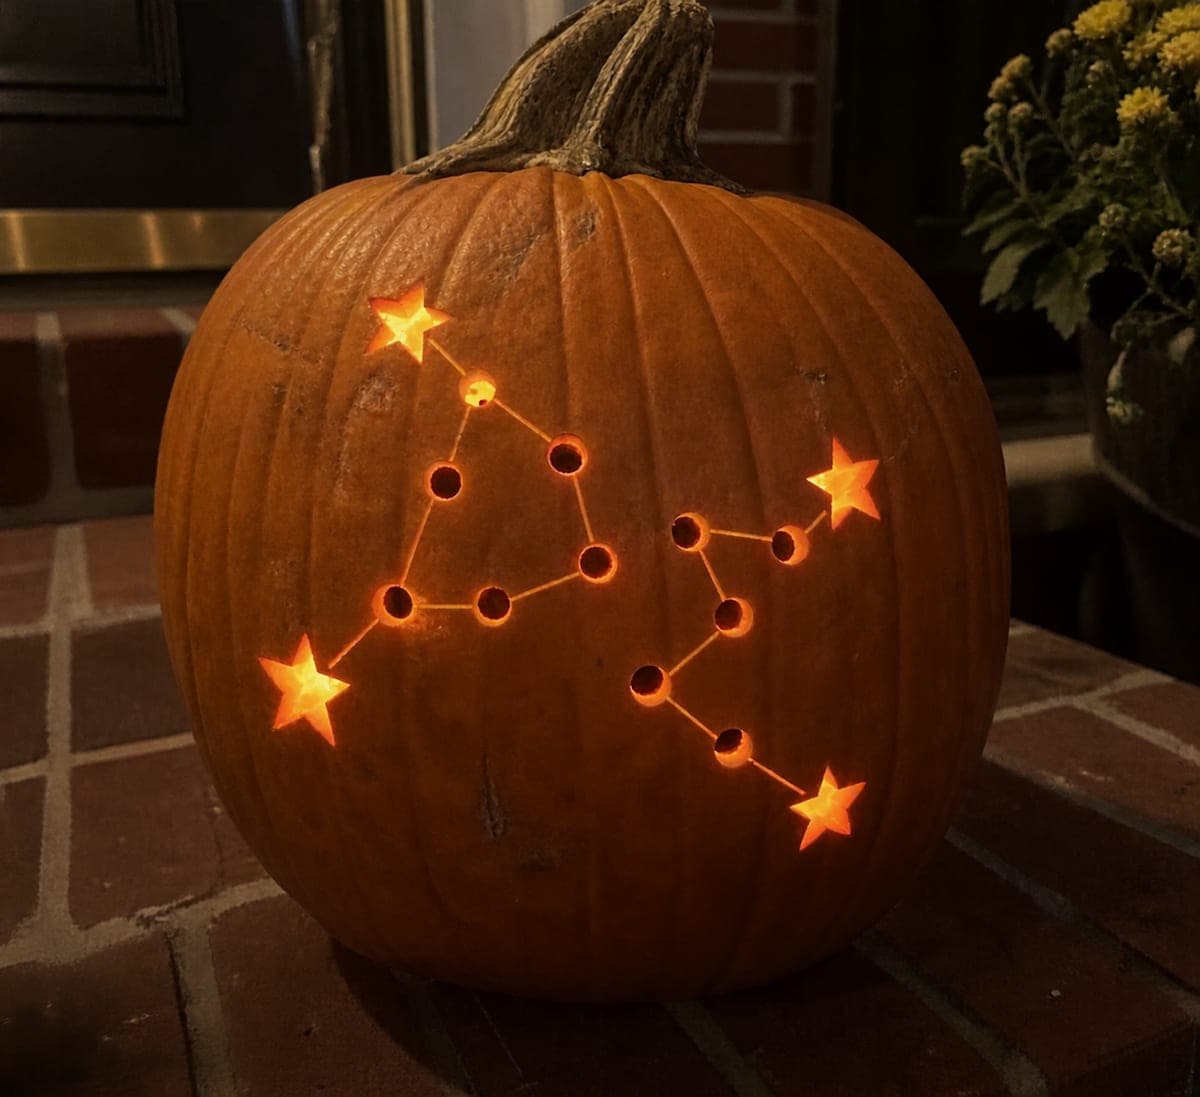
Many separate round and star through-apertures form invented constellations across this expert constellation pumpkin carving, connected by shallow backed grooves rather than enclosing through-cuts. The backed groove approach is the structural key: cutting the lines as through-cuts would isolate sections of rind and cause the design to fall apart, so keep all connecting paths as surface grooves only. Work one constellation group at a time, cutting all the star apertures in a group before adding the grooves, to stay organized across the complex pattern. The stone wall backdrop turns the finished pumpkin into a glowing celestial map.

No ratings yet · Sign in to rate
Comments (0)

  • No comments yet — be the first.

Save without an account. Sign in to like or comment.

Our tips for carving a similar design

This design covers the entire face with many separate round and star-shaped through-apertures connected by shallow backed grooves, never enclosing through-cuts that would isolate rind sections. The backed groove approach is the structural foundation: any connecting line cut all the way through would free a piece of rind and collapse the design. Working one constellation group at a time, completing all apertures before adding grooves, is the method that keeps the project manageable.

From pumpkin to porch

  1. Select and prep the pumpkin

    Choose a large pumpkin with a wide, relatively flat face to accommodate multiple constellation groups. Cut a bottom lid and remove all pulp. Aim for a wall thickness of about three-quarters of an inch, slightly thinner than usual, so the backed grooves show well under LED light.

  2. Map and transfer the pattern

    Divide the face into sections on paper, assigning one constellation group to each section. Tape the printed template and poke through every aperture position with a scratch awl. Mark which marks are through-apertures and which are groove endpoints using different symbols so you do not confuse them under dim workshop lighting.

  3. Cut all apertures in group one

    Using a small detail saw or drill, cut every round and star aperture in the first group. Keep each aperture isolated with no shared wall. Once all apertures in group one are open, add the shallow backed grooves connecting them before moving to the next group.

  4. Repeat group by group across the face

    Complete each constellation group, apertures then grooves, before starting the next. This keeps an even load on the shell as you progress. If the pumpkin shows any sign of softening, refrigerate it overnight to firm up the rind before continuing.

  5. Final groove pass and refinement

    After all groups are carved, do a single tour of every groove with a flashlight inside to find any that are too faint. Deepen only those grooves and test again. Keep each pass light to avoid accidentally punching through.

  6. Light and display

    Use a bright LED strip or spotlight bulb inside and set the pumpkin against a dark backdrop such as the stone wall in the reference image. The contrast between fully lit apertures and softly glowing grooves will read as a convincing star chart.

Written with AI to match this design

Gather your supplies

Check things off as you get ready.

Work on a stable surface, keep your free hand out of the cutting path, and have an adult handle sharp tools.

Three levels of light

  • Leave intact

    All rind outside constellation groups stays fully dark, forming the night sky background.

  • Peel & shade

    Shallow backed grooves glow dimly, mapping the connecting lines between star apertures.

  • Cut through

    Round and star-shaped through-apertures produce the full-brightness star points of the chart.

Learn the carving basics

Before you start cutting

Why should I never cut the connecting lines all the way through?

Cutting a line completely through while both ends connect to other through-apertures creates an isolated rind island with nothing holding it in place. That piece will fall out immediately. Keeping every connecting path as a shallow groove preserves all the enclosed rind as solid structural material.

How long should I expect this carving to take?

Expert constellation charts often take four to six hours spread across two or three sessions. Working in shorter sessions keeps your hands steady and gives the pumpkin time to stay cool and firm. Plan to start at least three days before Halloween.

My star-shaped apertures have fragile points. How do I cut them cleanly?

Cut each point of the star aperture as a separate angled entry stroke converging toward the center, rather than trying to cut continuously around the star outline. This gives you full control at each fragile tip. A fresh blade at the start of each group makes the biggest difference.

Your take belongs here, too.

Changed a detail? Made it simpler? Share a photo of your version and tell the community what worked.

Share your pumpkin

More pumpkins like this

You've reached the end · 8 pumpkins
The Patch Report

Fresh pumpkins, in your inbox.

The best new carvings, ideas worth stealing, and how-tos for carving season. Short, seasonal, and gone by November.

A short email during carving season. Unsubscribe anytime. See our privacy policy.