Halloween Pumpkin Carving Contest Β· Starts October 1st Β· $500 in prizes
← Back to ideas
@ai_concepts
Sep 25, 2026
Twin Zigzag Constellation Pumpkin Beside a Garden PathAI
0

Report this carving

Tell us what is wrong. Reports are private.

Twin Zigzag Constellation Pumpkin Beside a Garden Path

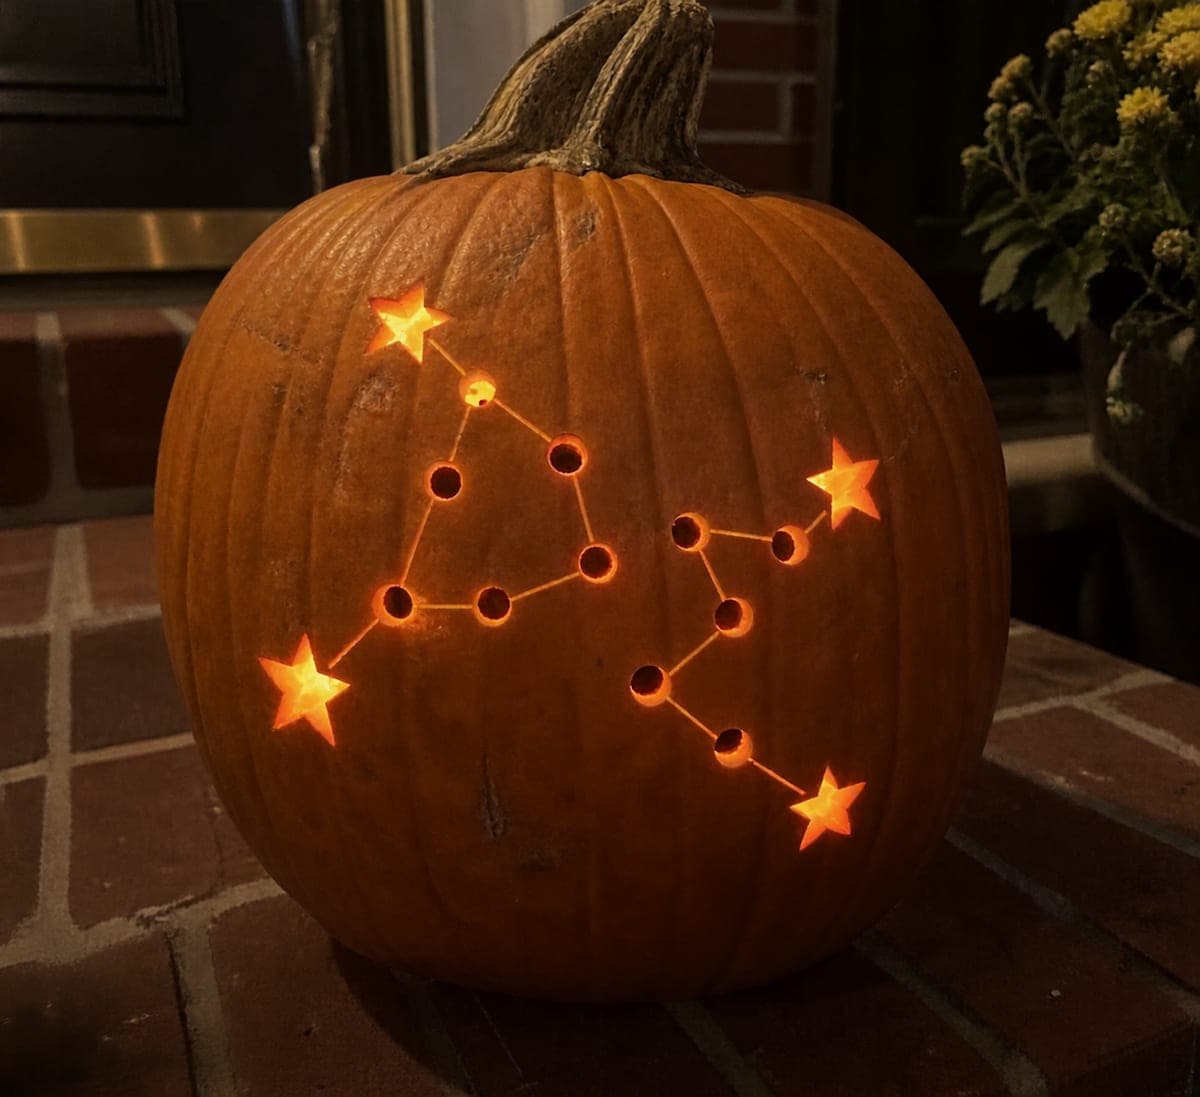
Two invented zigzag star groups made from spaced round through-holes and shallow backed linking grooves glow on this medium constellation pumpkin carving, displayed beside a garden path. The two separate constellations create visual balance while keeping enough intact rind between them for structural security. Cut all the round star holes first across both constellations, then add the shallow linking grooves with a detail tool. The gentle zigzag paths give this constellation pumpkin carving idea a dynamic, energetic quality compared to a simple circular cluster.

No ratings yet Β· Sign in to rate

Comments (0)

  • No comments yet β€” be the first.

Save without an account. Sign in to like or comment.

Our tips for carving a similar design

The design places two separate zigzag constellations on the same pumpkin face, using round through-holes for the stars and shallow backed linking grooves for the connecting lines. Keeping enough intact rind between the two clusters is the main structural concern. Completing all the star holes across both groups before adding any grooves ensures the shell stays stiff throughout the most demanding cutting.

From pumpkin to porch

  1. Hollow and prepare the pumpkin

    Cut a bottom opening so the lid stays invisible from the front. Scoop out all seeds and wet pulp, then thin the interior wall evenly to about one inch. A consistent wall thickness produces even glow across all the star holes.

  2. Plan both constellations

    Sketch both zigzag paths on paper first and hold the sketch against the pumpkin to check proportions. Transfer the star positions with a pushpin, leaving at least two finger-widths of intact rind between the two constellation clusters to prevent cracking.

  3. Cut all star holes

    Use a small round punch or drill bit to cut every star hole in both constellations before making any grooves. Starting with the largest or brightest stars in each group, work along each zigzag path. Finish all holes across both clusters before moving on.

  4. Score the linking grooves

    With a detail knife angled about 30 degrees from vertical, score each connecting groove to roughly one-third rind depth. Work from star hole to star hole in a single pulled stroke for the cleanest line. Keep the grooves lighter than the surrounding rind surface so the depth is visible but the shell is not weakened.

  5. Add dot accents

    Use the punch tool at a very shallow setting, or a scratch awl, to add small accent dots scattered between the two clusters. These tiny additions give the sky a fuller, more realistic feel without adding structural risk.

  6. Light and display

    Place a bright LED inside the pumpkin, centered so light reaches both constellation clusters evenly. Set the pumpkin beside a garden path at a height where the carved face is at eye level for the best viewing angle.

Written with AI to match this design

Gather your supplies

Check things off as you get ready.

Work on a stable surface, keep your free hand out of the cutting path, and have an adult handle sharp tools.

Three levels of light

  • Leave intact

    All rind outside the two constellation paths stays fully dark, framing both clusters.

  • Peel & shade

    The shallow linking grooves between star holes glow dimly, tracing the zigzag paths at lower intensity.

  • Cut through

    Every round star hole is cut fully through, producing the brightest points of light in both clusters.

Learn the carving basics

Before you start cutting

How far apart should the two constellations be?

Leave at least two finger-widths, roughly 1.5 inches, of solid rind between the outermost stars of each cluster. This gap provides structural support and also creates visual breathing room that makes both zigzag paths easier to read.

My grooves look inconsistent in depth. What should I do?

Score each groove in one smooth pulled stroke rather than sawing back and forth. If a groove is too shallow, make one more controlled pass at the same angle. A small LED flashlight held against the inside wall while you work lets you see how much light is already coming through.

Can I invent my own zigzag path instead of a preset template?

Absolutely. The design is built around invented star groups, so any zigzag arrangement that fits the pumpkin face works. Just mark all your dot positions first and step back to check the overall balance before cutting anything.

Your take belongs here, too.

Changed a detail? Made it simpler? Share a photo of your version and tell the community what worked.

Share your pumpkin

More pumpkins like this

You've reached the end Β· 8 pumpkins
The Patch Report

Fresh pumpkins, in your inbox.

The best new carvings, ideas worth stealing, and how-tos for carving season. Short, seasonal, and gone by November.

A short email during carving season. Unsubscribe anytime. See our privacy policy.