Halloween Pumpkin Carving Contest Β· Starts October 1st Β· $500 in prizes
← Back to ideas
@ai_concepts
Sep 25, 2026
Ladle Constellation Pumpkin With Shallow Connecting LinesAI
0

Report this carving

Tell us what is wrong. Reports are private.

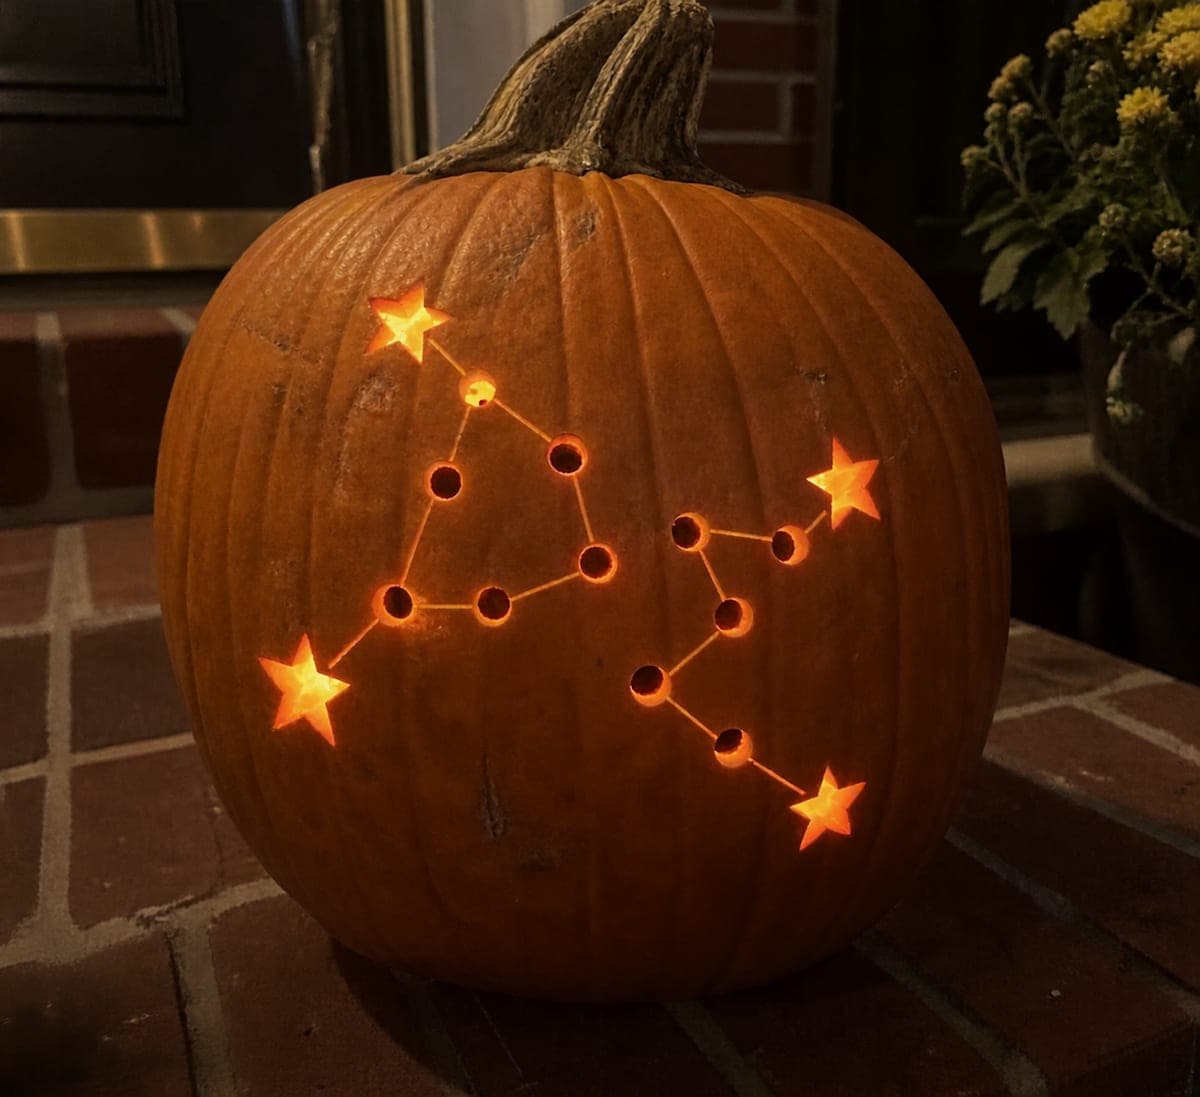
Ladle Constellation Pumpkin With Shallow Connecting Lines

Round star through-holes connected by shallow backed lines form a ladle-shaped constellation on this easy constellation pumpkin carving, with the shell staying fully connected throughout. Because the connecting lines do not cut all the way through, the design is structurally simple despite having multiple elements. Cut the round star holes first with a small drill bit or punch tool, then carefully score the connecting lines to a shallow depth with a detail knife. A candle inside makes the star holes glow brilliantly while the scored lines catch the light more subtly.

No ratings yet Β· Sign in to rate

Comments (0)

  • No comments yet β€” be the first.

Save without an account. Sign in to like or comment.

Our tips for carving a similar design

The design uses round through-holes for the bright stars and shallow backed scores for the connecting lines, so the shell stays fully intact and sturdy. Because the connecting lines never pierce through, the only real structural work is keeping enough rind between each star hole. Plan the ladle shape on paper first, then transfer the dot positions before touching a blade.

From pumpkin to porch

  1. Prep and hollow the pumpkin

    Cut a lid from the back or bottom so the opening stays hidden when the pumpkin faces forward. Scoop out seeds and stringy pulp until the interior wall is about an inch thick throughout. Dry the inner wall with a paper towel so tools grip cleanly.

  2. Transfer the constellation pattern

    Sketch the ladle shape lightly in dry-erase marker or tape a printed template to the pumpkin. Use a pushpin or scratch awl to poke a small pilot hole at each star position. Remove the template and connect the dots mentally to confirm the shape reads as a ladle before proceeding.

  3. Drill or punch the star holes

    Use a small drill bit, apple corer, or round punch tool to cut each star hole cleanly. Keep all holes the same diameter for a uniform look. Wipe away rind shavings between holes so you can see the spacing clearly.

  4. Score the connecting lines

    With a detail knife held at a shallow angle, score each connecting line to a depth of about a third of the rind thickness. Do not cut all the way through. Consistent shallow pressure is easier to control when you pull the blade toward you rather than push it away.

  5. Clean up and light

    Brush out any loose rind bits with a dry pastry brush. Place an LED tea light or small LED bulb inside, pointing toward the carved face. The star holes will glow brightly while the scored lines catch the light at a softer, secondary level.

  6. Photograph and display

    Take your photo in a darkened room to capture the full contrast between the glowing stars and the dim connecting lines. Display the pumpkin on a flat surface where the carved side faces viewers directly.

Written with AI to match this design

Gather your supplies

Check things off as you get ready.

Work on a stable surface, keep your free hand out of the cutting path, and have an adult handle sharp tools.

Three levels of light

  • Leave intact

    All rind outside the constellation pattern stays dark and opaque.

  • Peel & shade

    The shallow scored connecting lines between stars glow at a dim, secondary level as light filters through the thinned rind.

  • Cut through

    Each round star hole is cut through completely, producing a bright focused glow.

Learn the carving basics

Before you start cutting

How do I keep all the star holes the same size?

Use a single punch tool or drill bit for every hole rather than freehand cutting. Clamp a depth stop to your drill bit with tape so it cannot go deeper than you intend. Practice on a scrap piece of pumpkin rind first to dial in the size.

The scored lines are barely visible. How do I make them show more?

Score a second pass at the same angle to remove a little more rind. The brighter your interior light source, the more even a shallow groove will glow, so switching from a tea light to a brighter LED bulb often solves the problem without any extra cutting.

Can I do this without a drill?

Yes. A round linoleum-style punch tool or even a sharp apple corer pressed and twisted will cut clean holes. A metal straw pressed firmly through the wall also works for very small star holes.

Your take belongs here, too.

Changed a detail? Made it simpler? Share a photo of your version and tell the community what worked.

Share your pumpkin

More pumpkins like this

You've reached the end Β· 8 pumpkins
The Patch Report

Fresh pumpkins, in your inbox.

The best new carvings, ideas worth stealing, and how-tos for carving season. Short, seasonal, and gone by November.

A short email during carving season. Unsubscribe anytime. See our privacy policy.