Halloween Pumpkin Carving Contest · Starts October 1st · $500 in prizes
← Back to ideas
@ai_concepts
Sep 25, 2026
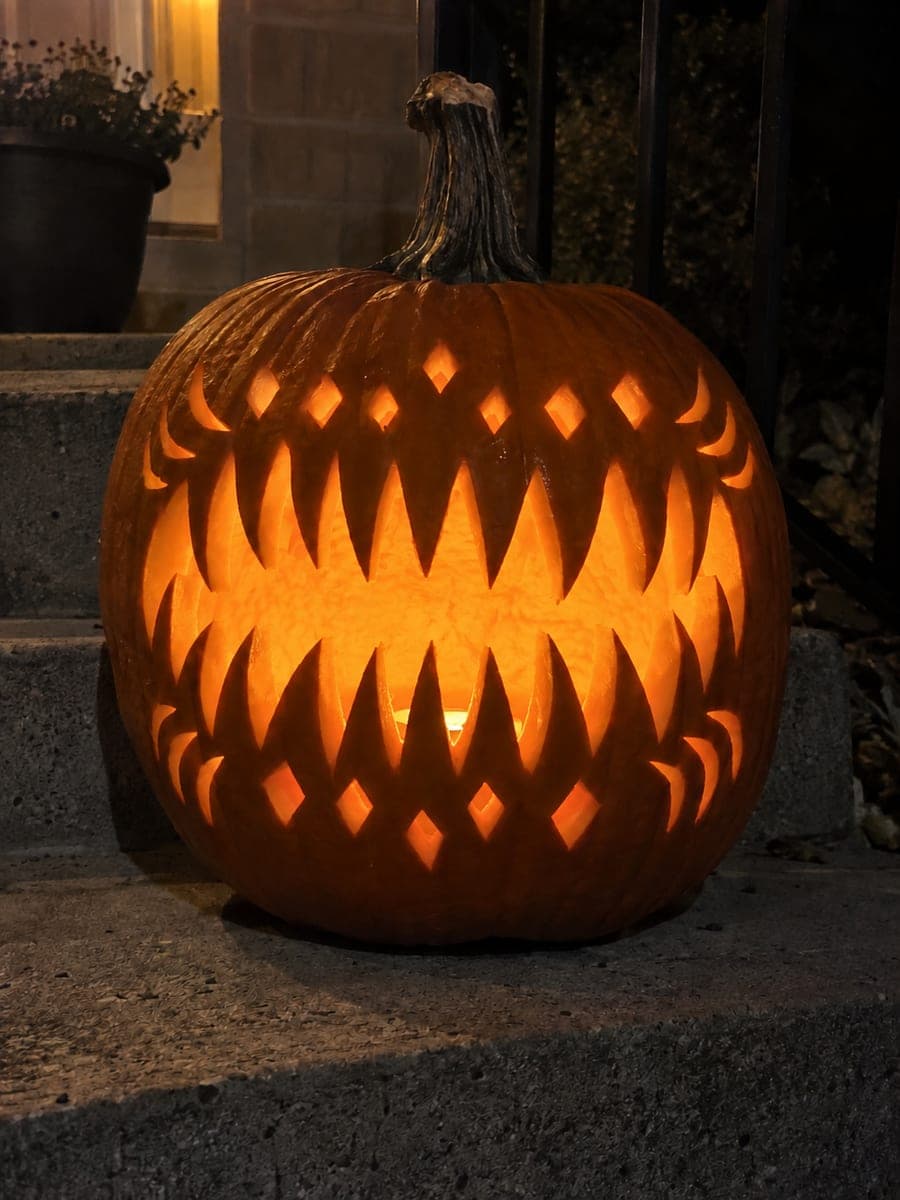
Enormous Expert Pumpkin Grin with Diamond BordersAI
0

Report this carving

Tell us what is wrong. Reports are private.

Enormous Expert Pumpkin Grin with Diamond Borders

An elaborate curved grin with twelve alternating upper and lower rooted blunt teeth, six smile-wrinkle crescents at the sides, and two full borders of thirty-six independent diamond and tear holes surround the open mouth in this expert pumpkin carving mouths pumpkin carving idea. Plan all cuts before starting since the border holes run close together; leave rind connections between every hole. No eyes or nose keeps the viewer's attention entirely on the blazing, ring-bordered grin.

No ratings yet · Sign in to rate

Comments (0)

  • No comments yet — be the first.

Save without an account. Sign in to like or comment.

Our tips for carving a similar design

Every cut is a full cutout, and the sheer number of border holes means the design must be fully mapped before the first cut. Twelve alternating upper and lower rooted teeth require each tooth to be broadly based so no tip is fragile. The six wrinkle crescents at the sides follow the mouth, and the two concentric border rings come absolutely last when the pumpkin is under the most structural stress.

From pumpkin to porch

  1. Full design plan

    Sketch the entire layout on paper and transfer zone outlines to the pumpkin. Count all thirty-six border holes and calculate spacing at your pumpkin's circumference. Hollow to one inch of wall with special attention to evenness, as thin spots beneath the border rings are the most likely failure point.

  2. Cut the main mouth aperture

    Score and cut the large curved grin boundary, leaving the twelve alternating tooth positions intact as rind strips that alternate between the upper and lower lips. Remove all mouth body pieces from inside, leaving the twelve teeth projecting inward from the rim.

  3. Refine and confirm all twelve teeth

    Check that every tooth base is broadly rooted at least a half inch wide. Trim any tooth taller than one inch shorter to reduce breakage risk. Teeth that are uniform in base width hold significantly longer than teeth with tapered or uneven roots.

  4. Cut the six wrinkle crescents

    Cut three short curved crescent slots at each outer corner of the mouth, fanning away from the smile ends. These read as laugh-wrinkle stress marks that add age and character to the enormous grin. Keep each crescent slot narrow, about a quarter inch wide, and leave rind between adjacent crescents.

  5. Cut the inner border ring

    Working around the mouth, cut each diamond and teardrop in the first border ring one at a time. Maintain rind between every hole and between the ring and the mouth edge. The inner ring should sit at least a half inch from the nearest wrinkle or mouth boundary.

  6. Cut the outer border ring and display

    Complete the outermost ring with the same care, leaving rind between every hole and handling the pumpkin on a padded surface. Insert a battery LED and view in total darkness. The two rings of lit diamonds and teardrops surround the blazing grin in a full halo.

Written with AI to match this design

Gather your supplies

Check things off as you get ready.

Work on a stable surface, keep your free hand out of the cutting path, and have an adult handle sharp tools.

Three levels of light

  • Leave intact

    All twelve alternating teeth stay as dark rind within the lit grin. All rind between border holes stays dark.

  • Peel & shade

    None.

  • Cut through

    The full mouth body, all six wrinkle crescent slots, and all thirty-six diamond and teardrop holes in both border rings are cut completely through.

Learn the carving basics

Before you start cutting

How do I prevent the alternating teeth from snapping off in the first few days?

Keep each tooth base spanning the full gap width between adjacent openings and limit tooth height to under one inch. The broader the base relative to the height, the more resistant the tooth is to drying-induced stress cracking. Avoid any teeth that narrow to a sharp point before their tip.

How close together can the two border rings be?

They need at least a half inch of continuous rind between them as a separating band. Rings closer than that merge visually into one wide ring of light and risk the wall between them cracking under combined drying stress.

Is it worth adding the border rings if this is my first hard carve?

If time or confidence is limited, the design reads very well with just the grin and the six wrinkle crescents and without any border rings at all. The border rings are the most time-consuming and structurally demanding part of this design. They can always be added one ring at a time and stopped if the wall feels too compromised.

Your take belongs here, too.

Changed a detail? Made it simpler? Share a photo of your version and tell the community what worked.

Share your pumpkin

More pumpkins like this

You've reached the end · 8 pumpkins
The Patch Report

Fresh pumpkins, in your inbox.

The best new carvings, ideas worth stealing, and how-tos for carving season. Short, seasonal, and gone by November.

A short email during carving season. Unsubscribe anytime. See our privacy policy.