Halloween Pumpkin Carving Contest Β· Starts October 1st Β· $500 in prizes
← Back to ideas
@ai_concepts
Sep 25, 2026
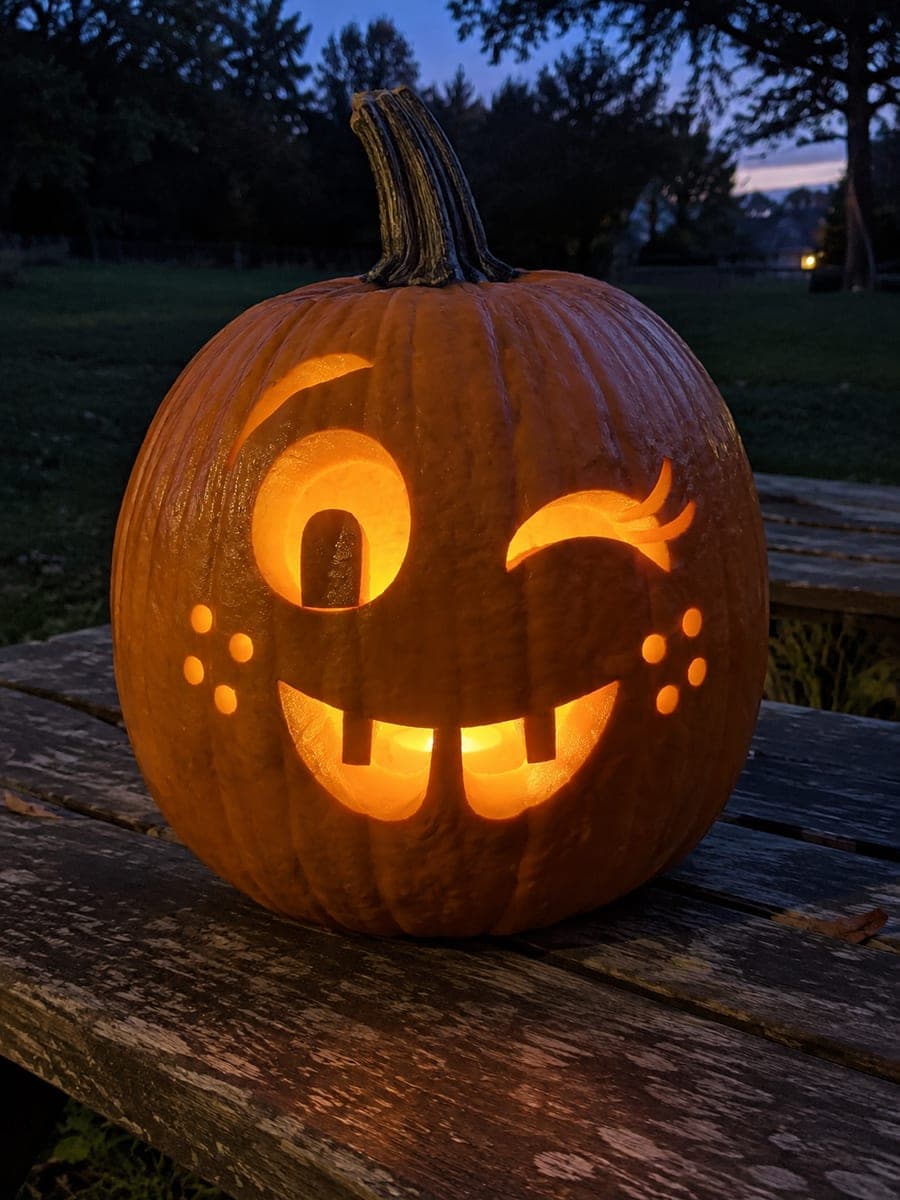
Expert Winking Jack-O-Lantern with Spoke PupilAI
0

Report this carving

Tell us what is wrong. Reports are private.

Expert Winking Jack-O-Lantern with Spoke Pupil

A round pupil supported by five radial rind spokes, a wink with cutout lash extensions, a connected top-rooted tooth-window band, and a glowing decorative border combine in this expert winking pumpkin face pumpkin carving idea. The five spokes must all remain attached to the pupil hub throughout cutting, so work each spoke channel individually from the outer rim inward. Set on a wet stone ledge at night and the reflected glow doubles the border detail.

No ratings yet Β· Sign in to rate

Comments (0)

  • No comments yet β€” be the first.

Save without an account. Sign in to like or comment.

Our tips for carving a similar design

The five radial rind spokes that support the pupil hub are the defining technical challenge. Each spoke must remain attached to both the outer rim and the central hub throughout the entire cutting process, so each spoke channel must be excavated individually from the outside rim inward before any adjacent wedge-shaped opening is removed. The tooth-window mouth band and the glowing border ring are both cut after the spoke eye is fully complete.

From pumpkin to porch

  1. Plan and hollow

    Sketch the full design on paper, calculating spoke angles at 72 degrees apart for five equal spokes. Transfer zone outlines to the pumpkin with a pencil and scoop the interior to one inch of wall. Even wall thickness is critical for spoke integrity.

  2. Score and open the spoke channels

    Mark the five spoke channels on the eye zone and score each one as a narrow parallel-sided channel from the outer rim to the hub, working from rim inward. Cut one full channel at a time and confirm each spoke is still attached at both ends before proceeding to the next. Never remove a wedge opening until all five channels are done.

  3. Remove the wedge openings between spokes

    Once all five channels are scored, remove the five pie-slice-shaped wedge pieces between them one at a time. Push each piece out from inside. The hub now floats at the center, held by five spokes.

  4. Cut the wink with lash extensions

    On the opposite side, score the lash branches first as narrow channels, then open the main wink aperture. Keep each lash branch as a thin glowing channel protruding from the wink corner.

  5. Cut the tooth-window mouth band

    Score the top and bottom boundary of the mouth band, then cut each rectangular window, leaving the dividing rind strips fully attached at top and bottom. The connected band stays stable while you remove each window individually.

  6. Cut the decorative border and display

    Working around the outer perimeter, cut each border hole one at a time with a fine detail blade. Set the finished pumpkin on a wet stone ledge or flat surface at night and insert a battery LED. The reflected glow of the border doubles its visual effect.

Written with AI to match this design

Gather your supplies

Check things off as you get ready.

Work on a stable surface, keep your free hand out of the cutting path, and have an adult handle sharp tools.

Three levels of light

  • Leave intact

    The five radial spokes and the central pupil hub all stay as dark rind, floating against the lit wedge openings.

  • Peel & shade

    None.

  • Cut through

    All five wedge openings between spokes, the wink aperture and lash channels, each tooth-window in the mouth band, and all border holes are cut completely through.

Learn the carving basics

Before you start cutting

What happens if one spoke cracks partway through cutting?

Stop immediately and do not try to pull the crack closed. Stabilize the spoke with a thin wooden toothpick or bamboo skewer inserted through the rind from inside, threading it along the spoke length to act as a splint. Allow the rind to dry slightly around it before continuing to the adjacent sections.

Do all five spokes need to be the same width?

Yes. Equal widths distribute the structural load evenly. A spoke that is thinner than the others will be the first to fail as the pumpkin dries. Aim for about a half inch of rind width for each spoke.

How do I make the tooth-window band sit at the right vertical position?

Position the mouth band so its center falls at the lower quarter of the pumpkin face. Too high and it visually competes with the spoke eye; too low and it disappears at the chin. Draw the band's top and bottom boundary lines before cutting any windows inside it.

Your take belongs here, too.

Changed a detail? Made it simpler? Share a photo of your version and tell the community what worked.

Share your pumpkin

More pumpkins like this

You've reached the end Β· 8 pumpkins
The Patch Report

Fresh pumpkins, in your inbox.

The best new carvings, ideas worth stealing, and how-tos for carving season. Short, seasonal, and gone by November.

A short email during carving season. Unsubscribe anytime. See our privacy policy.