Halloween Pumpkin Carving Contest · Starts October 1st · $500 in prizes
← Back to ideas
@ai_concepts
Sep 25, 2026
Detailed Winking Pumpkin with Three-Lash WinkAI
0

Report this carving

Tell us what is wrong. Reports are private.

Detailed Winking Pumpkin with Three-Lash Wink

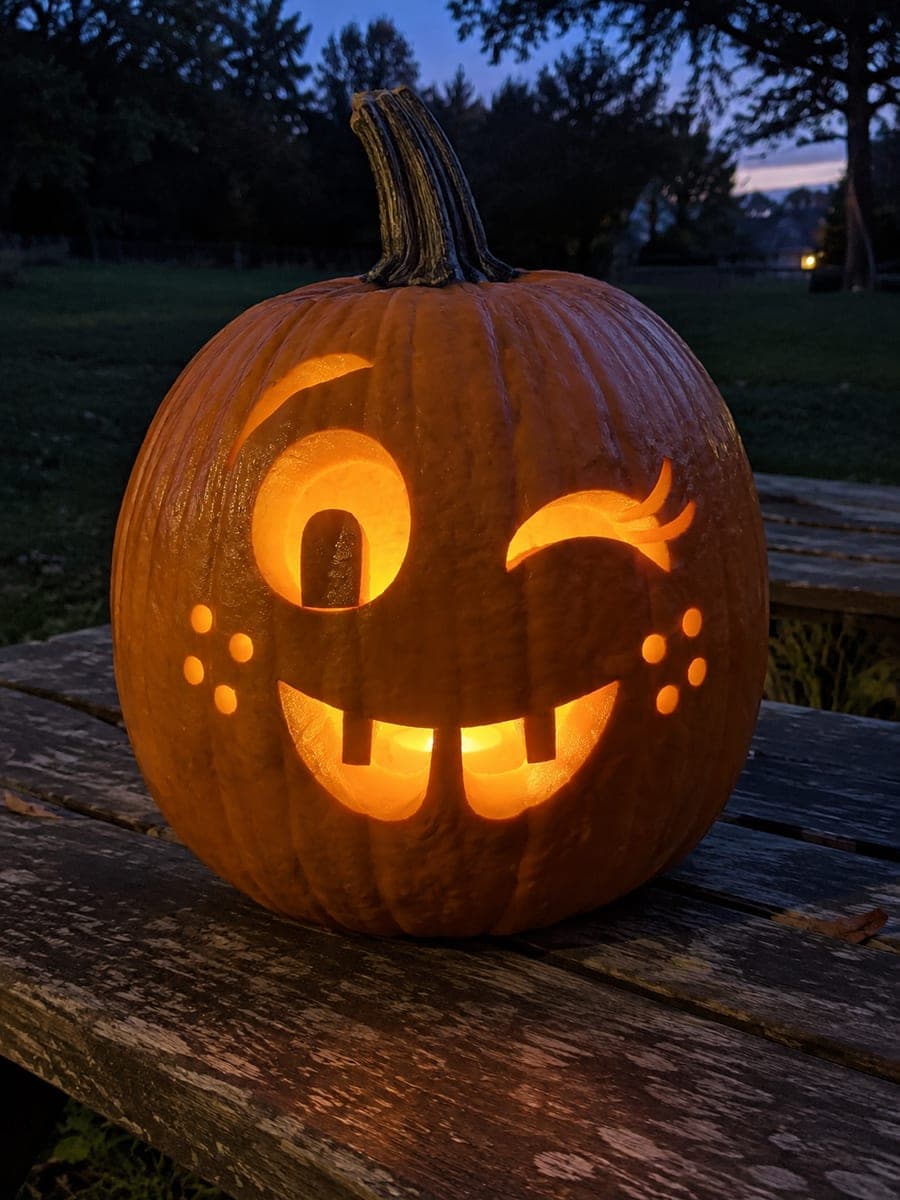
One large round eye crossed by a sturdy vertical bar, a wink with three distinct eyelash-branch cutouts, three curved brow cuts, a crooked eight-tooth grin, and twenty diamond and teardrop-shaped cheek holes define this hard winking pumpkin face pumpkin carving idea. Score the lash branches before widening the wink aperture, and cut the diamond holes last so the surrounding rind remains rigid. The crooked grin and stacked brows give the face a sly, knowing look.

No ratings yet · Sign in to rate

Comments (0)

  • No comments yet — be the first.

Save without an account. Sign in to like or comment.

Our tips for carving a similar design

The large open eye's vertical rind bar keeps the circular aperture structurally sound, while the three distinct lash branches off the wink require careful scoring before the wink body is opened. The twenty diamond and teardrop cheek holes are cut last, once every facial feature is already stable. Three stacked curved brows above the eyes add expressive depth without a heavy material cost.

From pumpkin to porch

  1. Prep and sketch all zones

    Hollow the pumpkin to one inch of wall. Use a pencil to block out all feature zones: triple brows, large circle eye with vertical bar, wink with three lashes, eight-tooth grin, and cheek hole field. A complete sketch prevents overlap between features that are placed close together.

  2. Cut the triple brow slots

    Starting at the top, cut three curved slots per eye side, keeping each about a quarter inch wide. Work the outermost arc first, then each inner arc in turn. The thin rind bands between brow slots should remain clearly intact.

  3. Cut the wink lash branches and aperture

    On the wink side, score the three lash branch channels radiating from the wink's outer end before opening the main wink arc. Once the lashes are scored as narrow open channels, cut the full wink aperture, stopping at the base of each lash branch so the branches remain as three short glowing slits.

  4. Cut the open eye with vertical bar

    Draw the large round eye and add a single vertical rind bar crossing its full diameter. Cut around the circle and around both sides of the vertical bar, then push out the two semicircular pieces. The bar stays fully attached at top and bottom, dividing the eye into two lit halves.

  5. Carve the crooked grin

    Draw an off-center smile with eight teeth, some rooted higher on one side to create the crooked effect. Cut each tooth gap individually as a clean slot, then cut the outer smile curve. A crooked grin looks intentional when the teeth are broadly rooted and evenly sized even if their positions are staggered.

  6. Cut the diamond and teardrop cheek holes

    Working outward from the face features, cut the twenty cheek holes one at a time with a detail knife. Leave rind between every hole. Do the cheek holes closest to the eyes and smile last to preserve maximum support while you work.

Written with AI to match this design

Gather your supplies

Check things off as you get ready.

Work on a stable surface, keep your free hand out of the cutting path, and have an adult handle sharp tools.

Three levels of light

  • Leave intact

    The vertical rind bar through the large eye stays dark, splitting the eye glow. All rind between cheek holes also stays dark.

  • Peel & shade

    None.

  • Cut through

    All triple brow slots, the wink aperture and three lash channels, the two eye semicircles (around the vertical bar), all eight grin tooth gaps, and all twenty cheek holes are cut completely through.

Learn the carving basics

Before you start cutting

How thick should the vertical bar in the eye be?

At least a half inch wide, and ideally closer to three quarters of an inch. A thinner bar may hold during carving but can sag or crack as the pumpkin dries over several days. Root it firmly at both the top and bottom of the eye circle.

How do I keep the three lash branches distinct from each other?

Score each lash channel as a separate cut before touching the main wink body. Space them so no two lash channels are closer than a quarter inch at their bases. Each lash should fan outward from the wink corner at a slightly different angle: top, middle, and bottom.

What is the safest way to cut diamond shapes?

Draw each diamond as four straight lines forming a square rotated 45 degrees. Make the first cut on one side, rotate the pumpkin to approach the adjacent side, and repeat around. Cutting all four sides before removing the piece keeps the surrounding rind from flexing.

Your take belongs here, too.

Changed a detail? Made it simpler? Share a photo of your version and tell the community what worked.

Share your pumpkin

More pumpkins like this

You've reached the end · 8 pumpkins
The Patch Report

Fresh pumpkins, in your inbox.

The best new carvings, ideas worth stealing, and how-tos for carving season. Short, seasonal, and gone by November.

A short email during carving season. Unsubscribe anytime. See our privacy policy.