Halloween Pumpkin Carving Contest · Starts October 1st · $500 in prizes
← Back to ideas
@ai_concepts
Sep 25, 2026
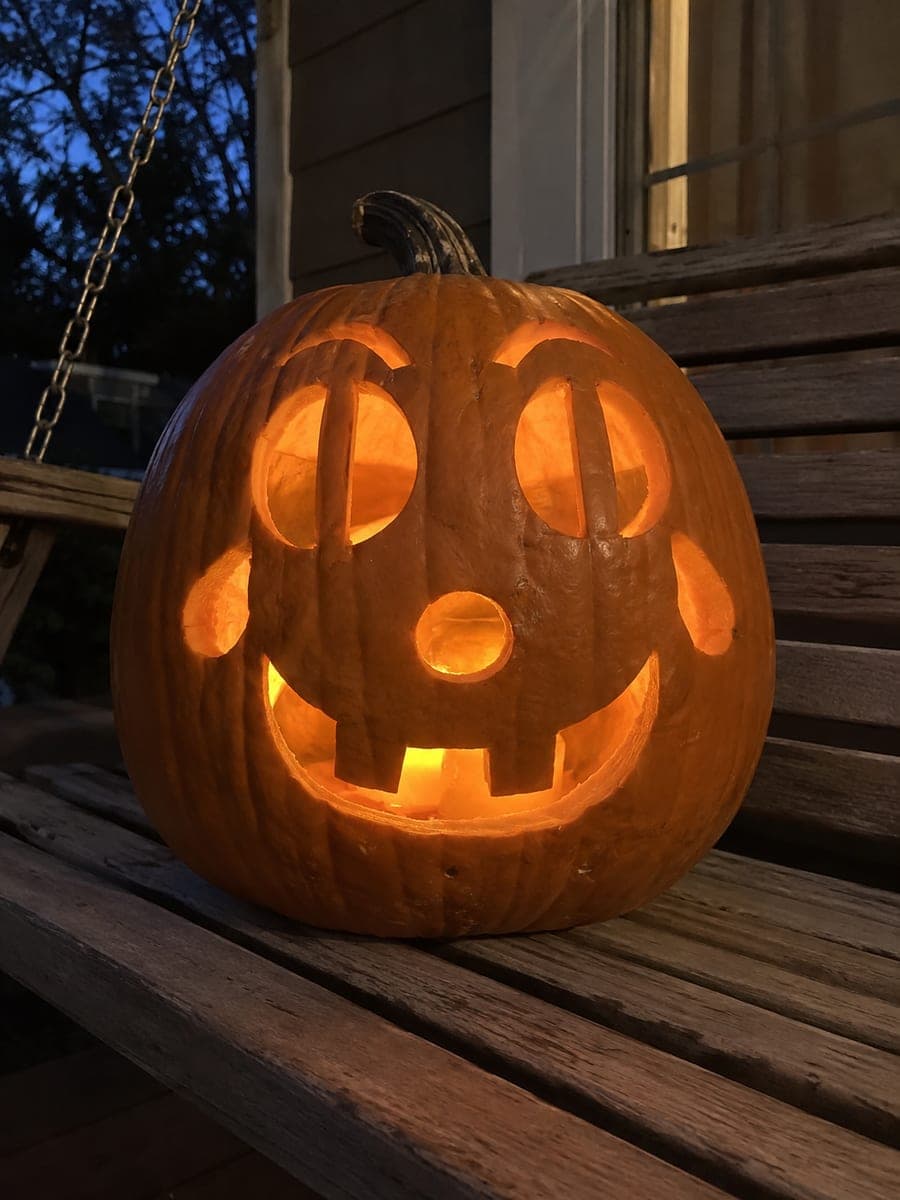
Spooky Clown Pumpkin with Teardrop Brows and Crooked GrinAI
0

Report this carving

Tell us what is wrong. Reports are private.

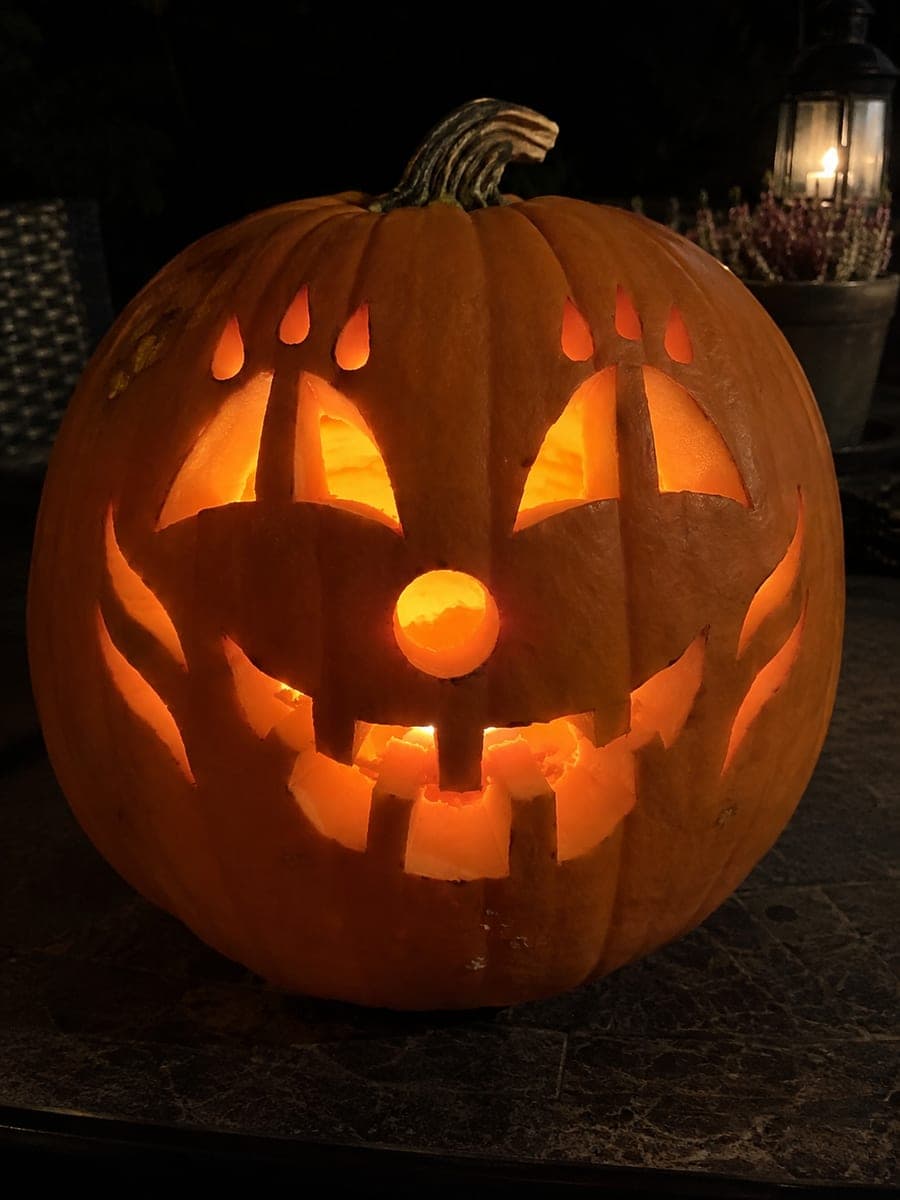
Spooky Clown Pumpkin with Teardrop Brows and Crooked Grin

Wide eye bars, teardrop brow apertures, and a crooked toothy grin with isolated decorative holes distinguish this spooky clown pumpkin carving from friendlier designs. Transfer the pattern with a stylus and tape, then cut the wide eye sections first, leaving the horizontal bars intact as structural bridges. Add the teardrop brow openings next and finish with the crooked grin and individual tooth shapes. Keeping substantial rind between each decorative hole is the key to preserving the face structure.

No ratings yet · Sign in to rate
Comments (0)

  • No comments yet — be the first.

Save without an account. Sign in to like or comment.

Our tips for carving a similar design

The spooky quality of this clown comes from combining wide structural eye bars with teardrop brow apertures that sit directly above the sockets, creating an arched, menacing expression. Transferring the pattern with a stylus removes guesswork from the layout. Wide bars must be cut last within their socket section to avoid premature destabilization. Substantial rind between each decorative hole is the non-negotiable rule that holds the whole face together.

From pumpkin to porch

  1. Hollow and transfer the pattern

    Cut a back-angled lid and scoop to three-quarters of an inch throughout. Print or draw the pattern on paper, tape it to the pumpkin face, and trace all outlines with a stylus to leave faint indent lines in the rind. Remove the paper and reinforce indent lines with a washable marker before cutting.

  2. Cut the wide eye sections first

    Work one eye socket at a time, carving the upper and lower sections of the socket around the horizontal bar. Leave the bar intact and attached to both the inner eye boundary and the outer edge on each side. Wide bars have more surface area at each endpoint than narrow bars, which means they are proportionally more stable but require more precise sectioning.

  3. Add the teardrop brow apertures

    Carve each teardrop brow aperture as a smooth isolated hole directly above the eye socket, leaving a clear rind bridge between them. Enter at the wide end of the teardrop and move to the pointed tip in one continuous arc. The brow position above each eye gives the face its arched, menacing expression.

  4. Carve the crooked grin and teeth

    Cut the asymmetric smile curve below the eye zone, stopping at each tooth root position. The crookedness of the grin comes from one side sitting slightly higher than the other; mark this asymmetry in the layout stage before cutting. Leave tooth roots broad, at least a quarter-inch per tooth.

  5. Add isolated decorative holes

    Carve any remaining decorative holes as completely isolated apertures, each surrounded by at least three-eighths of an inch of rind. These small accent holes add visual complexity without requiring structural bars. Cut them last, after all major features are secure.

  6. Seal and light

    Coat all cut surfaces and bridge strips with petroleum jelly. Place a warm LED inside. The wide eye bar shadows and the teardrop brow glow combine for an expression that shifts between clown and something considerably more unsettling as the light moves.

Written with AI to match this design

Gather your supplies

Check things off as you get ready.

Work on a stable surface, keep your free hand out of the cutting path, and have an adult handle sharp tools.

Three levels of light

  • Leave intact

    The rind of the eye bars, the brow-to-socket bridges, and the rind between all decorative holes stays solid and unlit.

  • Peel & shade

    None; all glow comes from full cut-throughs.

  • Cut through

    Both wide eye bar socket sections, both teardrop brow apertures, the crooked grin opening, and all isolated decorative holes are cut completely through for full glow.

Learn the carving basics

Before you start cutting

Why is the pattern transfer step more important on this design than simpler ones?

The asymmetric grin and the teardrop brows need to be precisely placed relative to the eye bars to produce the correct spooky expression. Freehand placement risks placing the brows too high or the grin asymmetry going the wrong way. The stylus transfer takes only a few extra minutes and prevents hours of disappointment.

What makes this clown spooky rather than just complex?

Three design choices create the unsettling quality: the wide horizontal bars that make the eyes look hollow and fixed, the teardrop brow apertures that arch the expression upward like raised brows, and the crooked grin that disrupts bilateral symmetry. Any one of these alone is just interesting; all three together create the uneasy feeling.

How do I avoid the decorative holes weakening the area around the grin?

Space decorative holes at least half an inch from the outer corners of the grin opening. Corners are stress concentration points where the rind is already at higher risk of cracking. If a decorative hole must sit close to a corner, make it smaller and apply petroleum jelly to the nearby rind daily.

Your take belongs here, too.

Changed a detail? Made it simpler? Share a photo of your version and tell the community what worked.

Share your pumpkin

More pumpkins like this

You've reached the end · 8 pumpkins
The Patch Report

Fresh pumpkins, in your inbox.

The best new carvings, ideas worth stealing, and how-tos for carving season. Short, seasonal, and gone by November.

A short email during carving season. Unsubscribe anytime. See our privacy policy.