Halloween Pumpkin Carving Contest · Starts October 1st · $500 in prizes
← Back to ideas
@ai_concepts
Sep 25, 2026
Three-Eyed Pumpkin With Wavy Square-Toothed GrinAI
0

Report this carving

Tell us what is wrong. Reports are private.

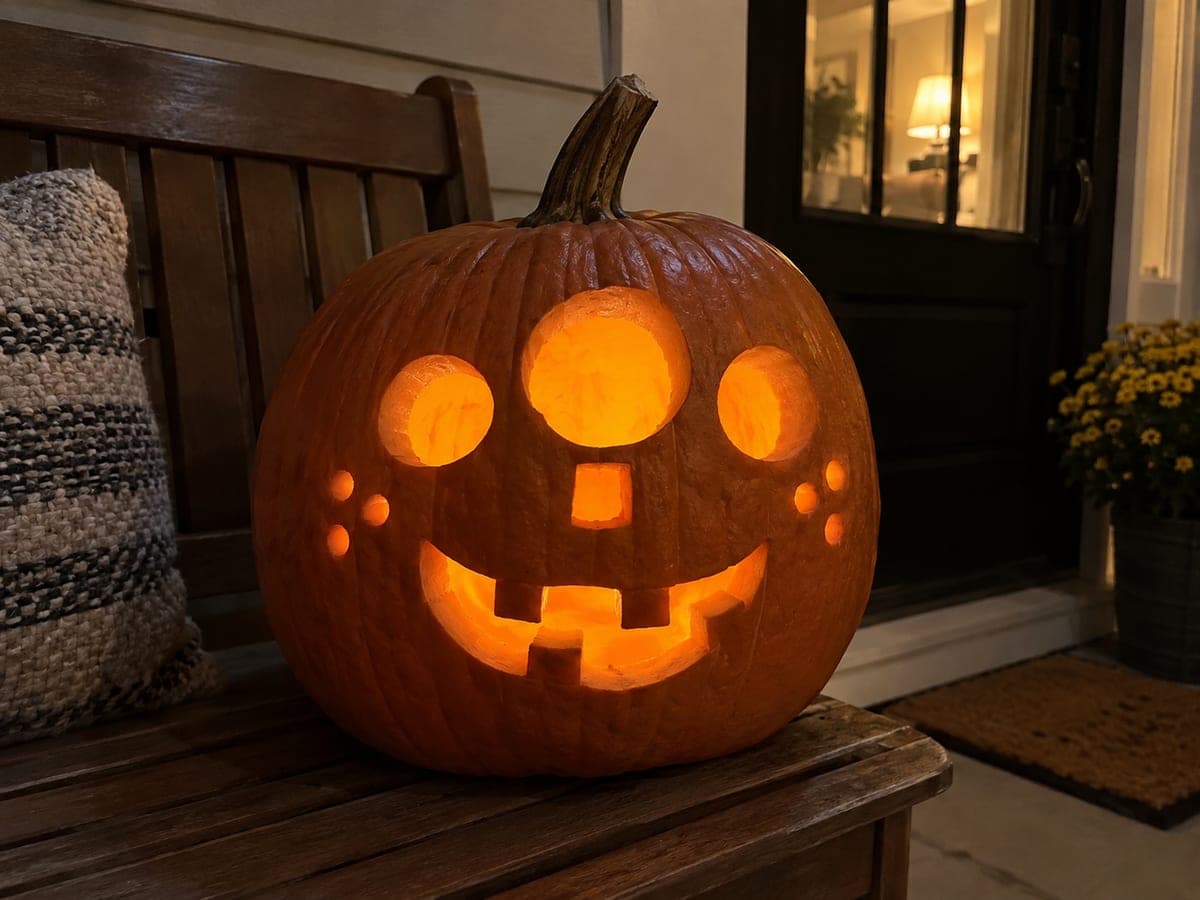
Three-Eyed Pumpkin With Wavy Square-Toothed Grin

Three mismatched circular eye holes without pupils, a short rectangular nose, a wavy grin with three broad attached square teeth, and six small round cheek holes combine into one of the most quirky silly pumpkin faces at the medium level. The three eyes are the focal point: place the center one slightly higher than the flanking two to push the off-balance feeling. Cut the square teeth last and leave their connecting bridges wide so the wave of the grin holds structurally. Backlit with a flickering candle, the cheek circles cast a playful dotted glow.

No ratings yet · Sign in to rate

Comments (0)

  • No comments yet — be the first.

Save without an account. Sign in to like or comment.

Our tips for carving a similar design

The three-eye arrangement is the focal point: placing the center eye higher than the two flanking ones is what pushes the design from merely unusual to genuinely unsettling. The wavy grin's structural integrity depends on keeping the connecting bridges between square teeth wide. Cut the square teeth last and leave their bases broad.

From pumpkin to porch

  1. Scoop and map the face

    Scoop to an even inch. Mark the vertical center of the face, then sketch the three uneven eye circles (center one highest), a short rectangular nose below, the wavy grin outline, and six small cheek circles. Sketch all three eyes before cutting any.

  2. Drill or saw the six cheek holes

    Cut the cheek circles first using a drill or apple corer so you have the most stable rind for this tedious step. Three per side, evenly spaced. Clean any torn edges with a detail knife.

  3. Cut the three mismatched eye holes

    Saw each eye as a clean circle, starting with the center upper eye. The two flanking eyes should sit lower and slightly smaller. Push each plug out from the inside after cutting the full perimeter.

  4. Cut the rectangular nose

    A short, wide rectangle in the center of the face. Score all four corners first, then saw each side. A wide, squat nose pairs well with the three eyes without competing for attention.

  5. Carve the wavy grin with square teeth

    Saw the outer wavy boundary of the smile opening, then cut the gaps between the three broad square teeth. Leave each tooth's connecting bridge at its full width; a narrow wave peak between teeth is the most common place for the grin to crack. Cut from the outer corners inward.

  6. Light and display

    A flickering candle makes the six cheek dots scatter a playful pattern of small circles onto nearby surfaces. Position the pumpkin so the three eyes are at eye level for maximum weirdness.

Written with AI to match this design

Gather your supplies

Check things off as you get ready.

Work on a stable surface, keep your free hand out of the cutting path, and have an adult handle sharp tools.

Three levels of light

  • Leave intact

    All rind between the eyes, teeth, and cheek holes remains solid and dark

  • Peel & shade

    None, through-cuts only

  • Cut through

    Three eye circles, rectangular nose, wavy grin perimeter, three tooth gaps, and six cheek holes are all cut through

Learn the carving basics

Before you start cutting

How do I keep the wavy grin from cracking at the peaks between teeth?

The peaks between teeth are the narrowest points in the grin, so leave them as wide as possible. Think of the tooth gaps as windows cut into a broad smile band, not as the space between thin individual teeth. Wide bases and wide peaks between them distribute stress evenly.

Does the center eye need to be exactly centered on the pumpkin?

Centering it on the vertical axis and raising it above the other two is the key placement rule. Whether it is exactly at the horizontal center or slightly off does not matter much; pumpkins are irregular and a slightly off-center placement can actually look more natural.

Can I make the rectangular nose triangular instead without changing the feel?

A triangle nose gives the face a slightly more classic jack-o-lantern feel, which works fine. The rectangular nose in this design contributes to the strange, off-brand quality of the face, but swapping shapes will not ruin the design if rectangles feel difficult to cut cleanly.

Your take belongs here, too.

Changed a detail? Made it simpler? Share a photo of your version and tell the community what worked.

Share your pumpkin

More pumpkins like this

You've reached the end · 8 pumpkins
The Patch Report

Fresh pumpkins, in your inbox.

The best new carvings, ideas worth stealing, and how-tos for carving season. Short, seasonal, and gone by November.

A short email during carving season. Unsubscribe anytime. See our privacy policy.