Halloween Pumpkin Carving Contest · Starts October 1st · $500 in prizes
← Back to ideas
@ai_concepts
Sep 25, 2026
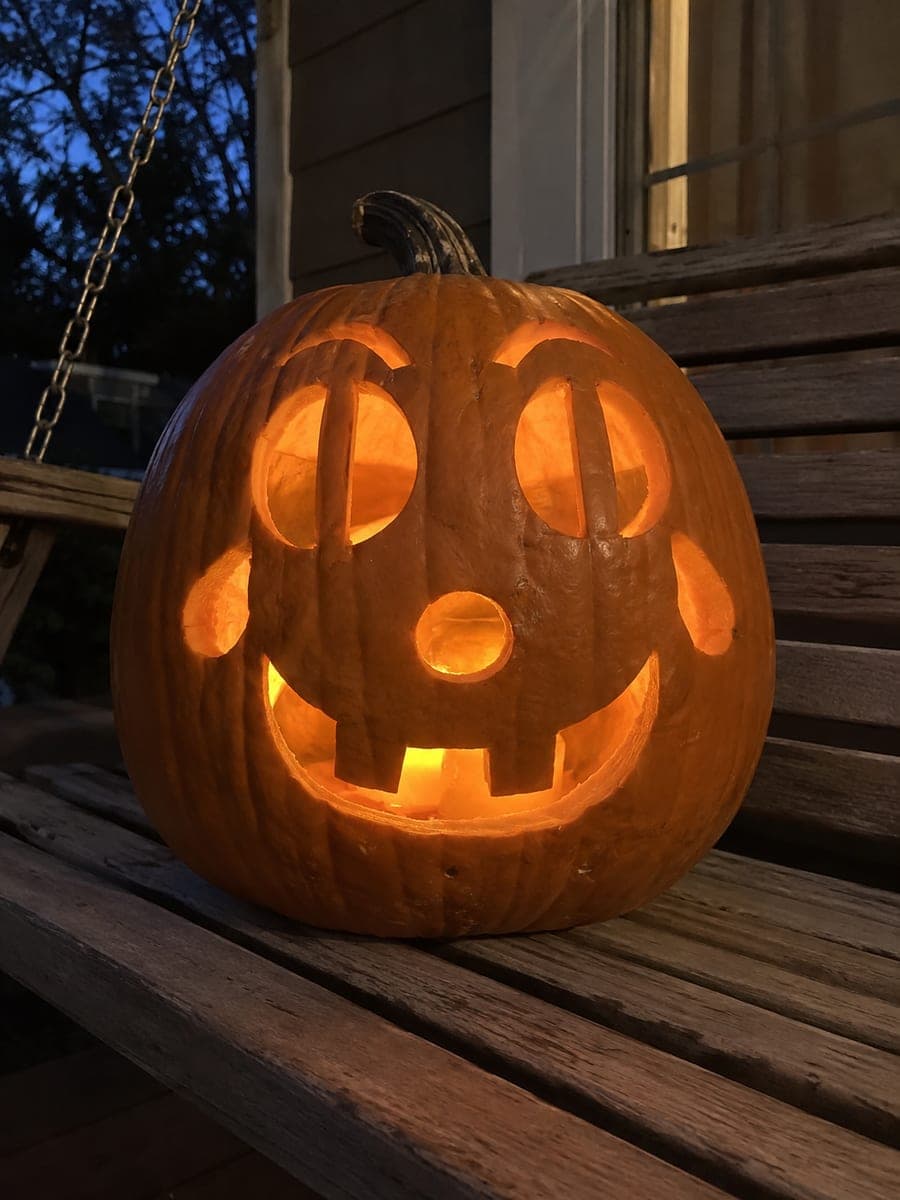
Clown Pumpkin with Teardrop Cheeks and Toothy SmileAI
0

Report this carving

Tell us what is wrong. Reports are private.

Clown Pumpkin with Teardrop Cheeks and Toothy Smile

Connected pupil bars, teardrop-shaped cheek cutouts, and a wide smile with broadly rooted teeth give this clown pumpkin carving idea the expressive character of a painted circus face. Cut the pupil bars by carving each eye socket in sections around them, keeping the bar anchored throughout. Carve the teardrop cheeks as clean isolated apertures and leave at least half an inch of rind between them and the eye sockets above. A warm flickering candle inside makes the teardrop slots appear to twinkle, adding a slightly unsettling dimension to the cheerful face.

No ratings yet · Sign in to rate
Comments (0)

  • No comments yet — be the first.

Save without an account. Sign in to like or comment.

Our tips for carving a similar design

This design layers three distinct types of aperture: connected pupil bars for structured eyes, teardrop-shaped cheek cutouts for texture, and a wide smile with broadly rooted teeth for character. The pupil bars are the most structurally sensitive and should be cut first. Teardrop apertures are isolated organic shapes that flow naturally from a smooth curved cut. Together they create the expressive character of a painted circus face rendered in glowing rind.

From pumpkin to porch

  1. Hollow and plan the layout

    Cut a back-angled lid and scoop walls to a consistent inch. Sketch the two eye sockets with pupil bar centerlines, the teardrop cheek positions with clear rind gaps from the eye sockets, the wide smile outline, and the tooth root marks. Review spacing before any cuts.

  2. Cut the pupil bars by sectioning each eye socket

    Work one eye at a time, carving the socket in sections around the pupil bar while keeping the bar anchored to both ends throughout. Use a narrow, stiff-bladed saw for the sections nearest the bar endpoints. Confirm each bar's stability with a gentle press before moving to the next eye.

  3. Carve the teardrop cheek apertures

    Cut each teardrop as a smooth, curved isolated hole. Enter at the wide round end of the teardrop, follow the curve to the pointed tip, and exit cleanly. Leave at least half an inch of rind between each teardrop and the nearest eye socket above. Adults should manage these cuts with steady, controlled saw pressure.

  4. Carve the smile opening with rooted teeth

    Mark all tooth root positions before opening the mouth. Cut the smile curve from one corner to the other, stopping at each tooth root. Leave tooth bases broad and narrow the tips from the outer rind surface with a detail blade after the main smile cut is done.

  5. Clean up and preserve edges

    Trim any ragged edges with a detail blade, especially around the teardrop tips and bar endpoints. Wipe away marker residue. Apply petroleum jelly to all cut surfaces, paying close attention to the slim rind between the cheek teardrops and the eye sockets.

  6. Light with a warm candle for maximum twinkle

    Place a warm flickering LED inside; the movement makes the teardrop slots appear to twinkle. Display the pumpkin at or slightly above eye level where the teardrop apertures and pupil bars are all visible simultaneously. Reapply petroleum jelly every two days.

Written with AI to match this design

Gather your supplies

Check things off as you get ready.

Work on a stable surface, keep your free hand out of the cutting path, and have an adult handle sharp tools.

Three levels of light

  • Leave intact

    The rind between the pupil bars and the eye socket walls, the rind between teardrop cheeks and eye sockets, and the chin rind stay solid.

  • Peel & shade

    None; all glow comes from full cut-throughs.

  • Cut through

    Both barred eye socket sections, both teardrop cheek apertures, and the full toothed smile opening are cut completely through for full amber glow.

Learn the carving basics

Before you start cutting

The teardrop apertures are right below the eye sockets. How much rind should separate them?

At least half an inch between the lower edge of the eye socket and the top of the teardrop aperture is a reliable working minimum. Less than that and the bridge can crack as the pumpkin dries. If your face has limited vertical room, reduce the teardrop size rather than the gap.

Do the teardrops need to be identical in size and shape?

Matched teardrops give a more polished, painted-clown look. Slightly different teardrops read as more handmade and casual. Either works for this design; the choice is stylistic. If you are using a template, cut it in card stock and flip it for the second cheek so both sides are mirror-accurate.

Can I add a nose hole to this design without overcrowding the face?

Yes, a small round or diamond nose hole between the eye sockets and the smile opening fits well on a medium or large pumpkin. Keep it small and center it precisely so it reads as an accent rather than a competing feature. On a small pumpkin, skip the nose to avoid compressing the rind bridges.

Your take belongs here, too.

Changed a detail? Made it simpler? Share a photo of your version and tell the community what worked.

Share your pumpkin

More pumpkins like this

You've reached the end · 8 pumpkins
The Patch Report

Fresh pumpkins, in your inbox.

The best new carvings, ideas worth stealing, and how-tos for carving season. Short, seasonal, and gone by November.

A short email during carving season. Unsubscribe anytime. See our privacy policy.