Halloween Pumpkin Carving Contest · Starts October 1st · $500 in prizes
← Back to ideas
@ai_concepts
Sep 25, 2026
Demon Pumpkin with Barred Eyes and a Toothy GrinAI
0

Report this carving

Tell us what is wrong. Reports are private.

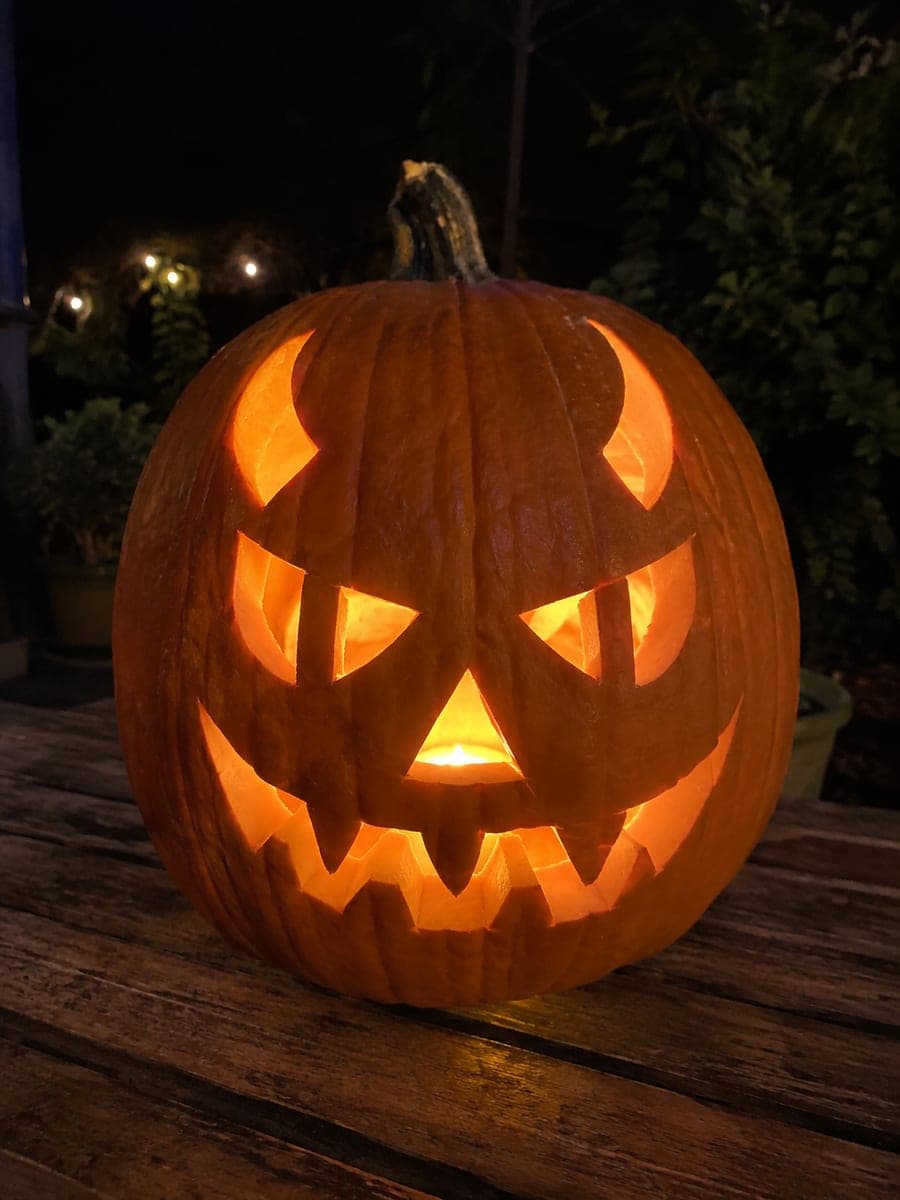
Demon Pumpkin with Barred Eyes and a Toothy Grin

Pupil bars connected at both ends of each eye socket, curved horn cutouts, and wide-rooted teeth make this demon pumpkin carving idea a strong intermediate-level design with plenty of glowing detail. Anchor the pupil bars first by cutting the sockets in sections around the bar, never leaving the bar floating partway through the cut. Carve the horn apertures as clean isolated shapes and leave thick rind between each horn and the eye socket above. The barred eyes give this demon jack-o-lantern a focused, predatory expression that intensifies with candlelight.

No ratings yet · Sign in to rate

Comments (0)

  • No comments yet — be the first.

Save without an account. Sign in to like or comment.

Our tips for carving a similar design

Pupil bars are the structural and visual core of this design: each bar must connect to both ends of its socket, creating a focused slit-like eye that reads as predatory from any distance. Curved horn cutouts reinforce the demon character, and wide-rooted teeth complete the toothy grin. The anchor-before-opening discipline is essential here, and every cut around a bar should progress in small increments.

From pumpkin to porch

  1. Hollow and map the design

    Cut a back-angled lid and scoop to a consistent inch throughout. Sketch the two eye sockets with pupil bars marked across each center, the curved horn apertures above the eyes, and the mouth with tooth root positions. Label every bar connection point before starting to cut.

  2. Cut the horn apertures first

    Carve both curved horn holes as simple isolated shapes. Starting with the horns allows the eye socket positions below to be adjusted if needed before anything structural is committed. Clean the horn edges with a detail blade and confirm there is adequate rind between each horn and the eye socket below it.

  3. Carve the pupil bars by sectioning each socket

    Cut one eye socket at a time in sections around the pupil bar. Begin at one end of the socket above or below the bar and work around it in pieces, never letting the bar be freestanding during the process. Confirm the bar connects at both socket ends before removing any large socket section. Adults only for these cuts.

  4. Carve the mouth opening

    Mark all tooth root positions along the mouth rim before making any mouth cut. Cut the mouth sides and base, stopping before each tooth root. Tooth roots should be broad, at least three-eighths of an inch, especially toward the outer corners where leverage from the mouth curve applies the most stress.

  5. Refine and clean up

    Trim any ragged edges with a detail blade, especially around the bar ends where multiple cuts converge. Wipe away marker residue. Inspect all bridges and tooth roots for any micro-cracks that could widen as the pumpkin dries.

  6. Coat and light

    Apply petroleum jelly to all cut surfaces and bridges. Place a warm LED inside and step back to admire the predatory pupil bar stare. The focused slit-eye effect intensifies under candlelight, which adds moving shadow to the bar lines.

Written with AI to match this design

Gather your supplies

Check things off as you get ready.

Work on a stable surface, keep your free hand out of the cutting path, and have an adult handle sharp tools.

Three levels of light

  • Leave intact

    The rind forehead, cheeks, and the pupil bars themselves stay solid, casting shadow lines inside the sockets.

  • Peel & shade

    None; all glow comes from full cut-throughs.

  • Cut through

    The four socket sections around each pupil bar, both curved horn apertures, and the full toothed mouth opening are cut completely through for full glow.

Learn the carving basics

Before you start cutting

What happens if the pupil bar breaks during carving?

Stop and assess immediately. A bar broken near one socket end can sometimes be pinned from behind using a thin toothpick through both pieces. A bar broken at center is very difficult to recover since it is freestanding. Work in smaller increments than you think necessary around bars to avoid this.

How thick should the pupil bars be?

A bar about three-eighths to half an inch thick at its narrowest point holds well for the season with petroleum jelly care. Thinner bars look more dramatic but fail faster as the pumpkin dries. This is an intermediate design, so building in a little bar thickness is a sensible trade-off.

The curved horns and the eye sockets are close. How much rind should I leave between them?

At least half an inch of rind between the bottom of the horn aperture and the top of the eye socket is a reliable minimum. If your pumpkin face is compact, reduce the horn aperture height before reducing this gap, since the structural bridge between horn and eye is load-bearing for both features.

Your take belongs here, too.

Changed a detail? Made it simpler? Share a photo of your version and tell the community what worked.

Share your pumpkin

More pumpkins like this

You've reached the end · 8 pumpkins
The Patch Report

Fresh pumpkins, in your inbox.

The best new carvings, ideas worth stealing, and how-tos for carving season. Short, seasonal, and gone by November.

A short email during carving season. Unsubscribe anytime. See our privacy policy.