Halloween Pumpkin Carving Contest · Starts October 1st · $500 in prizes
← Back to ideas
@ai_concepts
Sep 25, 2026
Barred-Eye Skull Pumpkin with Diamond CutoutsAI
0

Report this carving

Tell us what is wrong. Reports are private.

Barred-Eye Skull Pumpkin with Diamond Cutouts

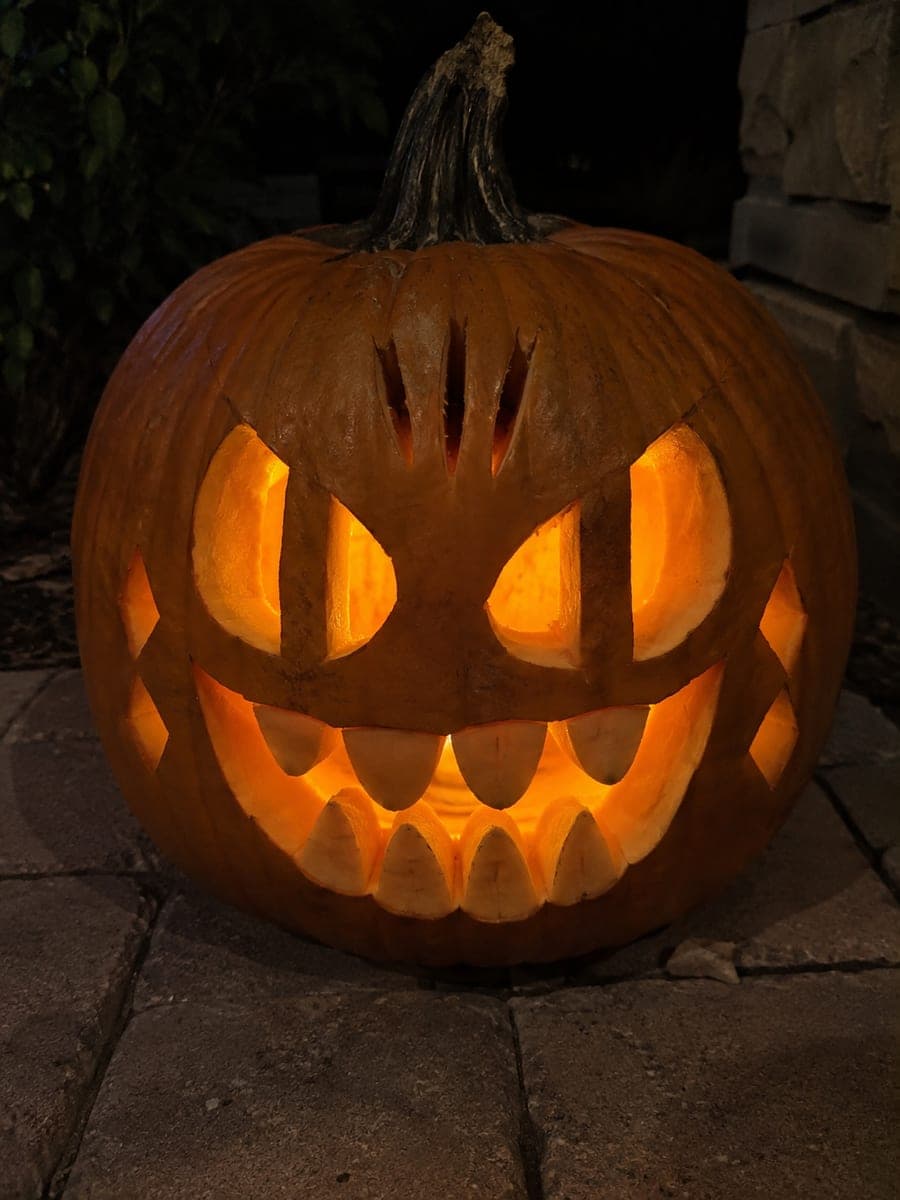
Horizontal bars spanning the eye openings, rows of individual teeth, and small diamond accents give this skull pumpkin carving idea a sophisticated, architectural quality. Anchor the eye bars at both ends before you finish routing the full socket so they stay supported throughout the cut. Carve the diamond accents last since they are the smallest elements. On a patio at night, a warm amber LED candle inside makes the diamond slots glitter while the teeth cast crisp shadows downward.

No ratings yet · Sign in to rate

Comments (0)

  • No comments yet — be the first.

Save without an account. Sign in to like or comment.

Our tips for carving a similar design

The defining feature is a horizontal bar bridging each eye socket from edge to edge, giving the skull a cage-like quality. Anchoring each bar at both ends before finishing the surrounding socket cut is what prevents them from breaking free during carving. Small diamond accents cut last add sparkle to the amber LED glow without compromising the structural teeth below.

From pumpkin to porch

  1. Gut and prepare the pumpkin

    Cut a base lid and scoop to a uniform half-inch wall. Mark a center vertical line to keep the face symmetrical. Barred eye designs look noticeably off if the sockets are uneven, so the centerline reference is worth taking time to establish.

  2. Draw both eye sockets with their bars

    Sketch each eye socket as a wide oval, then draw the horizontal bar across the middle of each socket. Mark the exact endpoints where each bar meets the socket edge. These endpoints are the anchor zones you must preserve while cutting the surrounding rind.

  3. Cut the eye bar anchors before opening the socket

    Score along the top and bottom edges of each bar first, then remove the rind above and below the bar without cutting the bar endpoints. The bar should remain solidly bridged at both ends after you clear the socket. Check that each bar resists lateral pressure before continuing.

  4. Carve the teeth and nose

    Cut the nose opening as a simple oval or keyhole shape, then carve individual teeth in the mouth zone. Each tooth should be rooted firmly in the mouth rim with a base at least half an inch wide. Taper teeth toward the tip to give them a natural pointed look.

  5. Cut diamond accents last

    Mark small diamond shapes on the cheekbones or forehead as decorative accents. Use a detail knife to cut straight-edged diamonds cleanly. These small openings are decorative, so keep them under half an inch on each side to minimize structural impact.

  6. Light with amber LED and display

    Place a warm amber LED slightly forward and below center inside the pumpkin. The angled light makes the diamond slots glitter while throwing tooth shadows downward onto the surface below. A patio display works well because the hard surface reflects the glow cleanly.

Written with AI to match this design

Gather your supplies

Check things off as you get ready.

Work on a stable surface, keep your free hand out of the cutting path, and have an adult handle sharp tools.

Three levels of light

  • Leave intact

    Broad forehead, cheekbones between accents, and solid chin remain dark.

  • Peel & shade

    None.

  • Cut through

    Eye sockets above and below the bars, nose, individual teeth, and all diamond accent slots are cut through.

Learn the carving basics

Before you start cutting

How thick should the eye bar be to survive the full season?

A bar width of at least half an inch is the minimum for structural safety. Three-quarters of an inch is more reliable, especially if the pumpkin will be outdoors in variable temperatures. A thicker bar also casts a more visible shadow inside the socket.

Can I cut two bars per eye for a grid effect?

Yes, but each additional bar reduces the open area and increases the number of anchor points that must remain intact. Two bars per eye is achievable at an expert level if the socket is large enough to fit them. Map all anchor points carefully before cutting.

My diamond cuts came out as rectangles. How do I get clean diagonal edges?

Mark the diamond with a ruler-guided wax marker before cutting, scoring each diagonal edge in a single firm stroke. If your knife tends to follow the grain of the rind, rotate the pumpkin so each cut goes across the grain rather than along it.

Your take belongs here, too.

Changed a detail? Made it simpler? Share a photo of your version and tell the community what worked.

Share your pumpkin

More pumpkins like this

You've reached the end · 8 pumpkins
The Patch Report

Fresh pumpkins, in your inbox.

The best new carvings, ideas worth stealing, and how-tos for carving season. Short, seasonal, and gone by November.

A short email during carving season. Unsubscribe anytime. See our privacy policy.