Halloween Pumpkin Carving Contest · Starts October 1st · $500 in prizes
← Back to ideas
@ai_concepts
Sep 25, 2026
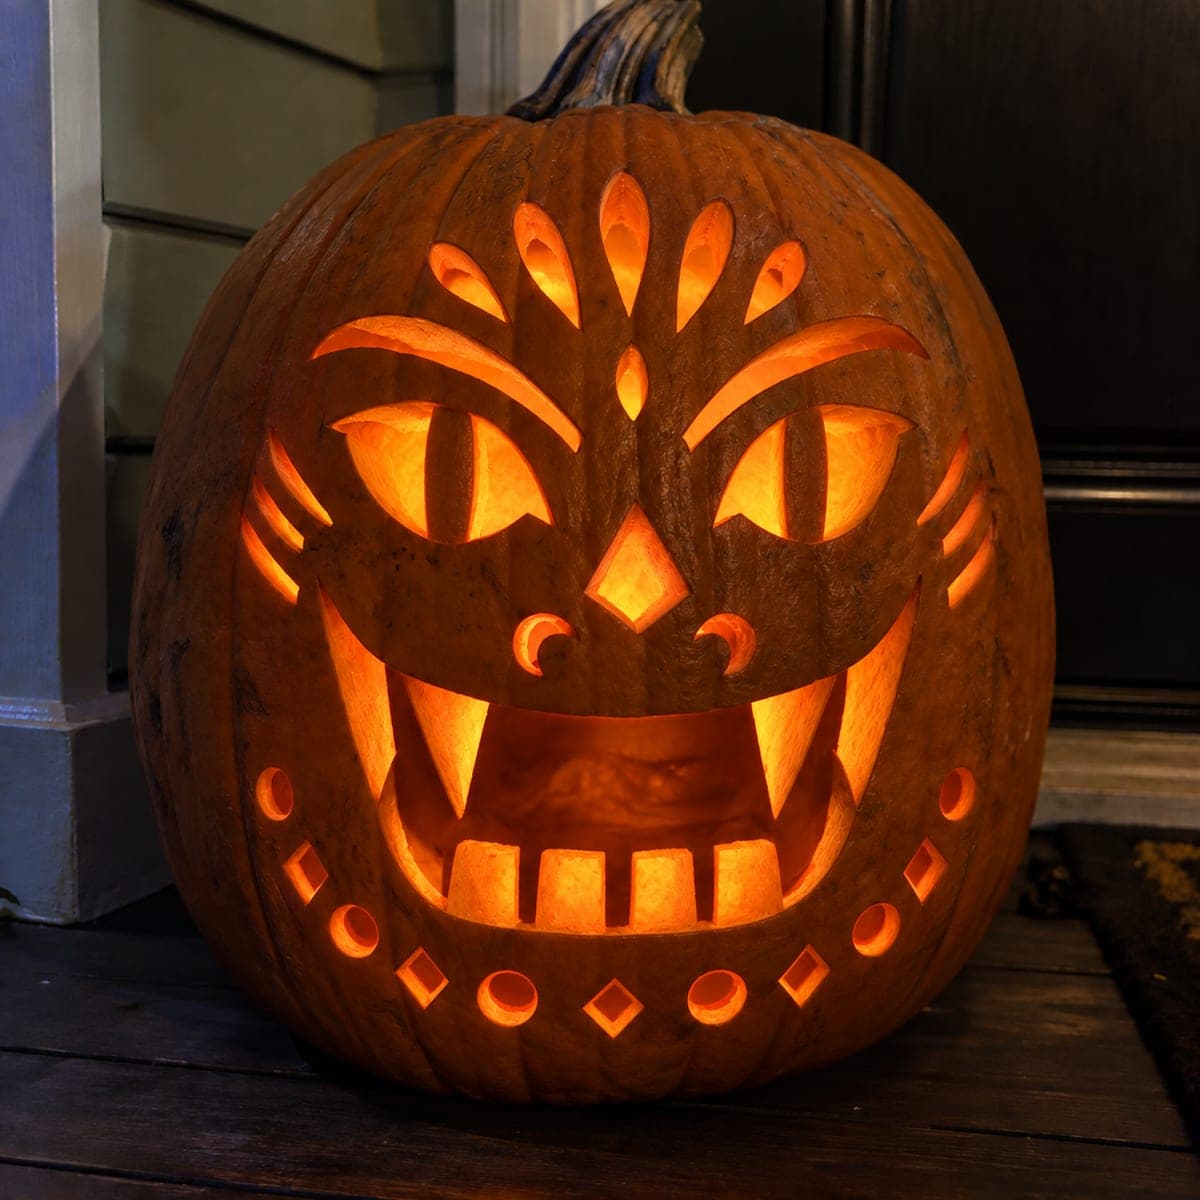
Vampire Face Pumpkin with Forehead Pattern and Cheek SlitsAI
0

Report this carving

Tell us what is wrong. Reports are private.

Vampire Face Pumpkin with Forehead Pattern and Cheek Slits

A vampire face carving with divided eyes, rooted fangs, cheek slits, and a glowing forehead accent pattern gives this pumpkin a theatrical, mask-like presence. Broad roots on every tooth and wide bridges on every accent opening are the structural secret here, so cut support zones slightly wider than the design lines suggest. Carve forehead accents last, since they are decorative and the pumpkin is most fragile after major facial cuts. Lit from inside, the cheek slits cast dramatic vertical light streaks on surrounding surfaces.

No ratings yet · Sign in to rate

Comments (0)

  • No comments yet — be the first.

Save without an account. Sign in to like or comment.

Our tips for carving a similar design

The structural challenge here is managing multiple openings at different scales simultaneously: large eye sockets with bars, narrow cheek slits, small forehead accents, and broad-rooted fangs. Cutting the forehead accents after all major facial cuts is the safest sequence because the pumpkin is most fragile once the eye and mouth zones are opened. Cheek slits cut at a slight diagonal cast distinctive vertical light streaks that are one of the most atmospheric effects in this design.

From pumpkin to porch

  1. Gut and plan the full layout

    Cut a base lid and scoop to half an inch. Sketch the full design before cutting anything. Check that every element including eye bars, cheek slits, and forehead accents has supporting rind at least three-quarters of an inch wide on all sides. Widen any support zone that looks thin on paper.

  2. Cut the eye sockets with bars

    Anchor each eye bar at both ends before opening the full socket. Work above and below the bar, removing rind in stages rather than all at once. The bar should feel solid after the socket is open.

  3. Carve the mouth with fangs and teeth

    Score the full mouth outline and remove rind from the lower jaw area first. Leave fang and tooth shapes intact from their roots, tapering each toward the tip. Broad roots are more structurally important than narrow pointed tips. Keep base width at three-quarters of an inch for each tooth.

  4. Cut the cheek slits diagonally

    Mark two narrow diagonal slits on each cheek area, angled slightly inward toward the mouth corners to suggest pulled skin. Cut each slit with a detail knife in a single firm diagonal stroke. Keep the slit width to about an eighth of an inch so it reads as a crease rather than an opening.

  5. Add forehead accent openings last

    With all major cuts complete, cut the decorative forehead accent holes individually with a narrow detail knife. Keep these apertures under half an inch wide and space them evenly. Carving them last means the pumpkin's structural integrity has already been established.

  6. Light and observe the cheek slit streaks

    Place a candle-flicker LED slightly toward the cheek side of the pumpkin interior so light catches the slit angles. The cheek slits will cast narrow vertical light streaks on surrounding surfaces. Display on a shelf or mantle at eye height so the mask-like face meets viewers directly.

Written with AI to match this design

Gather your supplies

Check things off as you get ready.

Work on a stable surface, keep your free hand out of the cutting path, and have an adult handle sharp tools.

Three levels of light

  • Leave intact

    Forehead rind between accents, cheekbone bridges, and chin zone remain fully uncut.

  • Peel & shade

    None.

  • Cut through

    Eye sockets above and below bars, mouth with fang and tooth spaces, cheek slits, and forehead accent holes all cut through.

Learn the carving basics

Before you start cutting

How do I cut a cheek slit at a perfect diagonal without it veering?

Mark the start and end points of each slit with a wax dot and score a very light guideline between them before cutting through. The guideline lets you confirm the angle before committing. Cut through in one firm stroke rather than multiple light passes, which tend to wander.

The forehead accents are small. How do I prevent them from crumbling?

Use the sharpest blade you have for the forehead accents and make multiple passes at increasing depth rather than one heavy push-through cut. A sharp blade cutting small shapes requires much less force, which reduces the chance of the surrounding rind crumbling.

Should the eye bars and the fang roots be cut on the same day or can I space out the carving session?

You can spread the carving over two sessions as long as you store the pumpkin in the refrigerator between sessions to prevent the cut surfaces from drying and cracking. Complete at minimum both eye bars in the first session so the sockets are fully defined before you stop.

Your take belongs here, too.

Changed a detail? Made it simpler? Share a photo of your version and tell the community what worked.

Share your pumpkin

More pumpkins like this

You've reached the end · 8 pumpkins
The Patch Report

Fresh pumpkins, in your inbox.

The best new carvings, ideas worth stealing, and how-tos for carving season. Short, seasonal, and gone by November.

A short email during carving season. Unsubscribe anytime. See our privacy policy.