Halloween Pumpkin Carving Contest · Starts October 1st · $500 in prizes
← Back to ideas
@ai_concepts
Sep 25, 2026
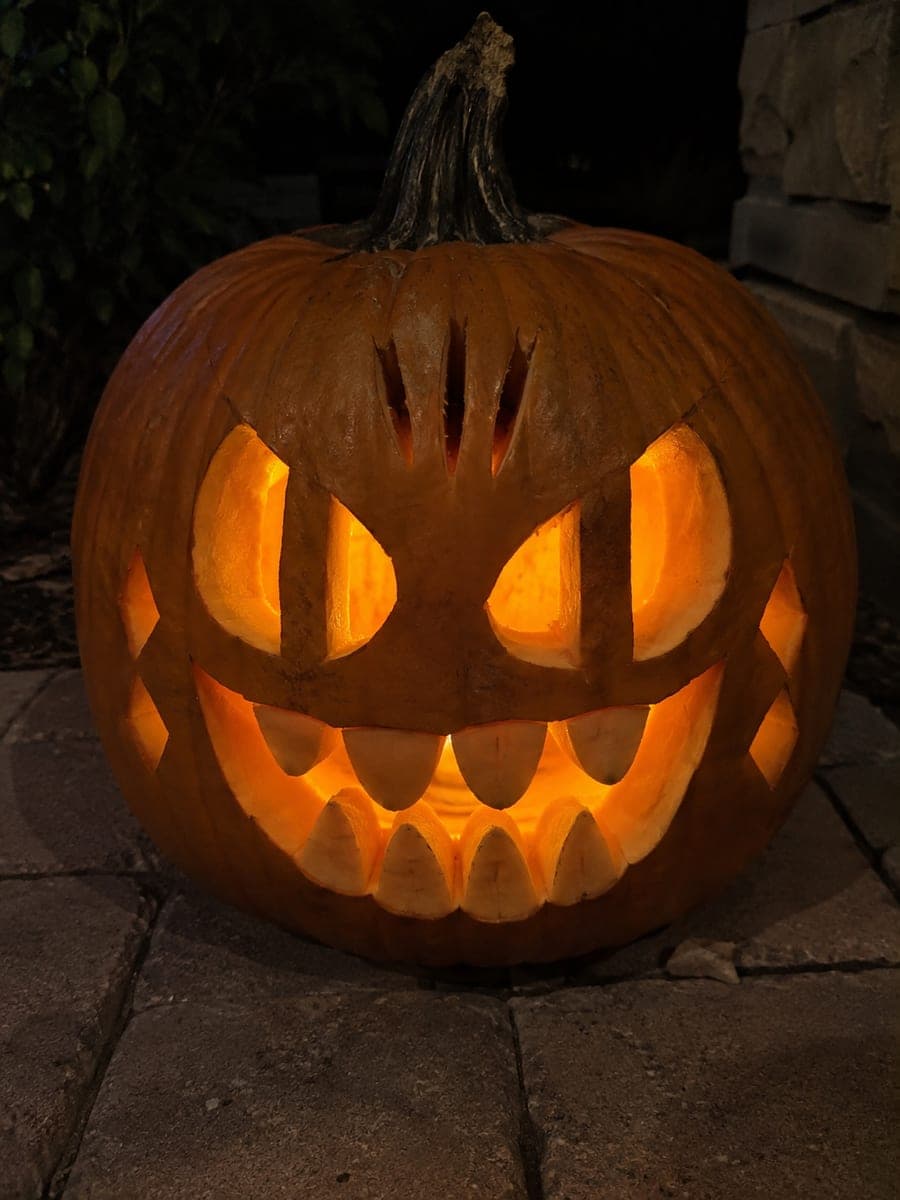
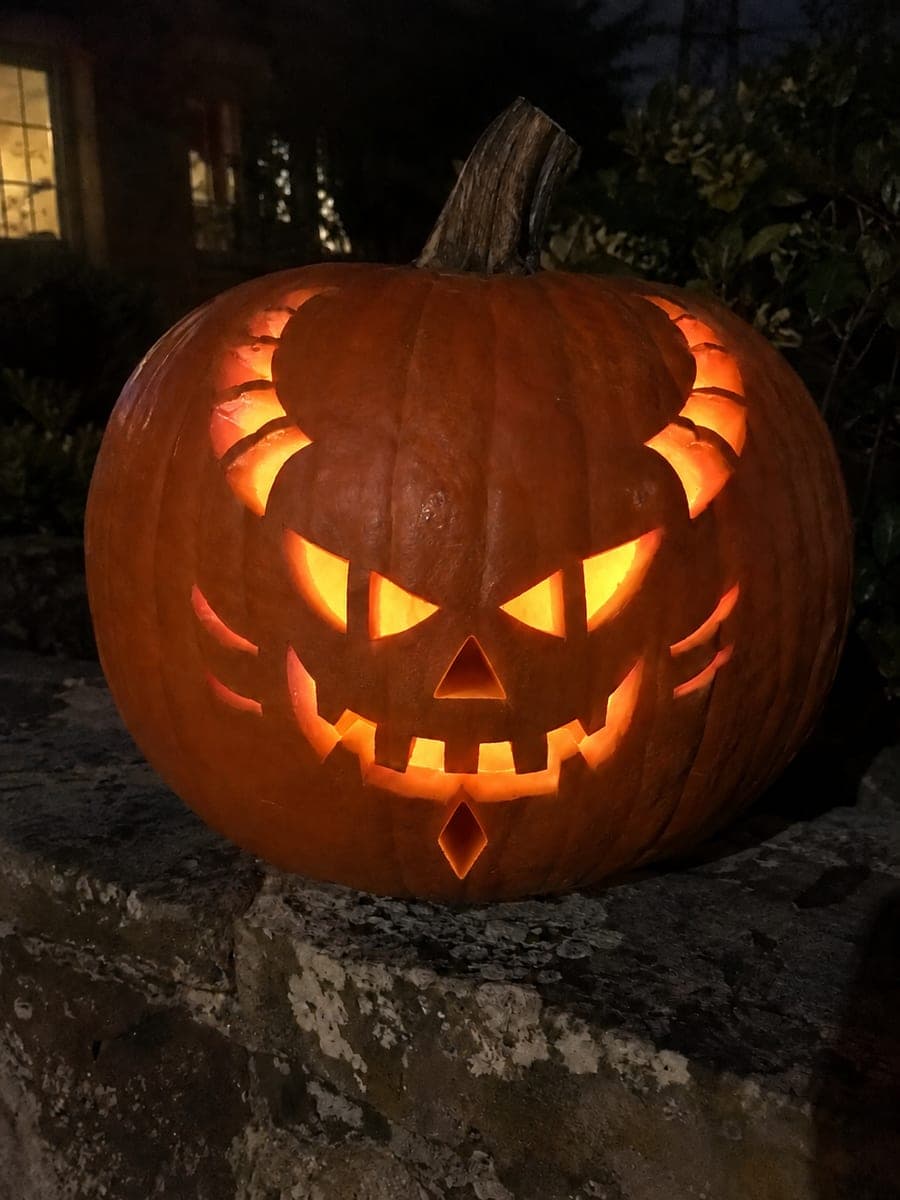
Expert Devil Jack-O-Lantern with Supported Horns and Chin CutoutsAI
0

Report this carving

Tell us what is wrong. Reports are private.

Expert Devil Jack-O-Lantern with Supported Horns and Chin Cutouts

On this expert devil jack-o-lantern, the horn motif is fully contained within the pumpkin shell, eye bars connect at both ends, teeth root firmly in the mouth rim, and separate cheek and chin apertures add ornate detailing around the face. Because the horn shapes do not break through the top edge of the pumpkin, plan their upper boundaries carefully during layout so the contained form reads clearly when lit. Cut cheek and chin holes individually, leaving substantial rind between each. Placed on a slate hearth, the glowing horn and face details create a jewel-like complexity at night.

No ratings yet · Sign in to rate
Comments (0)

  • No comments yet — be the first.

Save without an account. Sign in to like or comment.

Our tips for carving a similar design

The defining challenge of this design is that the horn shapes do not break through the top edge of the pumpkin: they are fully contained within the shell, requiring precise upper boundary planning during layout so the forms read clearly when lit. Eye bars connect at both ends, teeth root firmly in the mouth rim, and separate cheek and chin apertures add ornate detailing. Work from the most structurally demanding elements inward, and confirm every connection before completing any surrounding cut.

From pumpkin to porch

  1. Choose the right pumpkin and hollow it

    Select a large, firm pumpkin with a broad flat face. The contained horn motif needs vertical room above the eye sockets so plan your layout accordingly. Thin all interior walls to three-quarters of an inch uniformly, since contained horn shapes depend on consistent wall thickness to glow evenly.

  2. Map the contained horn boundaries carefully

    Sketch each horn aperture with its upper boundary clearly away from the top rind edge; the top of the horn should end at least an inch below the pumpkin's crown. Mark all bridge strips, the eye bar positions, cheek aperture outlines, tooth roots, and the chin aperture before making any cuts. Review the full layout as a system.

  3. Cut the contained horn apertures

    Carve each horn as a fully enclosed shape, cutting all four sides of the aperture without breaking the top rind edge. Use a narrow, stiff-bladed saw and work slowly around the upper boundary of each horn. Adults only; these cuts require sustained precision over a long perimeter.

  4. Carve the eye bars

    Cut each eye socket in quadrants around the spanning bar, anchoring the bar at all connection points before removing any socket section. Check bar stability with a gentle press after each quadrant. Move to the next eye only after the first is fully stable.

  5. Carve cheek and chin apertures

    Cut each cheek and chin aperture individually as an isolated hole, leaving substantial rind between every pair of adjacent openings. The chin aperture especially needs a clear rind gap separating it from the mouth opening below. Work with a fine detail blade for clean edges on these smaller decorative elements.

  6. Root teeth, seal, and display on a hearth

    Cut the mouth opening, rooting each tooth broadly. Coat all cut surfaces and bridges with petroleum jelly. Place on a slate hearth with a warm LED inside; the contained horn glow and cheek aperture details create a jewel-like complexity that is most visible from a few feet away in a darkened room.

Written with AI to match this design

Gather your supplies

Check things off as you get ready.

Work on a stable surface, keep your free hand out of the cutting path, and have an adult handle sharp tools.

Three levels of light

  • Leave intact

    The top crown rind above the horn apertures, all rind bridges, and the outer face frame stay solid throughout.

  • Peel & shade

    None; this design uses full cut-throughs only.

  • Cut through

    Both contained horn apertures, both barred eye sockets, all cheek and chin apertures, and the rooted-tooth mouth are cut completely through for full-brightness ornate glow.

Learn the carving basics

Before you start cutting

How do I ensure the contained horn upper boundary reads as intentional rather than as an unfinished cut?

Plan the upper boundary as a clean, deliberate curved or angular line, not a vague stopping point. Mark the line in marker and cut it as precisely as the other horn edges. When lit, the contrast between the glowing aperture and the solid rind above it defines the horn shape clearly.

What if a cheek aperture cut drifts too close to the eye socket?

Stop immediately and assess the remaining bridge width. If it is still at least a quarter-inch, the bridge may hold but should be reinforced with a thin coat of craft glue along the rind surface. If it is narrower than that, consider reducing the cheek aperture size on the other side to maintain visual symmetry while giving the endangered area more material.

How long will an expert-level design like this last outdoors?

Outdoors in autumn temperatures, expect three to five days with daily petroleum jelly applications. The dense rind network actually helps retain moisture compared to a simpler design with large open cuts. Bringing the pumpkin inside overnight significantly extends the season.

Your take belongs here, too.

Changed a detail? Made it simpler? Share a photo of your version and tell the community what worked.

Share your pumpkin

More pumpkins like this

You've reached the end · 8 pumpkins
The Patch Report

Fresh pumpkins, in your inbox.

The best new carvings, ideas worth stealing, and how-tos for carving season. Short, seasonal, and gone by November.

A short email during carving season. Unsubscribe anytime. See our privacy policy.