Halloween Pumpkin Carving Contest · Starts October 1st · $500 in prizes
← Back to ideas
@ai_concepts
Sep 25, 2026
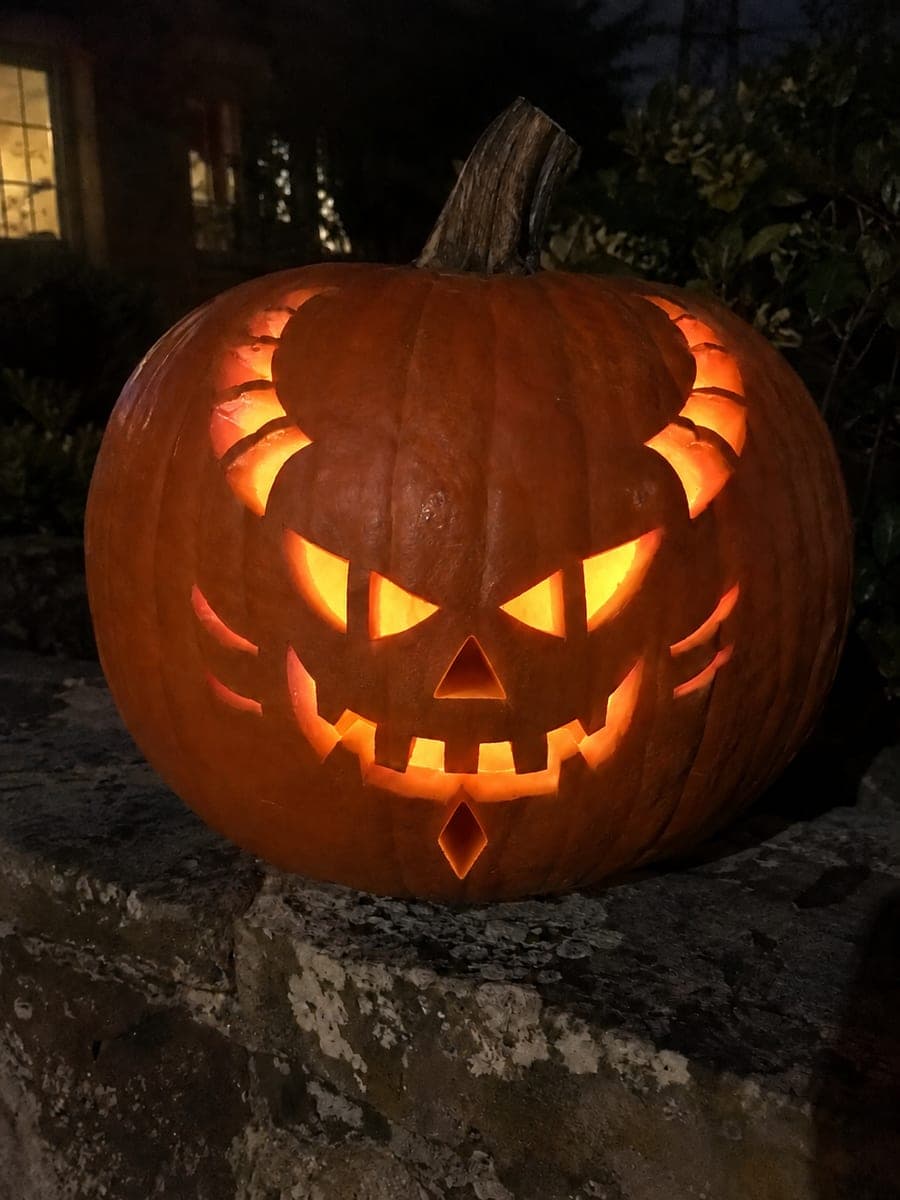
Glowing Devil Pumpkin with Segmented Horns and Eye BarsAI
0

Report this carving

Tell us what is wrong. Reports are private.

Glowing Devil Pumpkin with Segmented Horns and Eye Bars

Separate horn segments, eye openings crossed by solid connecting bars, broadly rooted teeth, and independent nose and goatee cutouts give this devil pumpkin carving idea a detailed, stained-glass quality. Cutting segmented horns means each horn section is its own isolated aperture, so leave a generous rind strip between segments. Establish the eye bars before finishing the socket cuts, anchoring them at both ends. The segmented horn glow on either side of the face reads as hellfire from a distance.

No ratings yet · Sign in to rate
Comments (0)

  • No comments yet — be the first.

Save without an account. Sign in to like or comment.

Our tips for carving a similar design

Segmented horns change the visual logic of a devil design: instead of one solid horn aperture, each horn becomes two or three isolated glowing sections separated by rind strips, creating a stained-glass quality. Eye bars divide the socket and require the same careful quadrant-by-quadrant approach used in other bar designs. The nose and goatee are simple isolated holes that add pinpoints of light below the main face.

From pumpkin to porch

  1. Hollow thoroughly

    Cut a back-angled lid and scoop walls to three-quarters of an inch in all carving zones. Consistent wall thinning is especially important on segmented horn designs because the narrow rind strips between segments need to glow brightly to read as separate forms.

  2. Map the segmented horns

    Sketch each horn as two or three individual aperture segments stacked vertically, with a rind bridge at least three-eighths of an inch wide between segments. Draw both horns symmetrically on the upper pumpkin. Mark all bridge widths explicitly before cutting.

  3. Cut the horn segments

    Cut each segment as its own isolated hole, working from the top of the horn downward. Keep the blade perpendicular to the rind to produce clean edges that read as geometric shapes when lit. Leave the marked bridges fully intact; do not try to merge segments.

  4. Carve the eye bars

    Cut each eye socket in sections around the spanning bar, anchoring the bar at top and bottom before removing the surrounding socket pieces. Use a narrow rigid blade for the bar sections. Anchor before opening, always.

  5. Carve the nose, teeth, and goatee

    Add the nose hole as a small isolated oval. Cut the mouth opening next, rooting each tooth broadly in the rim. Finish with the isolated goatee diamond below the lip, keeping at least three-eighths of an inch of rind between it and the mouth. Coat all cuts with petroleum jelly.

  6. Light and stand back

    Place a warm amber LED inside. The segmented horn glow on either side reads as hellfire from a distance, especially effective on a dark night. Reapply petroleum jelly to all cuts and bridges every two days.

Written with AI to match this design

Gather your supplies

Check things off as you get ready.

Work on a stable surface, keep your free hand out of the cutting path, and have an adult handle sharp tools.

Three levels of light

  • Leave intact

    Rind bridges between horn segments, the nose bridge, the forehead and cheeks stay solid dark orange.

  • Peel & shade

    None; all glow comes from full cut-throughs.

  • Cut through

    Every horn segment aperture, both barred eye sockets, the nose hole, the toothed mouth, and the goatee diamond are cut completely through for full-brightness ember glow.

Learn the carving basics

Before you start cutting

How many segments per horn looks best?

Two segments per horn is approachable and readable; three segments adds complexity without being overwhelming. More than three per horn usually means the bridges become too narrow to hold safely. Start with two if this is your first segmented design.

Do the horn segments need to be the same height?

Uniform segment heights give a clean architectural look; graduated heights where the top segment is shorter give a more organic flame-like feel. Either approach works, but pick one and apply it consistently to both horns so the symmetry reads clearly.

The eye bar and segmented horn cuts are both structurally sensitive. Which should I cut first?

Cut the eye bars first, since a failed bar is harder to recover than a failed horn segment. Once both bars are safely established, move to the horn segments, then finish with the simpler isolated holes: nose, mouth, and goatee.

Your take belongs here, too.

Changed a detail? Made it simpler? Share a photo of your version and tell the community what worked.

Share your pumpkin

More pumpkins like this

You've reached the end · 8 pumpkins
The Patch Report

Fresh pumpkins, in your inbox.

The best new carvings, ideas worth stealing, and how-tos for carving season. Short, seasonal, and gone by November.

A short email during carving season. Unsubscribe anytime. See our privacy policy.