Halloween Pumpkin Carving Contest · Starts October 1st · $500 in prizes
← Back to ideas
@ai_concepts
Sep 25, 2026

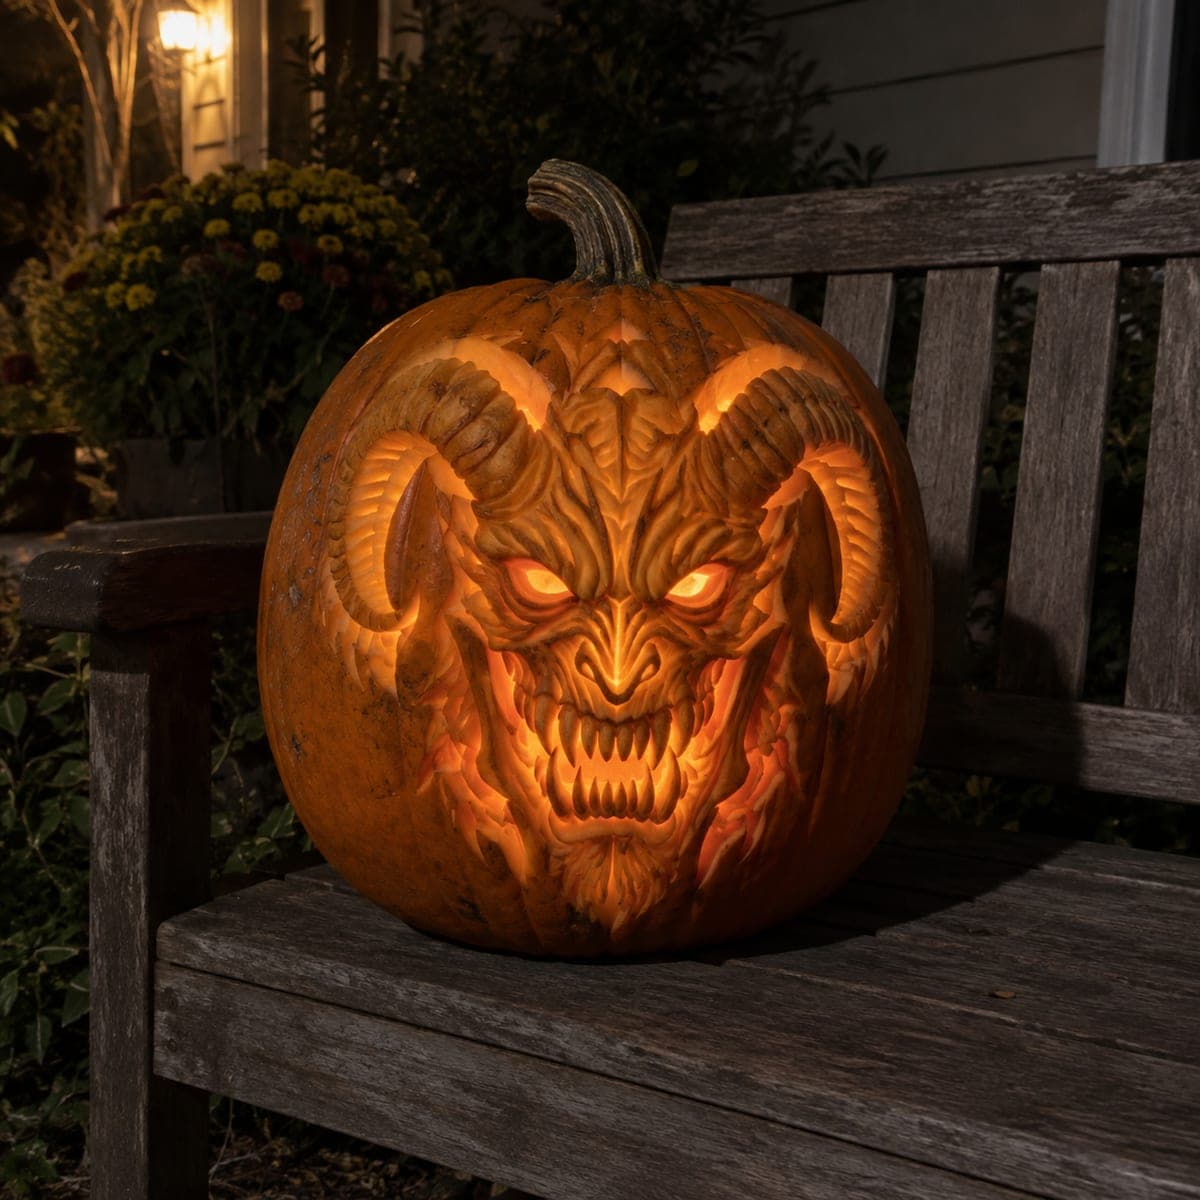
Elaborate Demon Mask Pumpkin with Flame OpeningsAI
0

Report this carving

Tell us what is wrong. Reports are private.

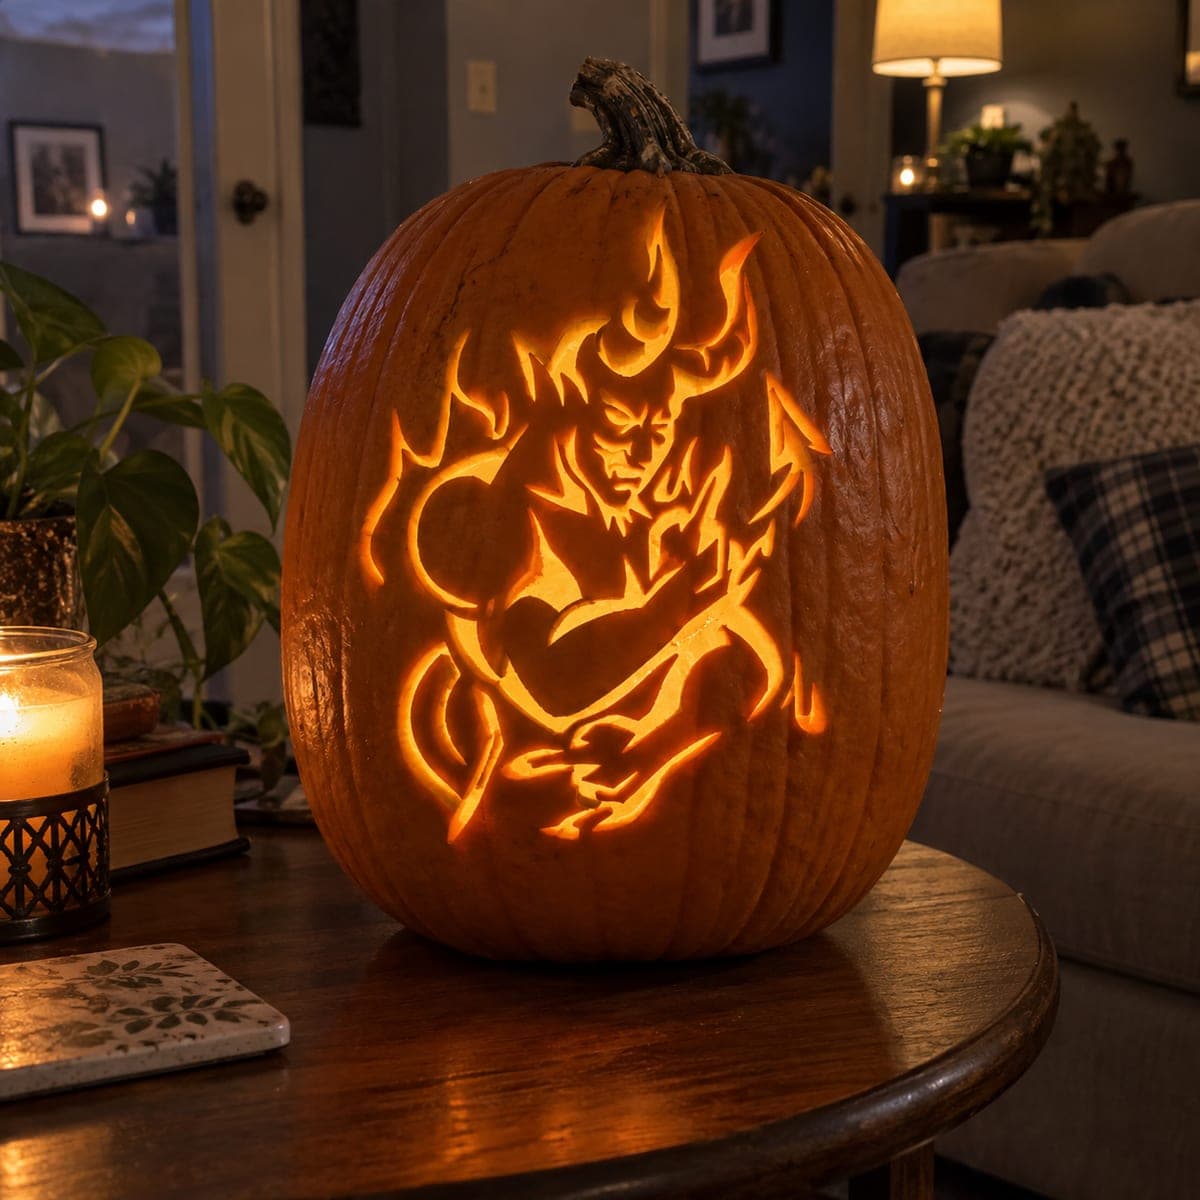
Elaborate Demon Mask Pumpkin with Flame Openings

Separate flame-shaped apertures flanking the face, connected pupil details, rooted teeth, and a network of solid rind holding everything together make this expert demon pumpkin carving idea one of the most striking designs in the series. Map the structural rind network first, treating it like a connected web, before cutting any individual aperture. Flame shapes require curved cuts, so use a thin flexible blade and move in smooth arcs rather than short choppy strokes. The flame cutouts surrounding the face create a corona of fire-like glow in any direction.

No ratings yet · Sign in to rate
Comments (0)

  • No comments yet — be the first.

Save without an account. Sign in to like or comment.

Our tips for carving a similar design

This design treats the rind itself as the artwork: the structural web of solid orange between flame and facial apertures is what holds the entire composition together. Mapping that web in marker before any cut is made is not optional here; it is the foundation of the whole approach. Flame shapes require smooth arcing cuts rather than choppy strokes, and the connected pupil details need the same quadrant-by-quadrant discipline as any eye bar design.

From pumpkin to porch

  1. Select a firm large pumpkin and hollow it carefully

    Choose a large, firm, flat-fronted pumpkin with no soft spots. Thin the interior walls to three-quarters of an inch throughout. Consistent thinning is especially important on flame shapes, which have long perimeters relative to their area and rely on uniform wall thickness to glow evenly.

  2. Map the structural rind network before any cuts

    Draw every aperture boundary in washable marker, including all flame shapes, the facial features, and the pupil details. Then study the space between apertures. Every bridge strip must be at least half an inch wide; mark any that fall short and adjust aperture boundaries before cutting. This planning session may take twenty minutes but prevents structural failures.

  3. Cut the flame apertures with smooth arcs

    Carve each flame aperture using a thin, flexible blade. Move in long smooth arcs from the base of the flame to the tip without reversing direction mid-stroke. Short choppy cuts create micro-tears in the rind that widen as the pumpkin dries. Complete each flame as one continuous perimeter cut before moving to the next.

  4. Carve the connected pupil details

    Cut each eye socket in sections around its pupil detail, anchoring the detail piece at all connection points before removing any surrounding section. This is the most demanding structural step in the design; rush it and the pupil piece detaches. Adults only, narrow rigid blade throughout.

  5. Carve the facial apertures and root the teeth

    Add nose, mouth, and any additional facial apertures as isolated cuts. Root each tooth broadly in the mouth rim edge. Work methodically and pause between cuts to verify that the surrounding structural web is still intact.

  6. Preserve immediately and display

    Coat every cut surface and every bridge strip with petroleum jelly the moment carving is complete. Do not leave any cut surface uncoated. Place a warm LED inside and view from multiple angles; the flame apertures create a corona of fire-like glow in every direction from the pumpkin.

Written with AI to match this design

Gather your supplies

Check things off as you get ready.

Work on a stable surface, keep your free hand out of the cutting path, and have an adult handle sharp tools.

Three levels of light

  • Leave intact

    The structural rind web between all flame and facial apertures stays solid, visible as the glowing orange ground of the design.

  • Peel & shade

    None; all glow comes from full cut-throughs.

  • Cut through

    Every flame-shaped aperture, all connected pupil sections, and all facial openings including the toothed mouth are cut completely through for full-brightness layered corona glow.

Learn the carving basics

Before you start cutting

How do I avoid the thin rind bridges between flame shapes from splitting under tool pressure?

Keep the blade moving continuously once you start a perimeter cut, since pausing and re-engaging at the same spot concentrates stress. Use a thin blade and let its sharpness do the work rather than forcing it with pressure. If a bridge feels thin mid-cut, stop and widen the adjacent aperture boundary on the safer side.

What is the best way to practice the smooth arc cuts for flame shapes?

Practice the arc motion on a spare piece of cardboard or a dollar-store foam pumpkin before committing to your real pumpkin. The muscle memory of a smooth arc cut is genuinely different from straight-line sawing, and five minutes of practice makes the real cuts noticeably cleaner.

How do I transport this carving to a display location without damaging the bridges?

Carry the pumpkin on a flat surface or in a box lined with crumpled paper so it cannot roll. Never carry it by the stem on a fully carved expert pumpkin; the weight stress at the lid can crack nearby rind. Have a second person stabilize the bottom if you are navigating stairs.

Your take belongs here, too.

Changed a detail? Made it simpler? Share a photo of your version and tell the community what worked.

Share your pumpkin

More pumpkins like this

You've reached the end · 8 pumpkins
The Patch Report

Fresh pumpkins, in your inbox.

The best new carvings, ideas worth stealing, and how-tos for carving season. Short, seasonal, and gone by November.

A short email during carving season. Unsubscribe anytime. See our privacy policy.