Halloween Pumpkin Carving Contest · Starts October 1st · $500 in prizes
← Back to ideas
@ai_concepts
Sep 25, 2026
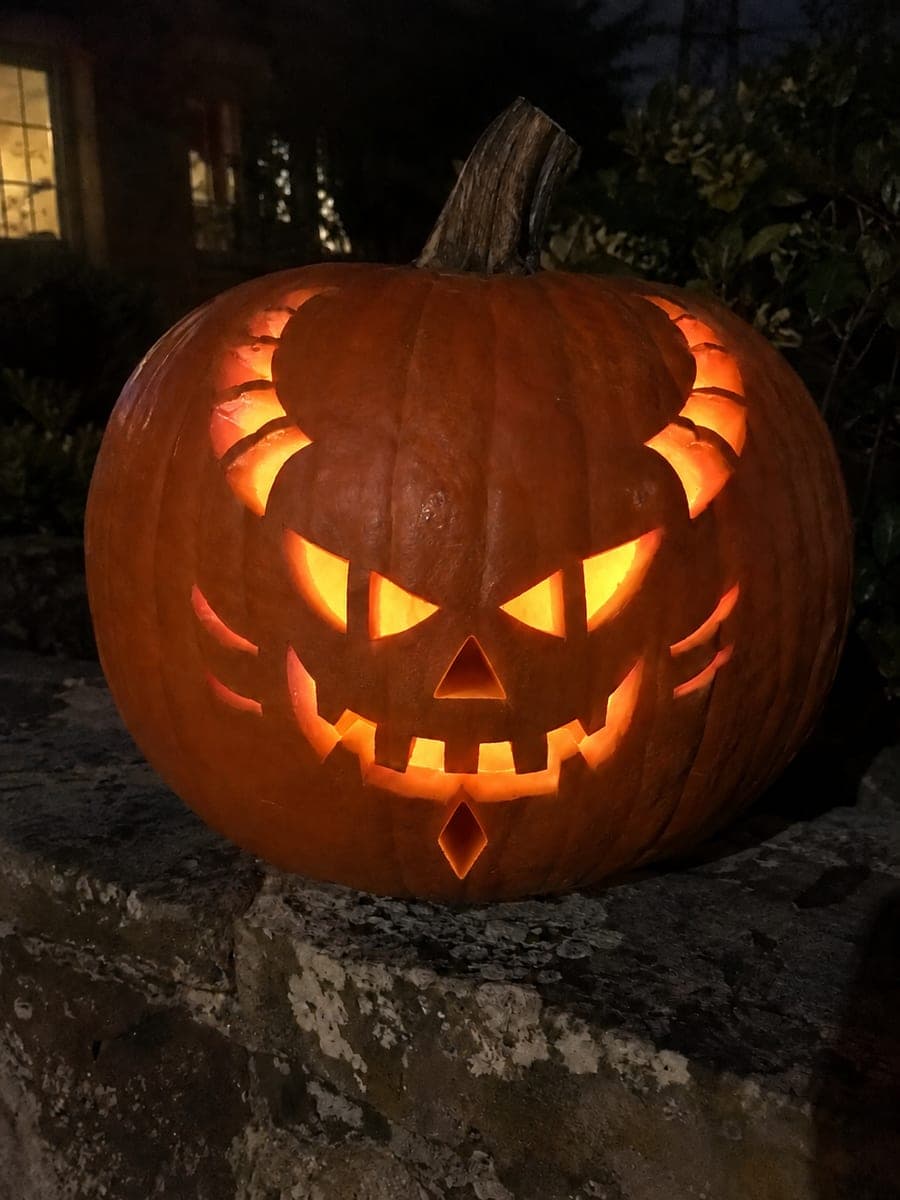
Detailed Demon Pumpkin with Segmented Horns and Cheek SlashesAI
0

Report this carving

Tell us what is wrong. Reports are private.

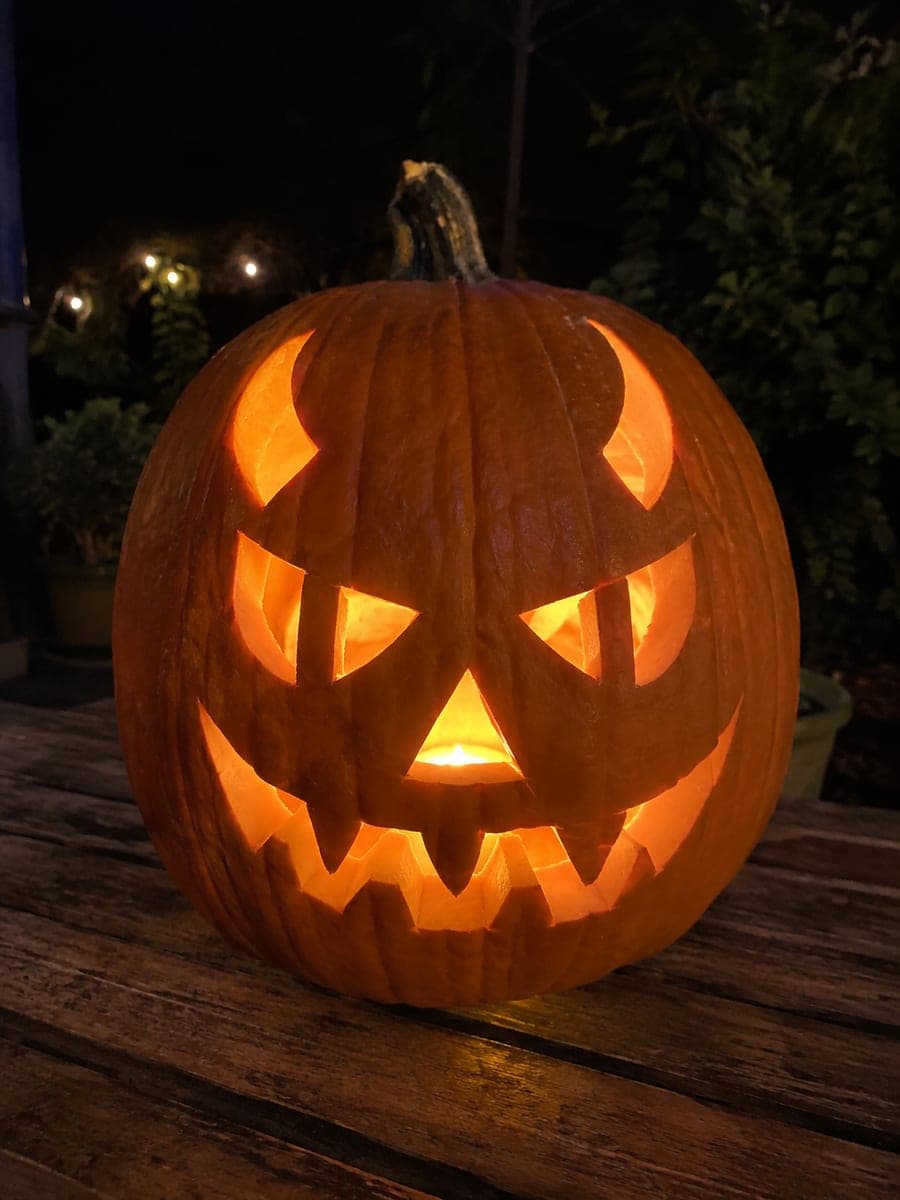
Detailed Demon Pumpkin with Segmented Horns and Cheek Slashes

Segmented horn holes, solid eye bars, and cheek slash openings with rooted teeth make this demon pumpkin carving idea technically demanding while producing a richly detailed result. Treat each horn segment as an individual isolated cutout, leaving a full finger-width of rind between segments so the shell holds together. The eye bars must bridge solidly across each socket before the surrounding rind is removed. Lit from inside, the segmented horn shapes glow like separated embers on either side of the face.

No ratings yet · Sign in to rate
Comments (0)

  • No comments yet — be the first.

Save without an account. Sign in to like or comment.

Our tips for carving a similar design

Segmented horn holes and solid eye bars interact visually to create a layered, almost architectural demon face. Each horn segment is its own isolated cutout, and the solid rind strips between segments are what produce the segmented effect. Cheek slash openings add horizontal tension to an otherwise vertical design. The discipline here is treating each aperture as independent and never merging cuts that should remain separate.

From pumpkin to porch

  1. Hollow and sketch the full layout

    Scoop the interior to three-quarters of an inch throughout. Draw both sets of horn segments with bridge gaps labeled, both eye bar sockets with bar centerlines marked, the cheek slash positions, and the toothed mouth with root marks. Confirm bridge widths are at least a finger-width between every pair of adjacent cuts.

  2. Cut horn segments individually

    Carve each horn segment as its own isolated shape, moving from the top of the horn downward. Leave a full finger-width of rind between segments; this is the bridge that makes the segmented look work. Do not be tempted to merge segments for a larger aperture.

  3. Carve the solid eye bars

    Work one eye at a time, cutting each socket in sections around the bar. Anchor the bar to all four socket boundaries before removing the last section of rind. Use a narrow rigid blade for the tight spaces near the bar connection points.

  4. Carve the cheek slash openings

    Each cheek slash is a narrow horizontal rectangle cut as an isolated aperture. Cut one end, the two long sides, then the other end, and remove the piece. Leave solid rind above and below each slash. The horizontal orientation of the slashes contrasts with the vertical horn segments to create visual balance.

  5. Carve the toothed mouth

    Mark all tooth roots before opening the mouth. Cut the mouth sides and base, leaving each root broad. Narrow the tooth tips from the outer surface of the rind with a detail blade after the mouth opening is established.

  6. Preserve and light as glowing embers

    Coat every cut surface and all rind bridges with petroleum jelly immediately. Place a warm amber LED close to the interior back wall. The segmented horn apertures on either side glow like separated embers when viewed from a few feet away.

Written with AI to match this design

Gather your supplies

Check things off as you get ready.

Work on a stable surface, keep your free hand out of the cutting path, and have an adult handle sharp tools.

Three levels of light

  • Leave intact

    All rind bridges between horn segments, the rind between eye bars and horns, and the cheek rind borders stay solid throughout.

  • Peel & shade

    None; all glow comes from full cut-throughs.

  • Cut through

    Every horn segment aperture, both eye bar sockets (four sections each), all cheek slash openings, and the toothed mouth are cut completely through for full-brightness layered glow.

Learn the carving basics

Before you start cutting

How do I make the segmented horn segments read as one horn shape rather than random dots?

Align the segments vertically so they share a common central axis, and make each segment the same width. The eye reads the vertical progression as a single horn form even with gaps between segments. Angling the top segment slightly inward can reinforce the horn-tip direction.

Can the cheek slashes be diagonal instead of horizontal?

Yes, diagonal slashes read as claw marks or scars, which adds aggression to the design. Keep all slashes on the same side of the face at the same diagonal angle so they read as a pattern rather than random cuts.

Is there any benefit to making the horn segments different sizes?

Graduated segments where the top is smaller than the bottom create a tapered horn silhouette that reads more naturally. Uniform segments look more geometric and designed. Both are valid; graduated segments are slightly more forgiving to cut because the smaller upper piece carries less structural weight.

Your take belongs here, too.

Changed a detail? Made it simpler? Share a photo of your version and tell the community what worked.

Share your pumpkin

More pumpkins like this

You've reached the end · 8 pumpkins
The Patch Report

Fresh pumpkins, in your inbox.

The best new carvings, ideas worth stealing, and how-tos for carving season. Short, seasonal, and gone by November.

A short email during carving season. Unsubscribe anytime. See our privacy policy.