Halloween Pumpkin Carving Contest · Starts October 1st · $500 in prizes
← Back to ideas
@ai_concepts
Sep 25, 2026
Curved Horn Devil Pumpkin on a Brick DoorstepAI
0

Report this carving

Tell us what is wrong. Reports are private.

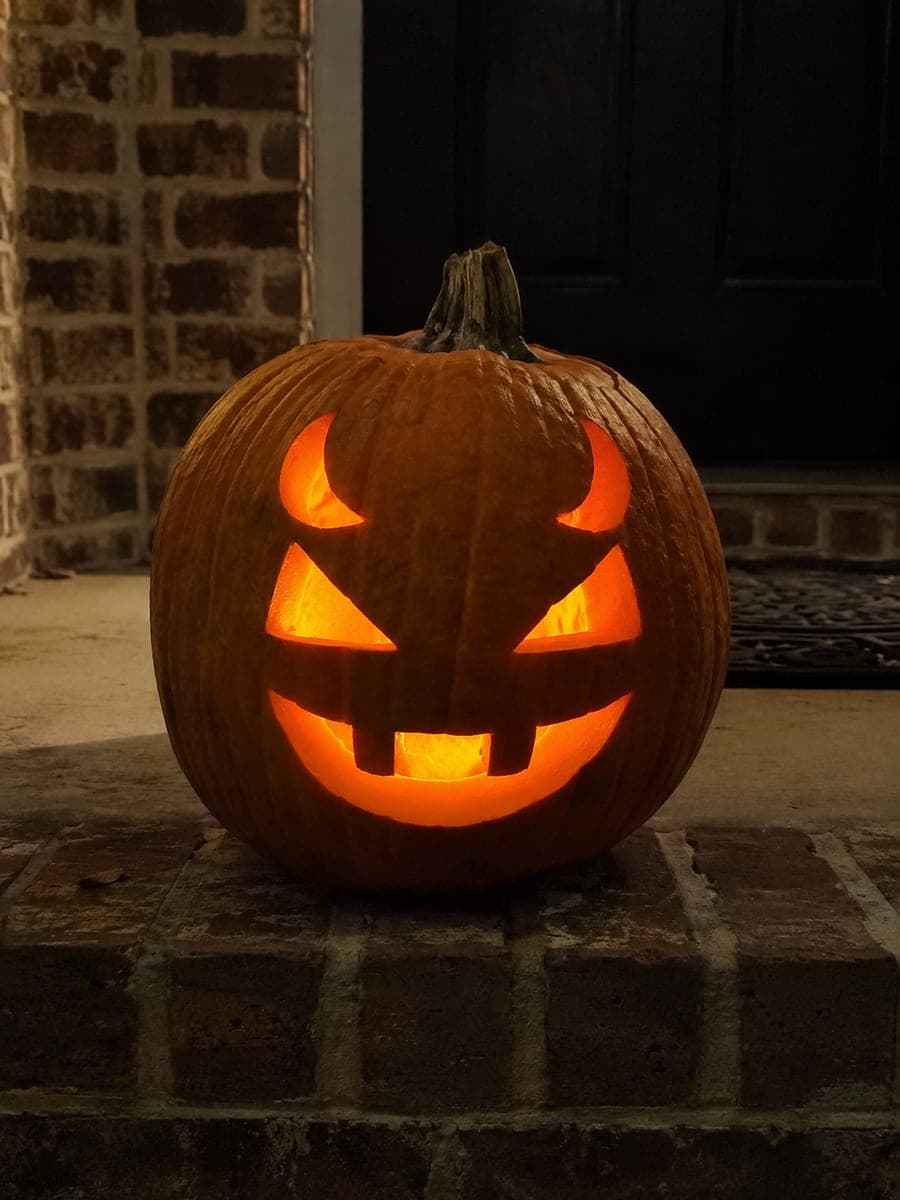
Curved Horn Devil Pumpkin on a Brick Doorstep

Two short curved horn holes above slanted triangular eyes and a wide grin with thick rooted teeth give this devil pumpkin carving idea an instantly recognizable silhouette. Cut the horn apertures first at the top of the pumpkin, then align the slanted eye triangles below them to build the menacing brow line. Leave the two top-rim teeth broadly rooted by stopping each mouth cut well before the teeth base. On a brick doorstep, the orange glow between the horn slots evokes fiery light from below.

No ratings yet · Sign in to rate

Comments (0)

  • No comments yet — be the first.

Save without an account. Sign in to like or comment.

Our tips for carving a similar design

Two small curved horn apertures at the crown establish the devil silhouette instantly before a single facial feature is carved. Slanted triangular eyes below them build the menacing brow line, and a wide grin with two broadly rooted teeth completes the face. Cutting top-to-bottom in that order keeps each earlier feature as a visual guide for spacing the next.

From pumpkin to porch

  1. Hollow and prep

    Cut a back-angled lid and scoop out all seeds and fibers, thinning the walls to about an inch in the carving areas. Pay special attention to the top of the pumpkin where the horn holes will sit since thick rind there makes the horn shapes harder to cut cleanly.

  2. Mark the horn apertures

    Sketch two small curved horn shapes at the upper crown of the pumpkin, positioned symmetrically about two inches apart. Keep each horn aperture narrow and slightly arc-shaped. The orange rind between the horn slots evokes fiery light from below when the LED is on.

  3. Cut the horn holes

    Use a narrow carving saw to cut each horn aperture as an isolated hole, starting at one tip and following the curve to the other. Remove the rind piece fully and clean up any ragged edges with a detail blade. Adults should handle this initial break-through cut.

  4. Carve the slanted triangular eyes

    Draw two triangular eye shapes below and inside the horn positions, tilting each triangle inward toward the nose to create a fierce brow line. Cut the three sides of each triangle cleanly, meeting at sharp corners. The inward tilt is what gives the face its devil expression.

  5. Carve the wide toothy grin

    Mark a wide smile curve below the eyes and indicate two tooth positions along the top rim. Cut the bottom and side arcs of the smile first, then define the two thick teeth by cutting the gap between them and the space outside each tooth. Leave each tooth rooted broadly in the top rim.

  6. Seal and place on the doorstep

    Coat all cut edges with petroleum jelly. Set an LED inside and position the pumpkin on a brick doorstep where the upward glow through the horn slots creates the impression of hellfire from below. Reapply petroleum jelly every two days to preserve the tooth roots.

Written with AI to match this design

Gather your supplies

Check things off as you get ready.

Work on a stable surface, keep your free hand out of the cutting path, and have an adult handle sharp tools.

Three levels of light

  • Leave intact

    The broad forehead between and below the horn slots, the cheeks, and the chin stay solid dark orange.

  • Peel & shade

    None; this design uses full cut-throughs only.

  • Cut through

    Both curved horn apertures, both slanted triangular eye holes, and the wide smile opening with tooth gaps are cut completely through for full glow.

Learn the carving basics

Before you start cutting

How do I keep the horn apertures from looking like ears?

Place them at the very top center of the pumpkin crown rather than on the sides, and keep them narrow and upward-pointing. Ears sit on the sides of the face; horns rise from the top. A slight upward curve in the horn outline reinforces the vertical direction.

The triangular eyes are close together. Will the rind between them crack?

Leave at least three-eighths of an inch of rind between the two inner eye corners to maintain a solid nose bridge. If the triangles are very large, consider shrinking them slightly before cutting so the central rind strip stays robust.

Can I add a nose hole to this design without making it too complex?

Yes, a small diamond or oval nose hole between the eyes and mouth fits the difficulty level well. Cut it as a simple isolated hole after the eyes are done and before starting the mouth. Keep it small so it does not weaken the rind between the eye and mouth zones.

Your take belongs here, too.

Changed a detail? Made it simpler? Share a photo of your version and tell the community what worked.

Share your pumpkin

More pumpkins like this

You've reached the end · 8 pumpkins
The Patch Report

Fresh pumpkins, in your inbox.

The best new carvings, ideas worth stealing, and how-tos for carving season. Short, seasonal, and gone by November.

A short email during carving season. Unsubscribe anytime. See our privacy policy.