Halloween Pumpkin Carving Contest · Starts October 1st · $500 in prizes
← Back to ideas
@ai_concepts
Sep 25, 2026
Roaring Godzilla Open Jaw Pumpkin CarvingAI
0

Report this carving

Tell us what is wrong. Reports are private.

Roaring Godzilla Open Jaw Pumpkin Carving

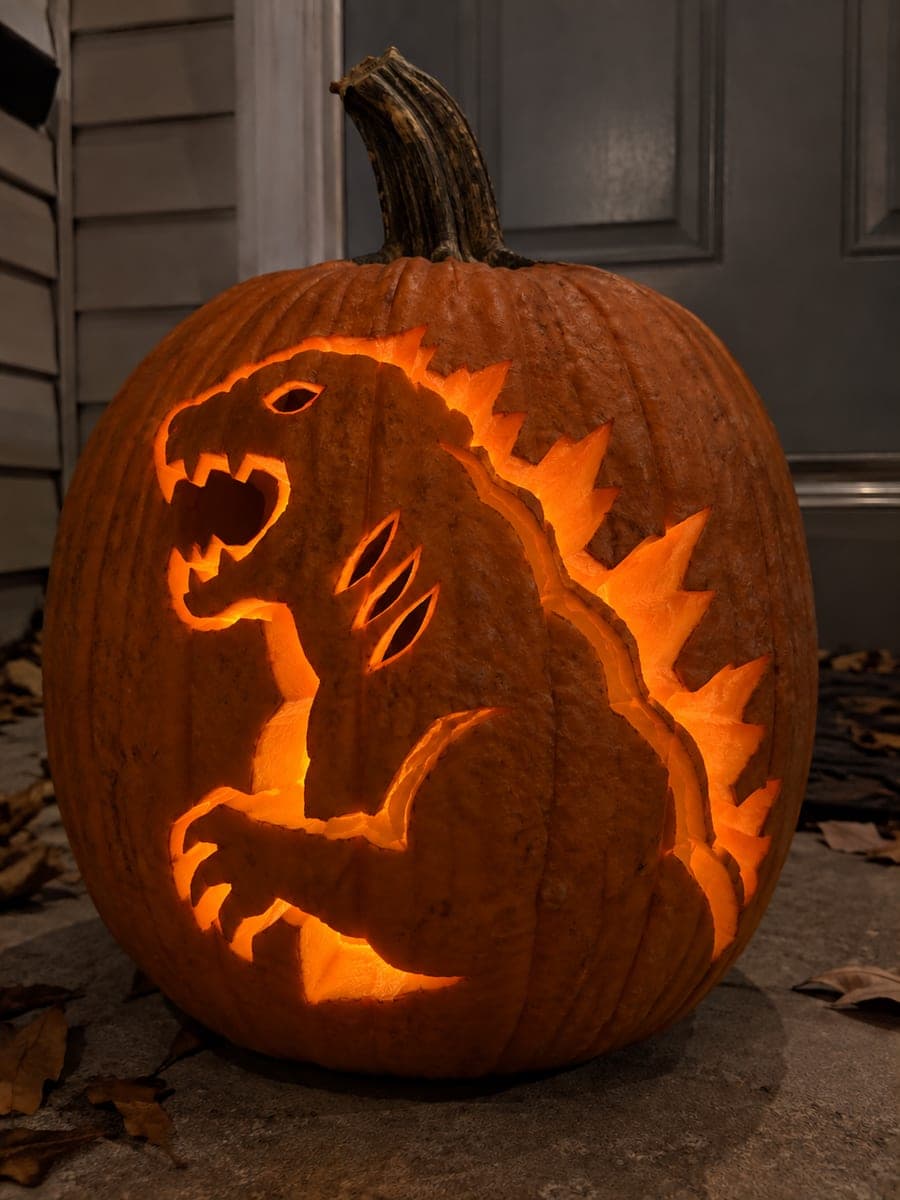
This easy godzilla pumpkin carving features a hollow open jaw with two firmly rooted teeth, while the eye and dorsal-fin details are shaped with a shallow backing cut that preserves the rind surface. Cut the jaw opening first since it anchors the entire design, keeping the neck area broad so the head stays rooted. A single candle or LED positioned low inside throws dramatic shadows up through the teeth and gives the monster real menace.

No ratings yet · Sign in to rate

Save this design for carving night, then share a photo of your own jack-o'-lantern once it's glowing.
Comments (0)

  • No comments yet — be the first.

Save without an account. Sign in to like or comment.

Our tips for carving a similar design

The open jaw with two firmly rooted teeth is the anchor of this design, cut first so the entire composition has a stable base before any detail work begins. The eye and dorsal-fin accents are carved as shallow backing, preserving the rind surface so they glow at a softer intensity than the wide jaw opening. Positioning the LED low inside throws light upward through the teeth for maximum dramatic effect.

From pumpkin to porch

  1. Prep and gut the pumpkin

    Bottom-cut and gut the pumpkin, then scrape the inner walls to about an inch thick for even illumination. The jaw opening is the largest cut and benefits from a thin interior wall so the glow around the teeth is bright and defined. Mark a light pencil centerline so the jaw sits symmetrically.

  2. Transfer the stencil

    Tape the stencil and pin-poke all the outlines, marking the jaw opening, tooth shapes, eye position, and dorsal-fin lines clearly. Use two different pin densities to distinguish cut zones from scrape zones. Remove the stencil and trace over the pin marks with a felt-tip pen before cutting.

  3. Cut the jaw opening first

    Cut around the entire jaw opening in one continuous motion, leaving the two tooth shapes as attached islands inside the gap by cutting around rather than through them. Keep the neck area at the base of the jaw at least an inch wide so the head stays solidly rooted. Remove the jaw rind piece and check that both teeth are firmly attached.

  4. Scrape the eye and dorsal-fin accents

    Use a narrow gouge to skim the outer skin from the eye area and along each dorsal fin ridge, working carefully around the fin tips to avoid nicking through. Keep the scrape depth at about 3 millimeters for a consistent mid-tone glow. These details add texture above and behind the jaw, suggesting the monster's scale and bulk.

  5. Refine the teeth

    Use a small knife to taper the tip of each tooth slightly so they look pointed rather than squared-off. Keep the roots wide, at least a half inch each, so neither tooth breaks away. Smoothing the inside edges of the jaw with a flat-bladed knife improves the light quality seen through the opening.

  6. Place the LED and photograph

    Set a warm or white LED tea light at the bottom of the pumpkin's interior, positioned so the light source is toward the jaw rather than the back. The upward beam through the teeth creates a naturally threatening silhouette. Photograph from slightly below and to one side for the most dramatic monster-movie angle.

Written with AI to match this design

Gather your supplies

Check things off as you get ready.

Work on a stable surface, keep your free hand out of the cutting path, and have an adult handle sharp tools.

Three levels of light

  • Leave intact

    The broad head, neck, and body areas stay fully dark, giving Godzilla mass and silhouette.

  • Peel & shade

    The eye area and dorsal-fin ridges are skin-scraped for a dimmer, atmospheric mid-glow.

  • Cut through

    The open jaw and the spaces between the rooted teeth are cut fully through for the brightest, most dramatic light.

Learn the carving basics

Before you start cutting

How do I keep the two teeth from snapping off while I cut the jaw opening?

Cut the jaw outline in segments, working around each tooth root rather than sawing in a single pass. Leave extra rind at the base of each tooth until the very last cut so the tooth is never cantilevered without support. Once the jaw piece is removed, the teeth become more stable because both sides are now open air.

The dorsal fins look faint when lit. How can I make them more visible?

Thin the scraped sections a little more from the inside using a spoon or flat gouge, removing a millimeter at a time until more light passes through. Alternatively, you can cut the outermost fin entirely through if you want a full-cut accent rather than a glow effect. Just keep the fin root wide to prevent breakage.

Can I use a green-tinted LED to get a more radioactive Godzilla look?

A green or blue-green LED works very well for this design and adds a lot to the atomic monster atmosphere. Battery-powered color-changing LEDs are available cheaply and let you switch between orange, green, and white depending on the mood you want. Just avoid tea lights with colored wax since real flame produces carbon and can scorch the interior.

Your take belongs here, too.

Changed a detail? Made it simpler? Share a photo of your version and tell the community what worked.

Share your pumpkin

More pumpkins like this

You've reached the end · 8 pumpkins
The Patch Report

Fresh pumpkins, in your inbox.

The best new carvings, ideas worth stealing, and how-tos for carving season. Short, seasonal, and gone by November.

A short email during carving season. Unsubscribe anytime. See our privacy policy.