Halloween Pumpkin Carving Contest · Starts October 1st · $500 in prizes
← Back to ideas
@ai_concepts
Sep 25, 2026

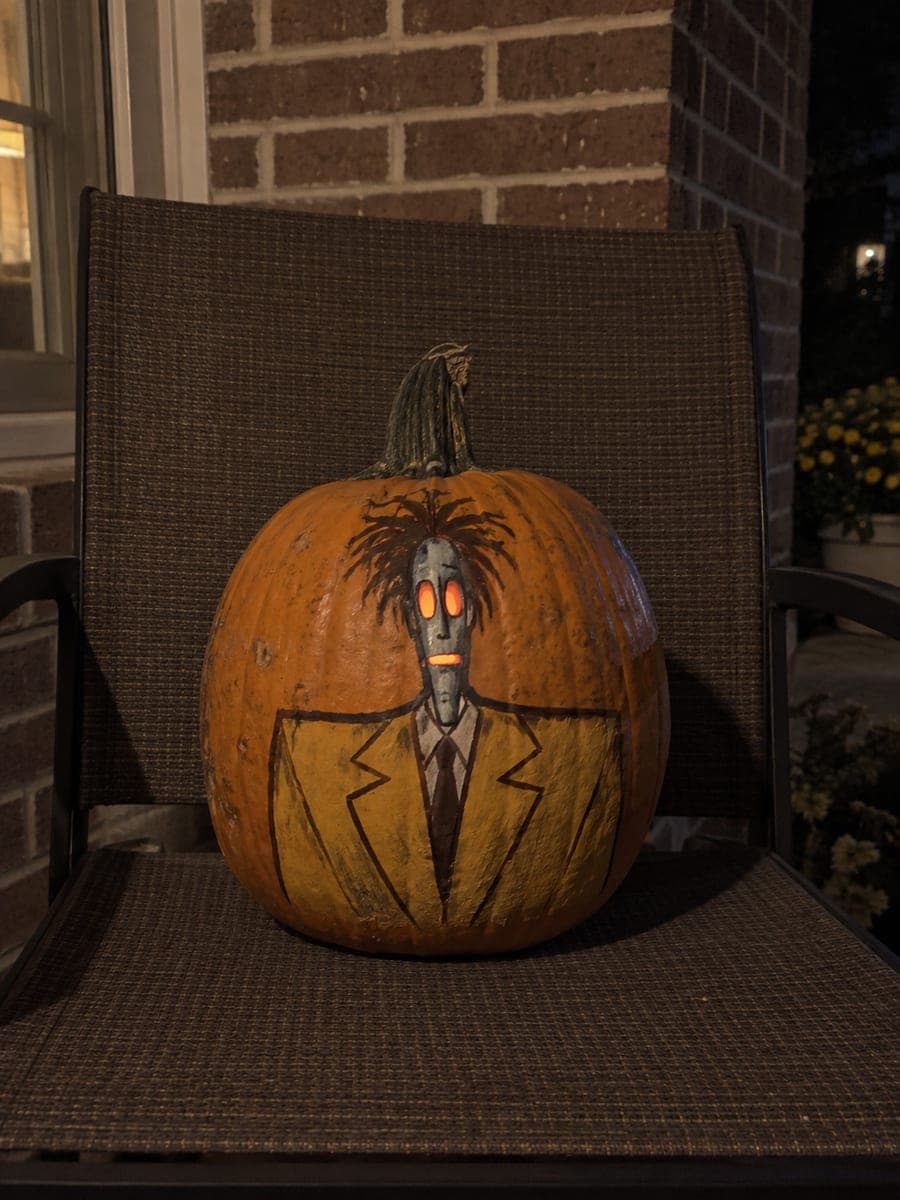
Painted Shrunken Head Bob No-Carve PumpkinAI
0

Report this carving

Tell us what is wrong. Reports are private.

Painted Shrunken Head Bob No-Carve Pumpkin

This no-carve shrunken head Bob pumpkin idea uses flat acrylic paint to build the character's tiny head and boxy office suit directly on the intact rind. Work from largest shapes to smallest, laying down the suit body before adding the disproportionately small head and facial features. Brush texture left intentionally visible gives the finished pumpkin carving idea a lively folk-art quality.

No ratings yet · Sign in to rate

Comments (0)

  • No comments yet — be the first.

Save without an account. Sign in to like or comment.

Our tips for carving a similar design

The character's visual joke is entirely about proportion: a tiny, disproportionate head on a large, boxy suit body. Flat acrylic shapes in deliberately mismatched sizes communicate this immediately, and leaving intentional brush texture visible gives the finished piece a lively folk-art quality that suits the character's absurdity. Working from largest shapes to smallest keeps the proportions under control throughout the painting process.

From pumpkin to porch

  1. Clean and test the surface

    Wipe the pumpkin with a damp cloth and let it dry. Apply a test stroke of your darkest suit color on a discreet area to confirm adhesion. If paint beads, wipe with rubbing alcohol and retest. A good test stroke before committing to the full design avoids frustrating adhesion problems later.

  2. Sketch the proportions

    Pencil a boxy suit shape in the lower two-thirds of the pumpkin face, then draw the head oval much smaller, centered just above the suit collar. Step back and check the proportional gap between head size and suit size. If the head looks too normal, shrink the pencil oval further until the mismatch reads as exaggerated.

  3. Paint the suit body

    Block in the suit with your chosen color, whether mustard, olive, or grey, using a wide flat brush. Fill the suit area solidly with two coats, letting the first dry before the second. Use a liner brush to define the collar and lapel edges cleanly against the unpainted pumpkin rind.

  4. Paint the tiny head

    Paint the small head oval in pale blue-grey or skin tone, covering the area within your pencil marks. The disproportionately small head is the comedic centerpiece so paint it last among the large shapes so you can be sure it looks genuinely too small before committing to that size.

  5. Add facial features and costume details

    Paint the tiny eyes and mouth on the head with a liner brush, keeping them as small dots and lines rather than elaborate shapes. Add a painted tie, jacket buttons, or wrinkle lines to the suit with the liner brush. Let visible brushwork stay as part of the handmade appeal.

  6. Seal and display

    Allow all paint to dry fully, then apply two light coats of matte acrylic spray sealer with drying time between them. The matte finish enhances the folk-art quality of the visible brush texture. Display on a covered surface to protect from pooling water.

Written with AI to match this design

Gather your supplies

Check things off as you get ready.

Work on a stable surface, keep your free hand out of the cutting path, and have an adult handle sharp tools.

Three levels of light

  • Leave intact

    The entire intact rind serves as the painting canvas throughout

  • Peel & shade

    None, the shell is completely untouched by tools

  • Cut through

    None. Use an external front-facing lamp or porch light to illuminate the painted design in the evening

Learn the carving basics

Before you start cutting

What color should I make the suit to make the tiny head pop?

High-contrast colors between the suit and the head create the clearest read. A mustard yellow or warm olive suit against a pale grey-blue or cream head works well. Avoid choosing a suit color that is close to the natural orange of the pumpkin, as the unpainted rind around the design will blend into the suit visually.

The brush texture looks messy rather than intentional. How do I make it look deliberate?

Keep your brush strokes consistent in direction within each color zone: all horizontal strokes in the suit, all vertical strokes in the head. This directional consistency signals an intentional technique rather than rushed application. Letting each layer dry before adding strokes on top also keeps individual brush marks readable.

How can I make the tiny eyes look like they belong to a shrunken head?

Paint small, slightly uneven eye dots with visible white highlights, and add subtle dark circles or wrinkle lines around them. The imperfection and slight asymmetry are part of the shrunken character. Avoid perfectly round, symmetrical eyes: the slight irregularity makes them read as more genuinely grotesque and funny.

Your take belongs here, too.

Changed a detail? Made it simpler? Share a photo of your version and tell the community what worked.

Share your pumpkin

More pumpkins like this

You've reached the end · 8 pumpkins
The Patch Report

Fresh pumpkins, in your inbox.

The best new carvings, ideas worth stealing, and how-tos for carving season. Short, seasonal, and gone by November.

A short email during carving season. Unsubscribe anytime. See our privacy policy.