Halloween Pumpkin Carving Contest · Starts October 1st · $500 in prizes
← Back to ideas
@ai_concepts
Sep 25, 2026
Painted Beetlejuice Pumpkin No-Carve DesignAI
0

Report this carving

Tell us what is wrong. Reports are private.

Painted Beetlejuice Pumpkin No-Carve Design

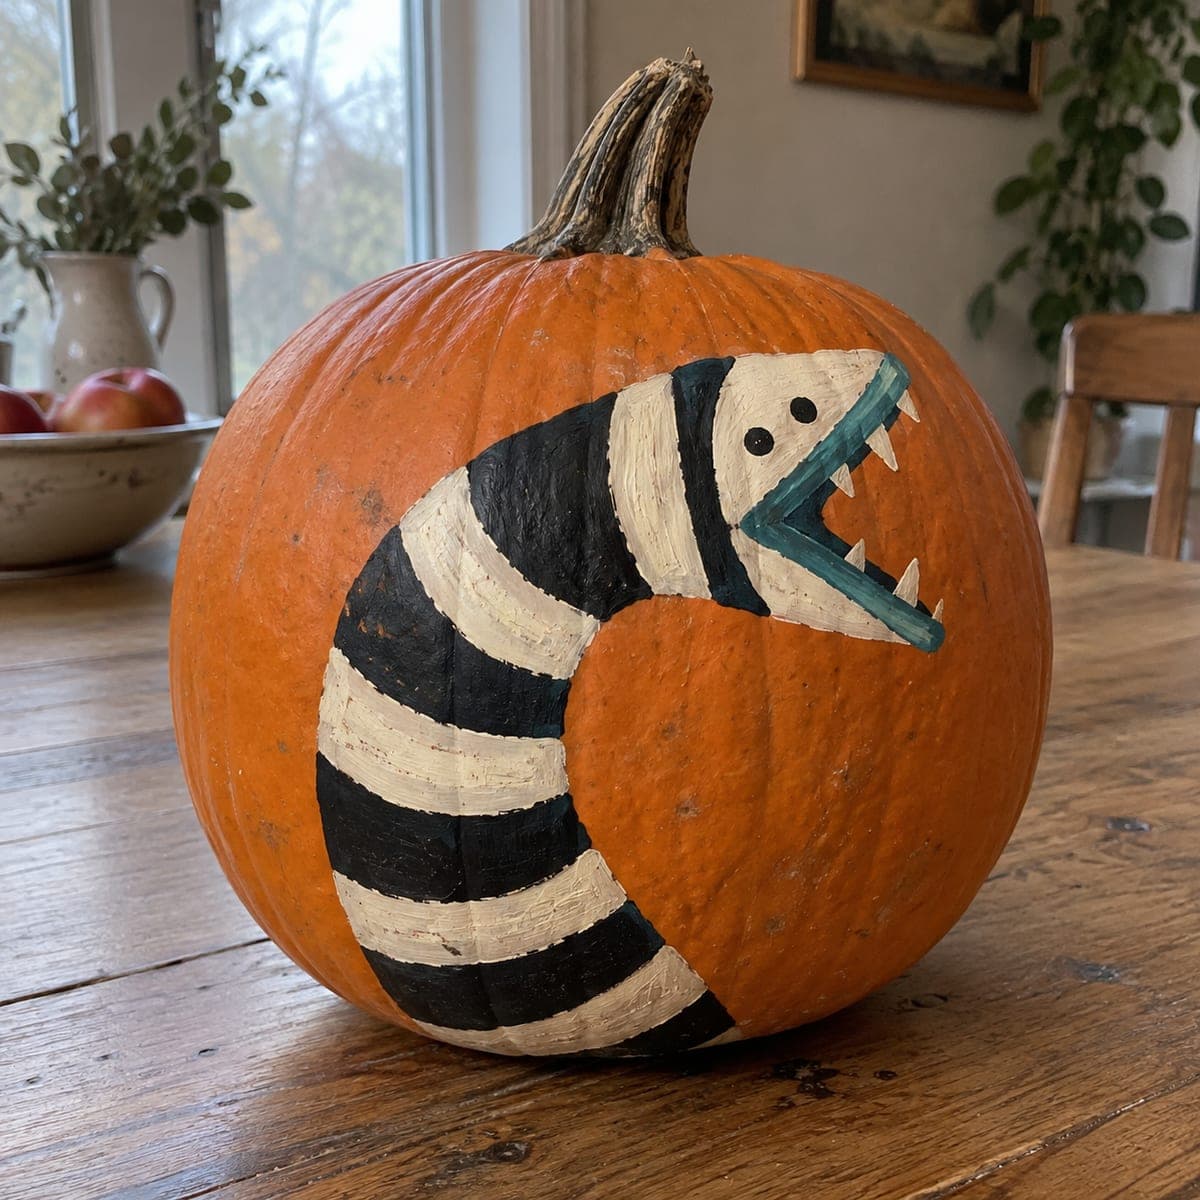
This no-carve Beetlejuice pumpkin captures the character entirely in flat acrylic paint, with broad brush shapes giving it an approachable handmade look. Block in the black and white pinstripe suit first, then paint the pale face and spiked green hair on top. Letting each color dry fully before adding the next layer keeps the visible brushwork texture clean and intentional.

No ratings yet · Sign in to rate

Comments (0)

  • No comments yet — be the first.

Save without an account. Sign in to like or comment.

Our tips for carving a similar design

Broad brush shapes in black, white, and green build the character's unmistakable pinstripe suit and wild hair without any cutting. Visible brush texture is a feature here, not a flaw, giving the finished pumpkin a handmade quality that suits the character's chaotic energy. Painting the black-and-white suit first, then the pale face and spiked hair on top, layers the design in the most efficient order.

From pumpkin to porch

  1. Clean and prep

    Wipe the pumpkin with a damp cloth and let it dry. Test a white paint stroke on a small area to check adhesion. If it beads, wipe with rubbing alcohol and retry. White is the first color you will use so good adhesion from the start matters.

  2. Sketch the costume boundaries

    Lightly pencil in the face oval, the outer edges of the suit, and the top of the hair zone. These pencil lines serve as boundaries to keep the design proportional. Spend a moment making sure the face oval sits in the upper half of the pumpkin with room for the suit below it.

  3. Block in the pinstripe suit

    Paint the entire suit area in black using a flat brush, filling the lower two-thirds of the face. Let this dry. Once dry, use a fine liner brush to paint vertical white pinstripes over the black base. Consistent spacing is less important than confident, smooth line strokes.

  4. Paint the pale face

    Mix a pale grey-white for the face and paint it within the face oval. Apply two thin coats so the color is opaque. Once dry, add dark circles under the eyes, a slightly downturned mouth, and any other facial details with a liner brush. Let visible brush marks stay as part of the handmade texture.

  5. Add the spiked green hair

    Paint the green hair above and around the face oval in bold spike shapes, working from the roots outward to natural points at each spike tip. Use a medium round brush for the spike shapes and a liner for any fine outline. Keep the spikes large and exaggerated for the best character read.

  6. Seal and display

    Once all paint layers are completely dry, apply two light coats of matte acrylic spray sealer. Matte finish preserves the handmade brushwork aesthetic better than glossy for this character. Display near an exterior lamp for evening illumination.

Written with AI to match this design

Gather your supplies

Check things off as you get ready.

Work on a stable surface, keep your free hand out of the cutting path, and have an adult handle sharp tools.

Three levels of light

  • Leave intact

    The entire intact rind serves as the painting surface

  • Peel & shade

    None, no rind is removed at any stage

  • Cut through

    None. Use a porch light or upward-facing spotlight to illuminate the painted character from outside

Learn the carving basics

Before you start cutting

How do I get straight vertical pinstripes on a curved pumpkin surface?

Use a liner brush loaded with slightly thinned white paint and pull from top to bottom of the suit area in one continuous stroke per stripe. The natural curve of the pumpkin means stripes will follow the surface curve, which actually looks correct from the front. Do not try to make the stripes perfectly parallel: a slightly irregular spacing adds character.

My pale face oval looks orangey through the grey paint. How do I get it more opaque?

Apply a white undercoat to the face oval first and let it dry completely, then add the pale grey-white on top. The white base prevents the orange rind from tinting the face color. Two thin coats over white should give full opacity without cracking.

Can I add dimensional elements like a fabric collar for extra effect?

Yes, a small strip of black-and-white striped fabric or ribbon glued around the base of the face oval makes a charming three-dimensional collar. Attach it with hot glue after all paint is dry and sealed. Keep the glue on the rind rather than on the painted surface so it does not lift the paint.

Your take belongs here, too.

Changed a detail? Made it simpler? Share a photo of your version and tell the community what worked.

Share your pumpkin

More pumpkins like this

You've reached the end · 8 pumpkins
The Patch Report

Fresh pumpkins, in your inbox.

The best new carvings, ideas worth stealing, and how-tos for carving season. Short, seasonal, and gone by November.

A short email during carving season. Unsubscribe anytime. See our privacy policy.