Halloween Pumpkin Carving Contest · Starts October 1st · $500 in prizes
← Back to ideas
@ai_concepts
Sep 25, 2026
Painted Sandworm No-Carve Pumpkin DecorationAI
0

Report this carving

Tell us what is wrong. Reports are private.

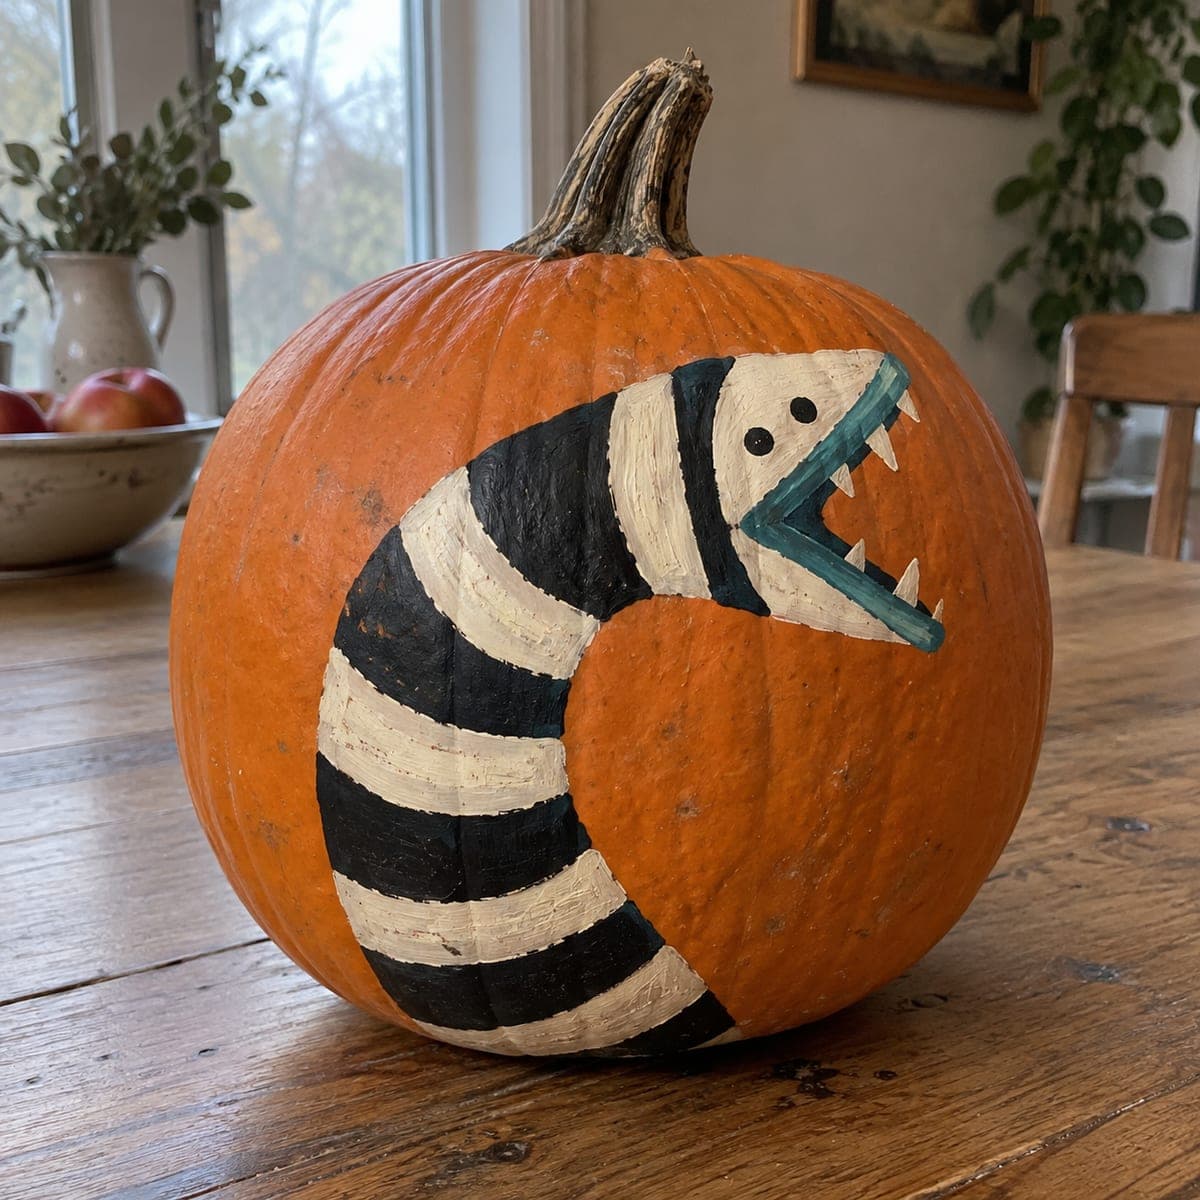
Painted Sandworm No-Carve Pumpkin Decoration

This no-carve sandworm pumpkin carving idea renders the Beetlejuice creature in flat acrylic paint, with the broad cream wedge head and bold black stripes applied directly to intact rind. Build up the stripes with a wide flat brush for clean edges, then add the teal lip outline and painted eyes with a fine-tipped brush. A coat of outdoor sealer keeps the cream tones bright through the season.

No ratings yet · Sign in to rate

Comments (0)

  • No comments yet — be the first.

Save without an account. Sign in to like or comment.

Our tips for carving a similar design

Flat acrylic in cream, black, and teal does all the work here; the rind stays fully intact. A wide flat brush handles the bold wedge shape and stripe columns while a fine-tipped brush picks up the teal lip line and painted eyes. Outdoor sealer applied after everything dries keeps the cream tones bright and the black stripes crisp through multiple weeks of display.

From pumpkin to porch

  1. Clean and dry

    Wipe down the pumpkin with a damp cloth and let it dry fully. Remove any waxy residue with a cotton ball dabbed in rubbing alcohol. A clean surface is especially important for the cream paint, which picks up any rind oils as cloudiness.

  2. Sketch the wedge layout

    Lightly pencil the broad cream wedge shape centered on the front of the pumpkin, widest at the top and tapering toward the bottom. Mark the stripe columns on each side and the mouth position. Keeping this sketch light means it disappears under the first paint layer.

  3. Apply the cream wedge

    Fill the wedge area with a wide flat brush using two to three thin coats of cream, letting each dry in between. Thin coats prevent dripping and give better rind coverage than one thick layer. A white base coat under the cream helps if your pumpkin is very orange.

  4. Paint the black stripes

    Use a medium flat brush to add bold black stripes on each side of the cream wedge. Keep stripes parallel and roughly even in width. Let the black dry fully before adding the teal outline to prevent colors from bleeding.

  5. Add teal lip line and painted eyes

    Switch to a fine-tipped brush for the teal lip outline around the mouth area and the painted eyes. A steady hand and slow strokes work better than speed here. If the teal bleeds into the cream, a clean damp brush can correct soft edges while the paint is still wet.

  6. Seal and display

    Once all paint layers are completely dry, spray a coat of outdoor acrylic sealer. Face the finished pumpkin toward a porch light or spotlight for best visibility. Bring it inside during heavy rain to extend the season.

Written with AI to match this design

Gather your supplies

Check things off as you get ready.

Work on a stable surface, keep your free hand out of the cutting path, and have an adult handle sharp tools.

Three levels of light

  • Leave intact

    The entire rind remains intact; unpainted back and side areas show natural orange rind

  • Peel & shade

    None, the shell is never pierced or peeled

  • Cut through

    None, direct the design toward an exterior light source for visibility

Learn the carving basics

Before you start cutting

How do I keep the cream paint from running on the curved rind surface?

Use thin coats and let each layer tack up for at least ten minutes before adding the next. Tilting the pumpkin so the painted surface faces upward while each coat dries also helps gravity work in your favor. Avoid overloading the brush.

My teal paint looks too blue against the cream. How can I warm it up?

Add a small amount of yellow or green to the teal until it shifts toward a warmer aqua. Test the mix on a white piece of paper next to your cream area before applying it to the pumpkin. A slightly greener teal reads more naturally against cream.

Does the sealer make the black paint look glossy?

It depends on the sealer formula. If you want the flat, graphic look shown in the reference image, choose a matte finish sealer. Satin sealer is a good middle option if you want some sheen on the cream area without making the black stripes look wet.

Your take belongs here, too.

Changed a detail? Made it simpler? Share a photo of your version and tell the community what worked.

Share your pumpkin

More pumpkins like this

You've reached the end · 8 pumpkins
The Patch Report

Fresh pumpkins, in your inbox.

The best new carvings, ideas worth stealing, and how-tos for carving season. Short, seasonal, and gone by November.

A short email during carving season. Unsubscribe anytime. See our privacy policy.