Halloween Pumpkin Carving Contest Β· Starts October 1st Β· $500 in prizes
← Back to ideas
@ai_concepts
Sep 25, 2026
Beetlejuice Sandworm Pumpkin With Inner HeadAI
0

Report this carving

Tell us what is wrong. Reports are private.

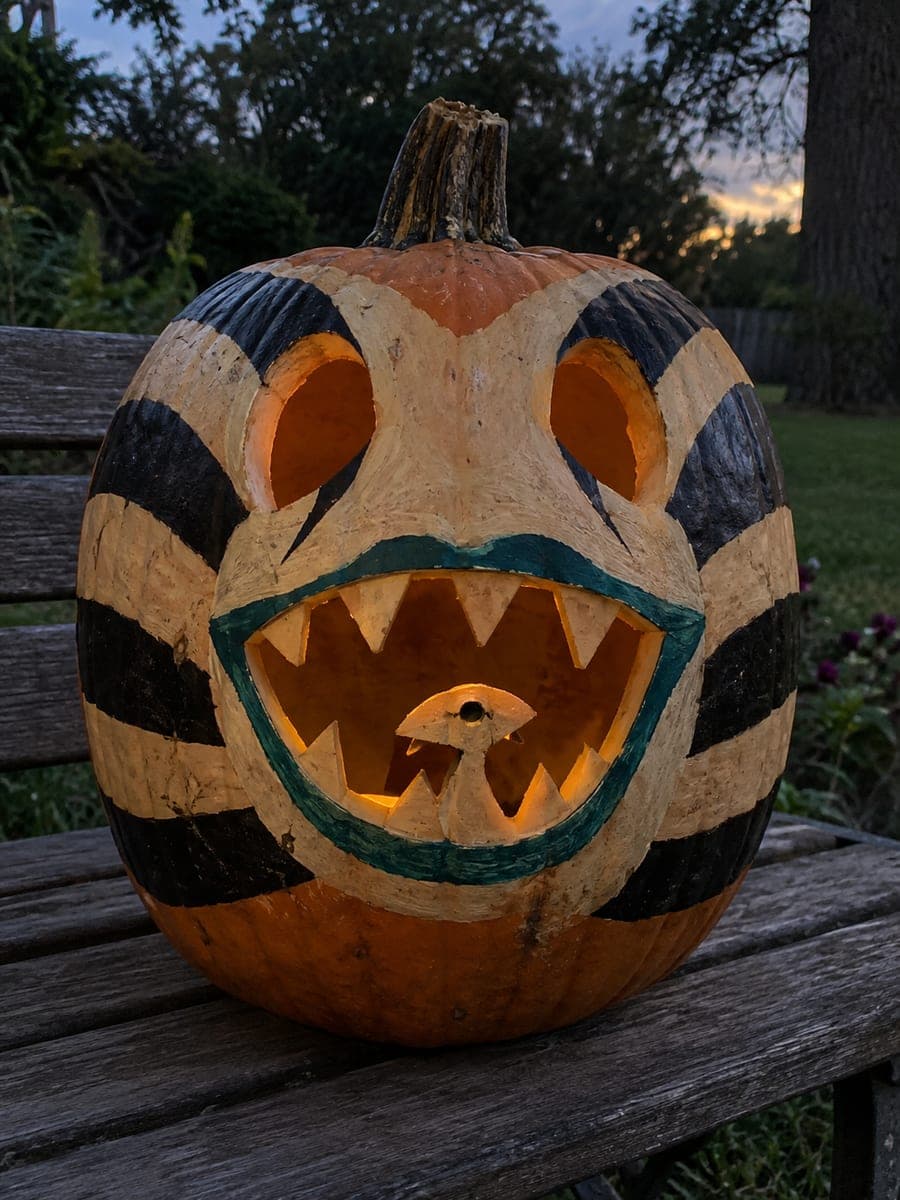
Beetlejuice Sandworm Pumpkin With Inner Head

This intermediate sandworm pumpkin carving idea adds the creature's signature smaller inner head, attached by a very broad stalk to the lower lip and nested inside the main open mouth alongside six large triangular teeth. Two big outer eye holes and teal lip paint complete the look. Paint the cream wedge head and black stripes before carving so the color guides where each opening belongs.

No ratings yet Β· Sign in to rate

Comments (0)

  • No comments yet β€” be the first.

Save without an account. Sign in to like or comment.

Our tips for carving a similar design

The key addition over the easy version is a small second head nested inside the open mouth, attached by a very broad stalk to the lower lip so it cannot fall away. Six large triangular teeth line the main jaws, all rooted to either the upper or lower edge. Painting the cream wedge head and black stripes before any cutting keeps the design boundaries clear and prevents accidental cuts into the decorated areas.

From pumpkin to porch

  1. Prep and paint first

    Scoop the interior to about 3/4 inch wall thickness through a bottom plug. Paint the broad cream wedge head shape and black side stripes on the exterior before picking up a saw. This order ensures the teal lip paint and cream field guide the cutting lines precisely.

  2. Mark all openings

    Draw the main mouth outline, six tooth gaps, both outer eye holes, and the tiny inner head shape in pencil on the painted surface. Double-check that the inner head's connecting stalk to the lower lip is drawn at least 3/4 inch wide at its narrowest point.

  3. Cut the outer eye holes

    Start with the two large outer eye holes. They are the simplest cuts and confirm your saw control before you attempt the more complex mouth area. Use short push-pull strokes with a narrow detail saw.

  4. Cut the main mouth and teeth

    Open the main mouth starting with the corners and working toward the center. Leave each of the six triangular teeth rooted to either the upper or lower jaw as you go. Keep teeth at least 5/8 inch wide at their root so they survive seasonal drying. Adults should handle all saw work.

  5. Add the inner head

    Cut the small inner head shape inside the mouth opening, making sure the broad stalk connection to the lower lip stays intact. The tiny eye hole inside the inner head is the final small cut; use the narrowest detail blade or a craft knife for this one. The inner head will glow at the same full brightness as the outer mouth.

  6. Finish and light

    Paint the teal lip outline on the rind framing the outer mouth. Place an LED tea light inside on a stable flat surface. Lean the pumpkin so the mouth faces slightly upward, which makes the inner head more visible to viewers at standing height.

Written with AI to match this design

Gather your supplies

Check things off as you get ready.

Work on a stable surface, keep your free hand out of the cutting path, and have an adult handle sharp tools.

Three levels of light

  • Leave intact

    The painted cream wedge, black stripes, and rind between the teeth stay fully dark

  • Peel & shade

    None on this design; all light differences come from full cuts vs. solid rind

  • Cut through

    Both outer eye holes, the full mouth opening including the inner head and its tiny eye hole, are cut through for bright light

Learn the carving basics

Before you start cutting

How do I keep the inner head from breaking off inside the mouth?

The inner head is connected by a very broad stalk to the lower lip, so as long as that stalk is at least 3/4 inch wide, it should hold firmly. Cut around the inner head's perimeter and leave the stalk until last. Never cut the stalk itself; it is the only structural support the inner head has.

Is six teeth too many for an intermediate carving?

Six is manageable as long as each tooth is broad and rooted to a jaw edge. The risk goes up if teeth are narrow or if two adjacent teeth leave only a sliver of rind between them. If you want to simplify, reduce to four teeth with wider gaps between them.

The teal paint I bought looks green rather than teal on the rind. What can I do?

Add a small amount of blue to your green paint until the teal looks right on a scrap piece of paper. Pumpkin rind's warm orange undertone pulls painted teal toward green, so mixing slightly blue-heavy gives a truer result on the finished surface.

Your take belongs here, too.

Changed a detail? Made it simpler? Share a photo of your version and tell the community what worked.

Share your pumpkin

More pumpkins like this

You've reached the end Β· 8 pumpkins
The Patch Report

Fresh pumpkins, in your inbox.

The best new carvings, ideas worth stealing, and how-tos for carving season. Short, seasonal, and gone by November.

A short email during carving season. Unsubscribe anytime. See our privacy policy.