Halloween Pumpkin Carving Contest · Starts October 1st · $500 in prizes
← Back to ideas
@ai_concepts
Sep 25, 2026
Connected Beetlejuice Portrait Pumpkin With Striped SuitAI
0

Report this carving

Tell us what is wrong. Reports are private.

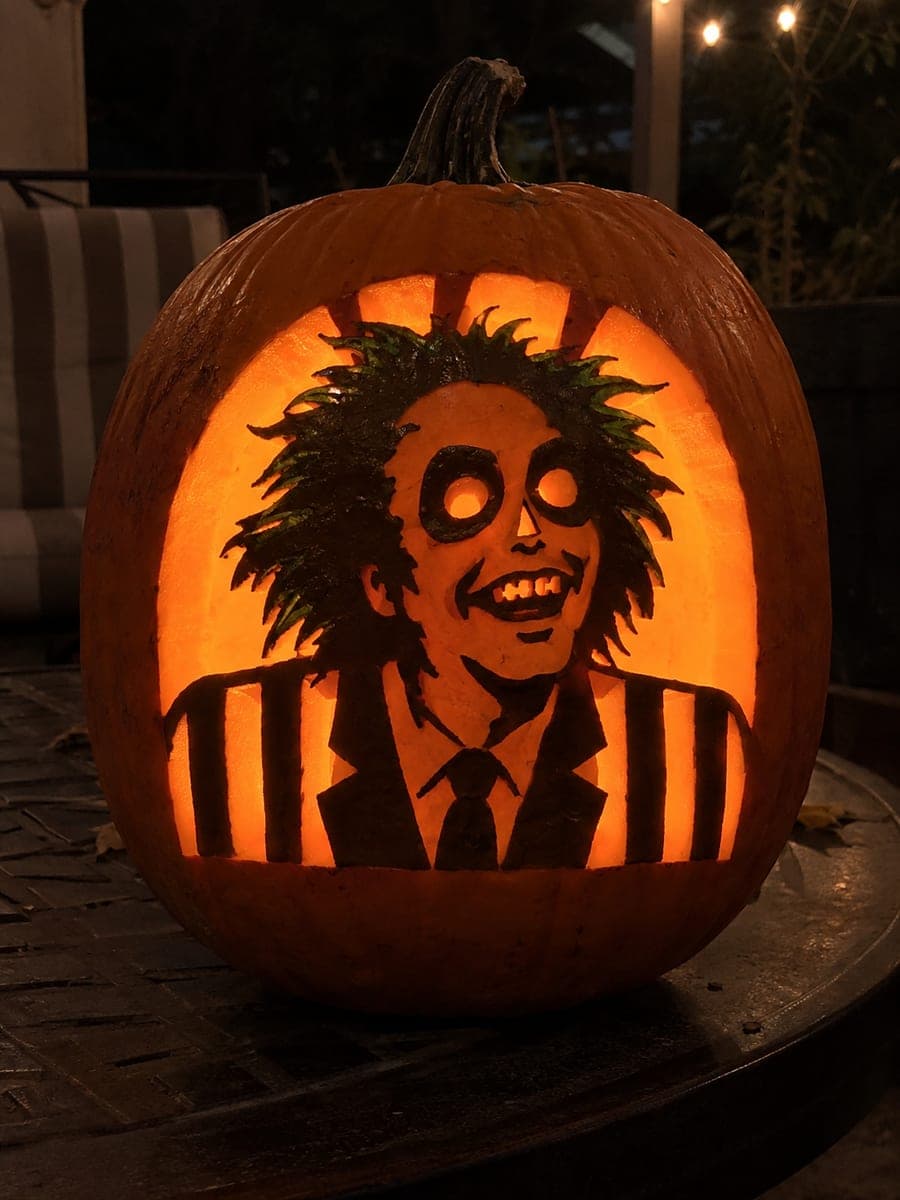
Connected Beetlejuice Portrait Pumpkin With Striped Suit

The hard Beetlejuice pumpkin carving idea retains the full portrait as a connected dark-rind piece supported at the hair, shoulders, and base, with eyes and mouth cut fully through the face. Jacket stripe cutouts and green hair paint finish the look without adding fragile free-floating pieces. Tape your stencil firmly before cutting the background arch so the portrait stays registered as you work inward.

No ratings yet · Sign in to rate
Comments (0)

  • No comments yet — be the first.

Save without an account. Sign in to like or comment.

Our tips for carving a similar design

The full portrait is retained as a connected dark-rind piece supported at the hair, shoulders, and base, with a glowing arch cut around it and the eyes and mouth cut through the face itself. Jacket stripe cutouts add pattern without introducing free-floating pieces, and green hair paint provides color detail that would be structurally impractical to carve. Taping the stencil firmly and cutting the background arch before any face work keeps the portrait in register throughout.

From pumpkin to porch

  1. Prep and scale the stencil

    Choose a large, tall pumpkin for this vertical composition. Print the stencil so the portrait fills most of the front panel. Apply green hair paint and any collar color before taping the stencil down, using the pencil outline of the hair shape as a guide.

  2. Transfer and mark root points

    Tape the stencil and pin-transfer the arch boundary, portrait silhouette, all root contact points, eye and mouth positions, and jacket stripe locations. Use bold marker dots on the hair, shoulder, and base root points so you stop precisely at each one when cutting the arch.

  3. Cut the background arch

    Cut the open arch background that surrounds the portrait, working from the sides downward. Stop at each root contact point and verify the retained portrait is still firmly attached before continuing around the curve. The arch is the largest single cut and establishes the main glow source.

  4. Cut the eyes and mouth

    Once the arch is complete, cut the eye holes and mouth opening through the dark retained face. These cuts now have the glowing background behind them, which makes their glow particularly dramatic. Keep solid rind between each opening so the face structure stays solid.

  5. Cut the jacket stripe cutouts

    Add the jacket stripe openings within the retained portrait body. These are medium-width rectangular slots separated by solid rind strips. Use a thin blade and cut them from the top of each slot downward. The solid rind between stripes is the main structural contribution of the jacket zone.

  6. Final details and lighting

    Touch up any painted hair or collar details that were disturbed by handling. Insert an LED puck and position it toward the arch opening to maximize the backlit portrait effect. The dark retained portrait against the bright arch background is the design's signature look.

Written with AI to match this design

Gather your supplies

Check things off as you get ready.

Work on a stable surface, keep your free hand out of the cutting path, and have an adult handle sharp tools.

Three levels of light

  • Leave intact

    Retained dark-rind portrait body including hair mass, shoulders, and jacket area

  • Peel & shade

    None, this design uses paint rather than shallow engraving for the hair detail

  • Cut through

    Open arch background, eye and mouth openings through the retained face, and jacket stripe slots

Learn the carving basics

Before you start cutting

The arch background is large. How do I remove it without the portrait shifting?

Cut the arch in four or five segments, pausing after each one to check that the portrait root contacts are still solid. Do not try to cut the full arch in one continuous pass, as the rind will flex more as material is removed. Working in segments gives you control at each checkpoint.

My jacket stripes ended up slightly different widths. Is that a problem?

Minor width variation between stripes is not a structural issue and reads fine when the pumpkin is lit. The key requirement is that the rind strips between stripes remain intact. If any strip is thinner than 5 mm, avoid cutting adjacent to it and leave that stripe slightly narrower to preserve the divider.

How do I get the green hair paint to look good against the darker pumpkin rind?

Apply a thin white undercoat to the hair area first and let it dry, then paint the green on top. The white base keeps the green from looking too dark or muddy against the natural orange-brown rind. Two thin coats of green over white give a vivid, true color without requiring expensive artist-grade paint.

Your take belongs here, too.

Changed a detail? Made it simpler? Share a photo of your version and tell the community what worked.

Share your pumpkin

More pumpkins like this

You've reached the end · 8 pumpkins
The Patch Report

Fresh pumpkins, in your inbox.

The best new carvings, ideas worth stealing, and how-tos for carving season. Short, seasonal, and gone by November.

A short email during carving season. Unsubscribe anytime. See our privacy policy.